Add a Link to an Instagram Post: 10 Practical Ways (Stories, Reels, Bio, and More)
Discover 10 practical ways to add clickable links on Instagram—bio, Stories, Reels, Shopping, and ads—plus CTAs and tracking to turn views into visits.

Getting people to click a link from Instagram can feel tricky, but the platform offers more clickable surfaces than many realize. This guide focuses on the exact places links work, how to place and design them for higher tap-through rates, and how to track performance so you can improve over time. Follow the steps below to turn views into measurable visits using Stories, Reels, your bio, Shopping, and ads.
Add a Link to an Instagram Post: 10 Practical Ways (Stories, Reels, Bio, and More)
Want to add a link to Instagram post content and actually drive clicks? Instagram famously limits where links work, so the trick is to use the native, clickable surfaces and back them up with smart CTAs, tracking, and a few creative workarounds. This guide covers what’s clickable, how to add links to Stories and Reels, how to optimize your bio, and more—so you can reliably turn views into visits.
---
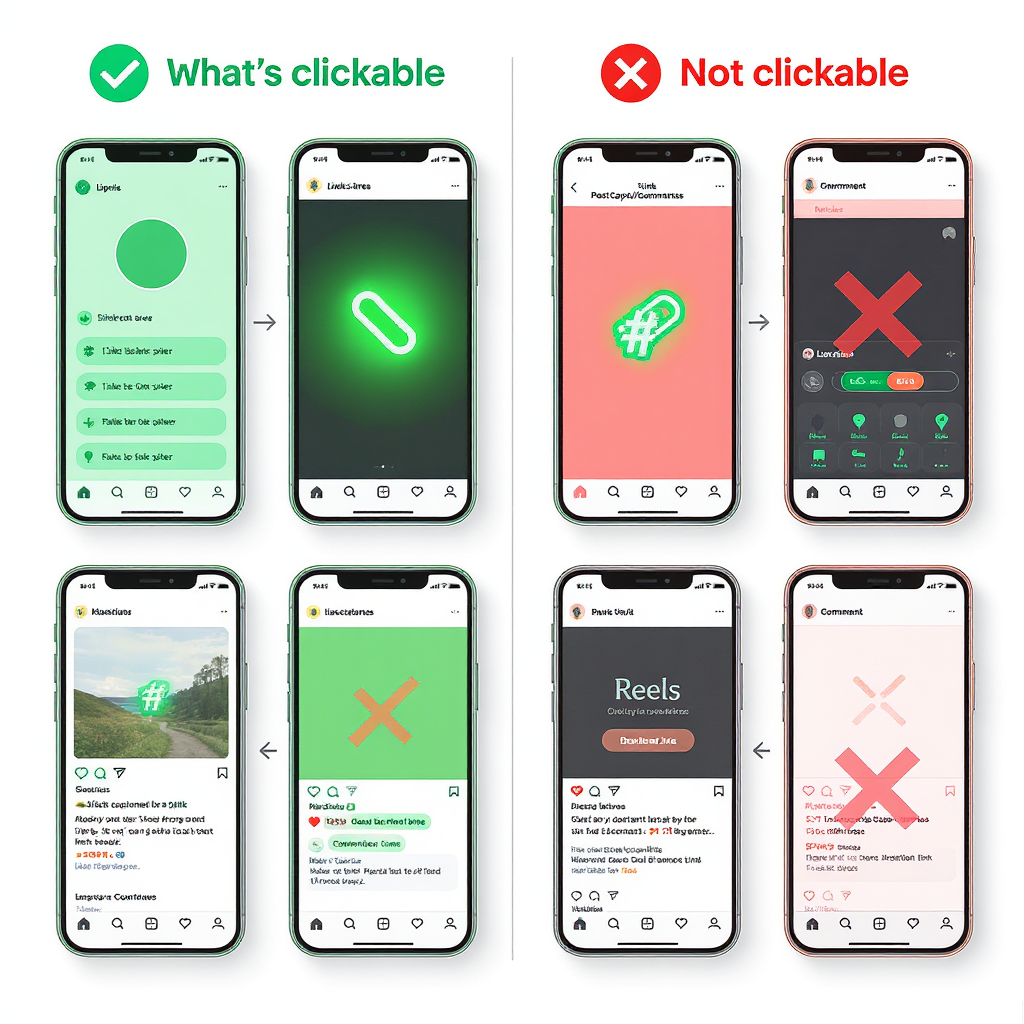
What’s Actually Clickable on Instagram (and What Isn’t)
Instagram’s core feed still doesn’t support clickable links in captions or comments. Instead, use the placements that do support taps.
| Placement | Clickable? | Notes |
|---|---|---|
| Bio links (up to 5) | Yes | Primary link shows; others accessible via a “+” dropdown. |
| Story Link Sticker | Yes | Available to all accounts; saves to Highlights remain clickable. |
| Reels Link Sticker | Yes | Attach a URL; customize label; time its appearance. |
| Instagram ads CTA | Yes | Boost or Ads Manager; choose objectives like Traffic/Sales. |
| Product tags (Shopping) | Yes | Opens product detail page with a link out or IG Checkout. |
| Action Buttons (Book/Reserve/Order) | Yes | Requires a partner integration via Edit Profile > Action Buttons. |
| Direct Messages (DMs) | Yes | URLs in DMs are clickable. |
| Feed captions & comments | No | Non-clickable; use “link in bio” + short links/QR as workarounds. |
Pro tip: Even when a placement is clickable, the user still needs a nudge. Always pair links with clear, visible calls-to-action.
---
Add Links to Your Bio (Up to 5)
Your profile is the most durable place to send traffic—and the one surface your feed audience is already trained to check (“link in bio”).
How to add or edit bio links
- Go to your profile and tap Edit profile.
- Tap Links > Add external link.
- Paste your URL and add a descriptive Title (e.g., “Shop the Drop,” “Join the Webinar”).
- Repeat to add up to 5 links.
- Reorder links so your “Primary” link sits at the top. Drag to reorder (long-press) if available, or edit and re-add as needed.
Best practices
- Keep your primary link aligned with your current campaign.
- Use a branded short link for readability.
- Audit monthly to remove expired promos and avoid “link rot.”
Write a strong “link in bio” CTA in your post
- Be explicit: “Tap our profile → Link in bio → ‘Free Guide’.”
- Add urgency or value: “Save 20% today only—details in bio.”
- Use a short, memorable slug (e.g., go.brand.com/guide) to reduce friction.
---
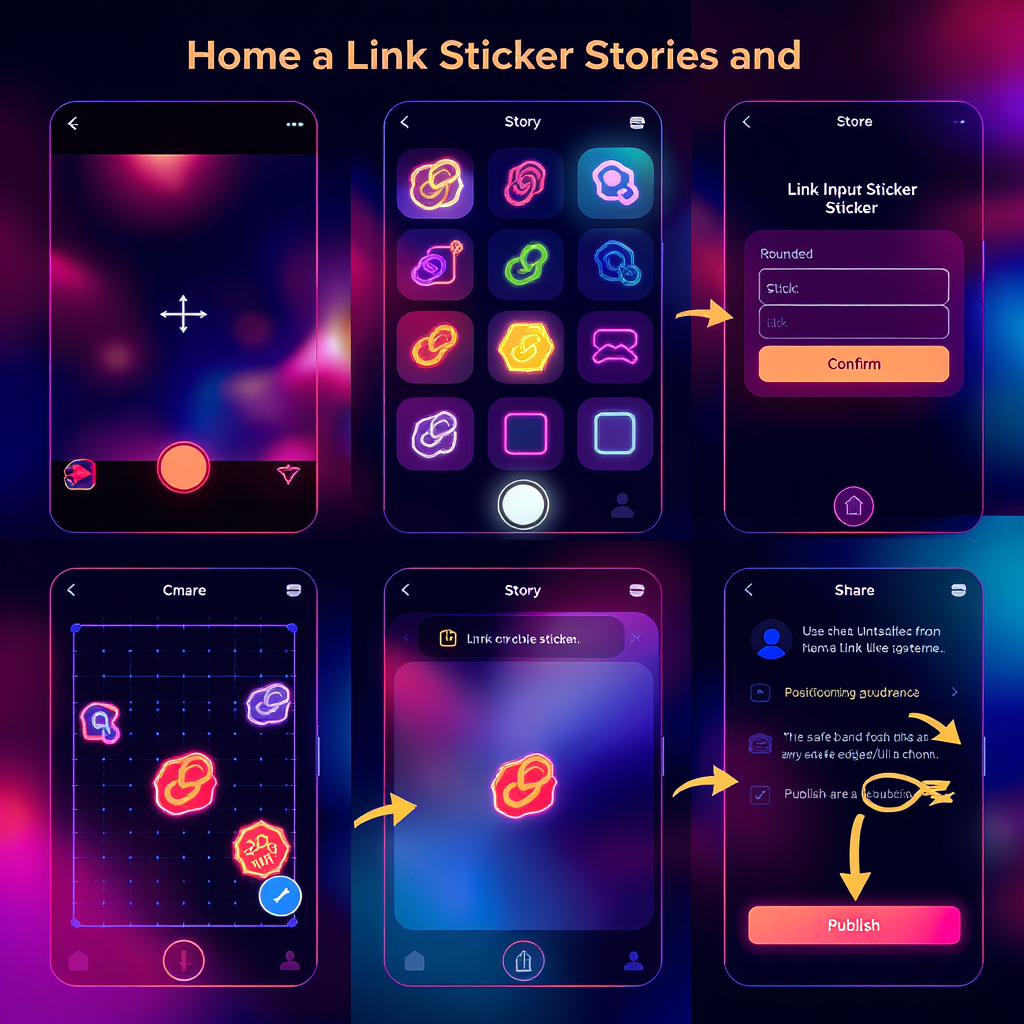
Use the Link Sticker in Stories
Stories still drive some of the highest intent taps if you design for clarity.
Add a Link Sticker step-by-step
- Create a Story (photo/video) and tap the Sticker icon.
- Choose Link, paste your URL.
- Customize the sticker label (e.g., “Download the Checklist,” “Shop Now”).
- Tap the sticker to cycle styles and colors for visibility.
- Place it in a reachable spot (not too close to edges or UI elements).
- Publish—or save to a Highlight for longer shelf life.
Design tips to increase tap-through rate (TTR)
- Use high contrast and whitespace; don’t bury the sticker in clutter.
- Add directional cues: arrows, circles, or motion graphics pointing at the sticker.
- Pair with on-screen copy: “Tap the link” or “Swipe tap here” for clarity.
- Include a benefit-driven CTA: “Tap to get the template.”
- Keep text legible: minimum 16–20 px equivalent, strong contrast ratio.
---
Add a Link Sticker to Reels
Reels now support the Link Sticker, so your short-form video can drive direct traffic.
Quick steps
- Create or upload your Reel and proceed to the editing screen.
- Tap Stickers > Link, then paste your URL and set a custom label.
- Resize and place the sticker where it won’t be covered by captions or buttons.
- Tap and hold to set the sticker’s timing—reveal it when attention peaks.
- Publish.
Best practices for Reels link performance
- Timing: Show the link around your hook payoff (e.g., seconds 3–5).
- On-screen prompts: “Watch to the end—link appears!” then point visibly to it.
- Pin a reinforcing comment: “Tap the Link Sticker or visit our bio: go.brand.com/offer” and Pin it so it stays on top.
- Cover text: Mention “Link in video” on the cover to set expectations.
---
Create a Link-in-Bio Landing Page
If you promote many URLs, a dedicated mini-landing page consolidates everything behind one bio link.
Why use tools like Linktree, Beacons, Later’s Linkin.bio, or Campsite
- Centralize evergreen pages, new drops, and seasonal campaigns.
- Track clicks per button with built-in analytics.
- Match your branding without engineering effort.
- Some tools map posts to specific URLs for “visual linking.”
What to look for
- Branding and design control (fonts, colors, custom CSS).
- Speed (fast load, minimal tracking bloat).
- Analytics (per-link clicks, UTM support, GA/Pixel).
- Pricing and limits (buttons, integrations, custom domain).
| Tool | Free Plan | Branding Control | Analytics | Speed/Perf | From (USD) | Notable Extras |
|---|---|---|---|---|---|---|
| Linktree | Yes | High on paid | Solid; UTM/Pixel on paid | Good | $0–$24+ | Multiple link types, scheduling |
| Beacons | Yes | High | Strong | Good | $0–$30+ | Built-in forms, payments |
| Linkin.bio (Later) | With Later plan | Moderate | Post-to-link mapping | Good | Included in Later | Planner integration, IG feed grid |
| Campsite | Yes | High on Pro | Robust | Fast | $0–$24+ | Custom domains, embeds |
Pro tip: Use a custom domain or subdomain (e.g., links.brand.com) for trust, faster approvals, and better brand recall.
---
Track Clicks and Conversions
If you can’t measure it, you can’t scale it.
Use UTM parameters
Append UTMs so analytics tools attribute traffic and conversions.
Example URL:
https://example.com/offer?utm_source=instagram&utm_medium=social&utm_campaign=summer_sale&utm_content=story_linkstickerTemplate you can copy:
https://YOURDOMAIN.com/PAGE?
utm_source=instagram
&utm_medium=social
&utm_campaign=CAMPAIGN_NAME
&utm_content=PLACEMENT_VARIANT
Common values:
- utm_source: instagram
- utm_medium: social or paid_social
- utm_campaign: launch_q3, black_friday_2025
- utm_content: story_link, reel_link, bio_primary, highlight, ad_ig_feed
Short links and branded domains
- Use a branded shortener (e.g., go.brand.com/offer) built on your domain.
- Avoid shady link shorteners; Instagram may suppress reach on suspicious domains.
- Map short links to full UTM URLs for clean captions and comments.
Analytics stack
- Instagram Insights: Monitor Link Sticker taps, Profile activity, Story/Highlight performance.
- Google Analytics 4: Create reports filtered on utm_source=instagram. Track landing page views, scroll, and conversions.
- A/B testing: Alternate CTAs (“Get 20% Off” vs “Shop the Sale”), placement (top vs bottom), and colors. Run 3–5 day tests to account for algorithm variability.
---
Workarounds for Feed Posts
You can’t make a feed caption clickable—but you can reduce friction.
- Add a scannable QR code to the image or first carousel slide. Keep it high-contrast, with quiet zone and short URL. Include “Scan to Shop” text.
- Pin a comment with the URL. It won’t be clickable, but a short, branded link is easy to retype: “Shop: go.brand.com/drop (also in bio).” Pin your comment to the top.
- Update CTAs after publishing. Edit the caption to reflect the current bio link (“Bio now → ‘Free Course’”). You can also update the image alt text for accessibility clarity.
- Cross-post to Stories after you publish a feed post, and add a Link Sticker there. Mention the Story in the caption.

---
Ecommerce and Bookings
If you sell products or take appointments, Instagram has built-in, clickable flows.
Tag products via Instagram Shopping
- Set up a product catalog in Meta Commerce Manager and request approval for Instagram Shopping.
- When publishing a feed post, Story, or Reel, tag products from your catalog.
- Viewers can tap the product tag to see details and click out to your site (or use IG Checkout where available).
Benefits
- Native shopping UI increases trust.
- Product detail pages can rank in Explore/Shop surfaces.
- Per-product insights (views, taps, conversions).
Add Profile Action Buttons
Service businesses can enable direct, clickable actions on their profile.
Steps
- Go to Edit profile > Action Buttons.
- Choose a partner (e.g., OpenTable, Resy, Acuity, Eventbrite, DoorDash).
- Connect your account and configure the button (Book Now, Reserve, Order Food).
Use cases
Restaurants, salons, fitness studios, and creators with paid sessions.
---
Use Ads When You Need Guaranteed Clicks
Organic reach is great, but sometimes you need certainty.
Boost vs Ads Manager
- Boost: Fast and simple from the app; fewer targeting and optimization options. Good for quick Traffic pushes.
- Ads Manager: Full control over placements, objectives, audiences, bidding, and creative variations. Best for serious, link-focused campaigns.
Choose the right objective and CTA
- Objectives: Traffic, Sales, Leads. For website actions, Traffic or Sales usually perform best.
- Optimize for Landing Page Views (not just Link Clicks) to filter accidental taps.
- Use CTA buttons like “Learn More,” “Shop Now,” “Sign Up” that match your funnel stage.
Budgeting tips
- Start with $20–$50/day per ad set for learning phase stability.
- Cap frequency to avoid fatigue; rotate creative every 7–14 days.
- Exclude recent purchasers when relevant to avoid wasted spend.
---
FAQs and Mistakes to Avoid
Are links in captions or comments clickable?
No. Use bio links, Link Stickers in Stories/Reels, product tags, ads CTAs, Action Buttons, or DMs.
How many bio links can I add?
Up to 5. Choose a “primary” link by ordering them strategically.
Can I add multiple Link Stickers to a single Story or Reel?
Instagram generally supports one Link Sticker per Story page or Reel. Use Highlights to extend life and multiple pages for more links.
What about extremely long URLs?
Avoid them. Use branded short links pointing to UTM-tagged destinations.
Banned or flagged domains?
If your domain is flagged, links may not render or may show warnings. Use a reputable, branded domain, HTTPS, and avoid aggressive redirects or spammy parameters.
Broken links and redirects?
Test every link before publishing. Prefer HTTPS, ensure mobile-friendly pages, and keep redirects to a minimum.
Accessibility mistakes?
- Tiny text on Stickers or CTAs.
- Poor color contrast.
- Lack of alt text. Add alt text on images and describe CTAs in captions.
How do I keep links fresh and safe?
- Audit monthly (or per campaign).
- Retire expired promos.
- Use analytics to prune underperforming buttons on your link-in-bio page.
---
Quick Checklist: How to Add a Link to Instagram Post Content That Converts
- Pick a clickable surface: Bio, Story Link Sticker, Reel Link Sticker, Shopping tag, Action Button, or Ad CTA.
- Craft a benefit-driven CTA and place it prominently (with arrows or motion cues).
- Use branded short links that map to UTM-tagged URLs for clean presentation and reliable tracking.
- Reinforce in multiple places: caption CTA, pinned comment, Story Highlight.
- Measure taps and conversions via Instagram Insights + GA4; iterate on label text, placement, and creative.
With the right placements, clear CTAs, and solid tracking, you won’t just add a link to Instagram post content—you’ll build a repeatable system for turning attention into clicks and clicks into customers.
---
Summary
Instagram doesn’t allow clickable links in feed captions, so focus on the surfaces that do: bio links, Story and Reel Link Stickers, Shopping tags, Action Buttons, DMs, and ads. Pair every link with a strong, benefit-led CTA, and use branded short links mapped to UTM-tagged URLs for clean presentation and accurate attribution. Track performance in Instagram Insights and GA4, iterate on creative and placement, and use Highlights and link-in-bio pages to extend the life of your traffic drivers.


