Add Users to a Facebook Business Page Guide
Learn how to add users to a Facebook Business Page or Business Manager, assign roles, manage permissions, and keep your assets secure.

Introduction to Facebook Business Page Roles and Permissions
Managing a business presence on Facebook often goes beyond a single administrator—it requires coordinated collaboration among marketers, designers, advertisers, and support teams. Understanding how to add users to a Facebook Business Page and assign appropriate permissions is essential for productivity and security.
By leveraging Facebook's role and permissions system, you can ensure contributors have the right level of access without risking sensitive business data. Roles may be set directly via your Page settings or managed at scale using Meta Business Manager.
In this comprehensive guide, you'll learn the difference between Facebook Page Roles and Business Manager Roles, how to add and manage users step by step, what each permission level allows, and the best practices for keeping your assets secure.
---
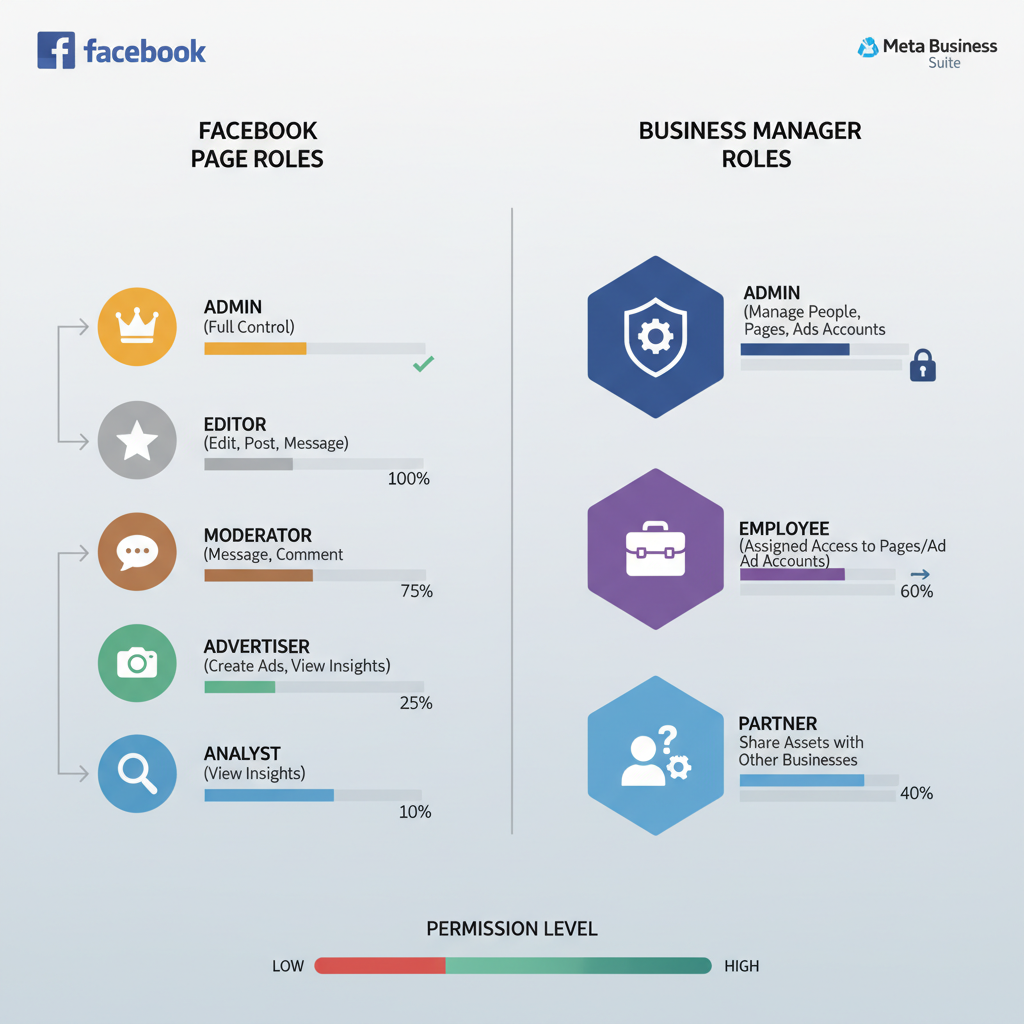
Facebook Page Roles vs. Business Manager Roles
Before you start adding users, it’s important to understand that Facebook has two separate role systems:
- Page Roles (directly on the Facebook Page) — Grant access specific to one page only.
- Business Manager Roles — Manage access across multiple assets such as Pages, ad accounts, catalogs, and pixels.
Key Differences
| Feature | Facebook Page Role | Business Manager Role |
|---|---|---|
| Scope | Single Facebook Page | Multiple assets in a Business Manager account |
| Management Level | Only page-related settings | Overall business settings including ads, pixels, catalogs |
| Access Assignment | Directly from Page settings | From Business Manager dashboard |
| Best Use Case | Small teams managing one page | Larger organizations with multiple assets |
---
Prerequisites Before Adding Users
For a smooth setup process, ensure you have the following in place:
- Admin Access — You must be an admin of the Page or Business Manager account.
- Verified Ownership — Business Manager accounts should be verified to avoid access issues.
- Active Facebook Profile — The invitee must have a personal Facebook account.
- Clear Role Choice — Decide the correct role before sending an invitation to prevent errors.
---
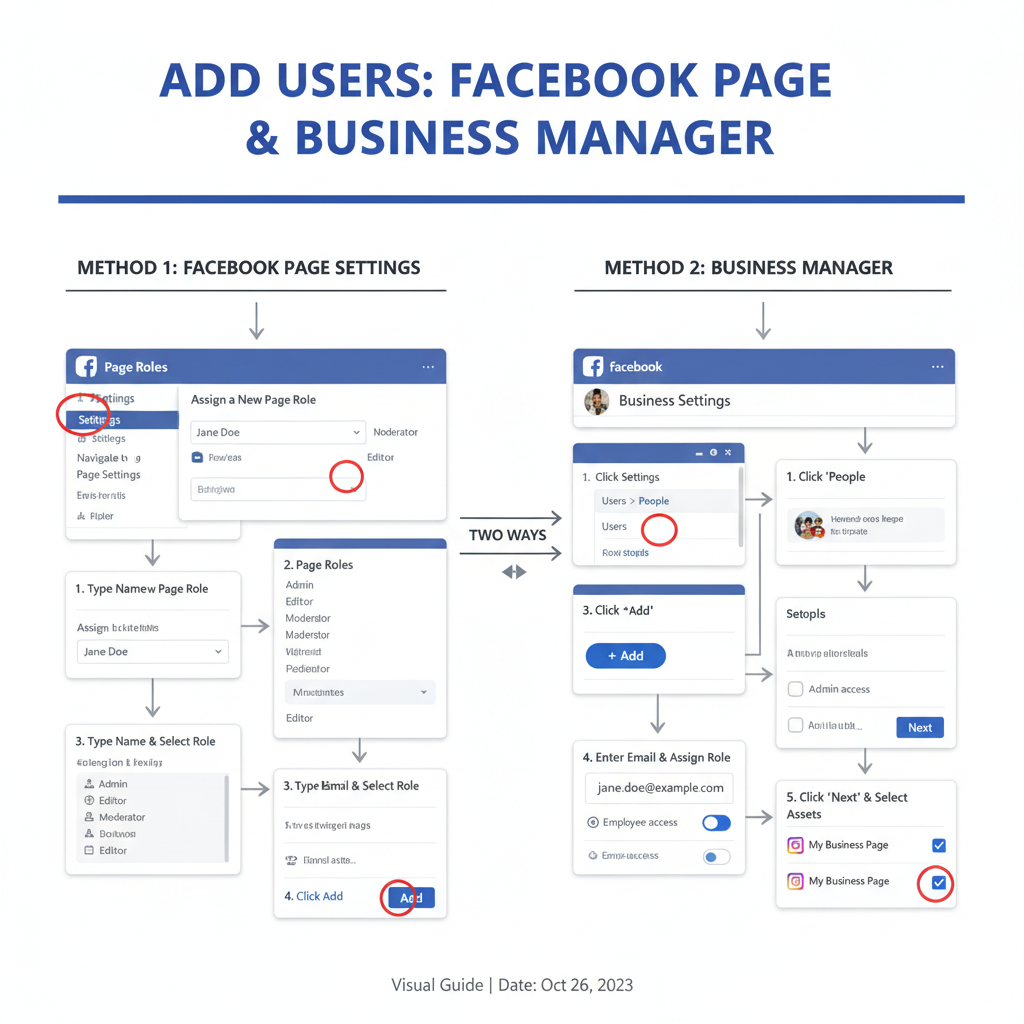
Adding Users via Facebook Page Settings
This is ideal for teams managing a single Page:
- Go to Your Facebook Page — Log in, navigate to your Page.
- Access Settings — From the left sidebar, choose Settings > New Pages Experience or Page Roles.
- Assign a New Role — Under Assign a New Page Role, type the user's name or email.
- Select Role — Choose from Admin, Editor, Moderator, Advertiser, Analyst, or Custom.
- Send Invitation — Click Add, confirm with your password if required.
- User Accepts Invitation — They must accept via Facebook notifications to gain access.
---
Adding Users via Facebook Business Manager
For multi-asset environments, use Meta Business Suite or Business Manager:
- Go to Business Settings — Visit business.facebook.com and log in as an admin.
- Navigate to People — In the left menu, choose Users > People.
- Add — Click the blue Add button.
- Enter Email Address — Use the person’s work email.
- Assign Business Role — Select Employee Access (limited) or Admin Access (full control).
- Assign Assets and Permissions — Choose relevant Pages, ad accounts, catalogs, and their specific roles.
- Send Invitation — The invitee will receive an email and must accept to access the assets.
---
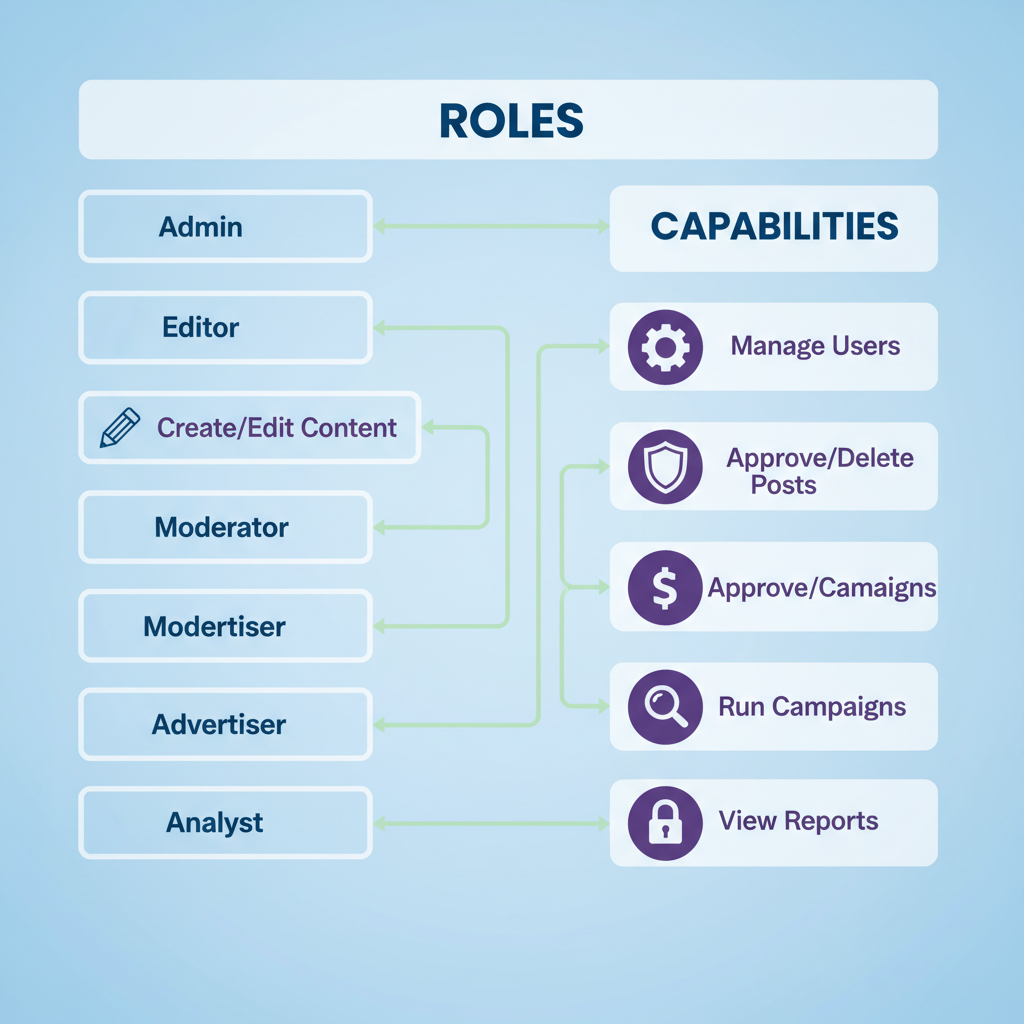
Explanation of Role Permission Levels
Assigning permissions correctly is critical to operational security:
| Role | Capabilities |
|---|---|
| Admin | Full control over settings, roles, posts, ads, and analytics. Can add or remove users. |
| Editor | Create and manage posts, respond to messages, view insights; cannot manage roles. |
| Moderator | Respond to messages/comments, remove posts, ban users, and run ads. |
| Advertiser | Create ads, view insights; cannot post organically or moderate comments. |
| Analyst | View insights and analytics only. |
| Custom | Customizable permissions via Business Manager to fit unique needs. |
---
Tips on Choosing the Right Role for Each Team Member
- Match Role to Duties — Only grant admin rights when necessary.
- Mitigate Risk — Assign limited roles (like Analyst) for contractors or temporary staff.
- Plan for Scalability — Choose roles that can grow with the team member’s responsibilities.
- Audit Regularly — Review access quarterly to ensure accuracy.
---
Managing and Removing Users Safely
Whenever someone changes responsibilities or leaves, promptly adjust or remove their access.
To Remove a User (Page Role):
- Go to Page Settings > Page Roles.
- Find the user, select Edit > Remove.
- Confirm removal.
To Remove via Business Manager:
- Go to Business Settings > People.
- Select the person's profile.
- Click Remove.
---
Common Issues and Troubleshooting
Invitation not received:
- Check spam/junk folders.
- Confirm correct email address.
- Resend invitation.
Role changes not saving:
- Clear browser cache and refresh.
- Verify admin permissions.
- Check for Facebook outages.
Unable to find user:
- Ensure they have a valid Facebook profile.
- Use their email if name search fails.
---
Best Practices for Security and Organization
- Enable Two-Factor Authentication (2FA) for all admins.
- Maintain an Access Log listing who has access and why.
- Separate Accounts — Staff should use dedicated work emails.
- Conduct Regular Audits after major projects or quarterly.
- Apply Least Privilege Principle — Only grant the level of access needed.
---
Conclusion and Next Steps
Mastering how to add users to a Facebook Business Page empowers you to delegate efficiently while safeguarding assets. Whether you opt for direct Page Roles or manage multiple assets with Business Manager, knowing the distinctions and following proven security measures ensures secure and efficient collaboration.
Next Steps:
- Review your current team access list.
- Adjust roles as responsibilities evolve.
- Implement regular security audits and training.
Following these steps will help you maintain a strong, well-managed Facebook presence that supports business growth while minimizing risk.