After Flashing Open-Source Firmware on a 17-Year-Old ThinkPad, I Brought It Back to Life in 2025

# Restoring ThinkPad X200 with Coreboot: A Complete Flashing Guide
> **Editor's Note:** We periodically select high-quality articles from Matrix to showcase authentic user experiences and perspectives. This article reflects the author’s personal views; our editorial team has made only minor adjustments to the title and formatting.
---
## Introduction
I own a **ThinkPad X200** — launched in 2008 as Lenovo’s flagship business laptop. Even over a decade later, it’s still my go-to machine for programming and writing.
However, the previous owner set a **super administrator password** in the BIOS. That long-forgotten password locked BIOS settings but didn’t prevent booting the OS — until I tried removing the BIOS battery to clear it. The X200’s business-grade safeguards kicked in, forcing the password prompt **before** every boot.
To fully restore control, I decided to flash **Coreboot** — an open-source system firmware with full X200 support.
> **Coreboot** replaces proprietary BIOS/UEFI, offering faster boot times, deep customisation, and, in this case, a way to bypass the BIOS password.

---
## Tools & Preparations
### Required hardware
- **Linux PC** (to compile and flash Coreboot)
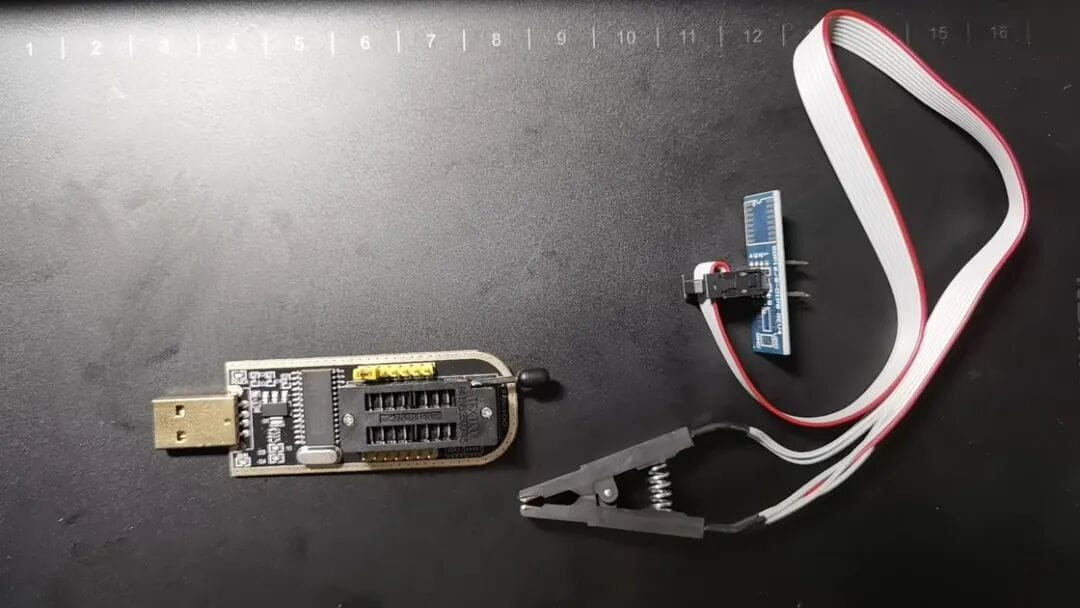
- **CH341A programmer** (Gold Edition, supported by Flashrom)
- **SOP-16 clip** (to connect the programmer to the BIOS chip)
The X200’s BIOS chip is an 8 MiB, 16-pin “25” series SPI chip. Both the clip and programmer are widely available.
### Required software
- **Flashrom** (for reading/writing the BIOS chip)
- **Coreboot** (source code from GitHub)
- **Linux GCC/Ada toolchain** (needed to compile some Coreboot components)
⚠ **Note:** Coreboot only provides source code. It must be compiled from scratch, or you risk missing features with prebuilt ROMs.
---
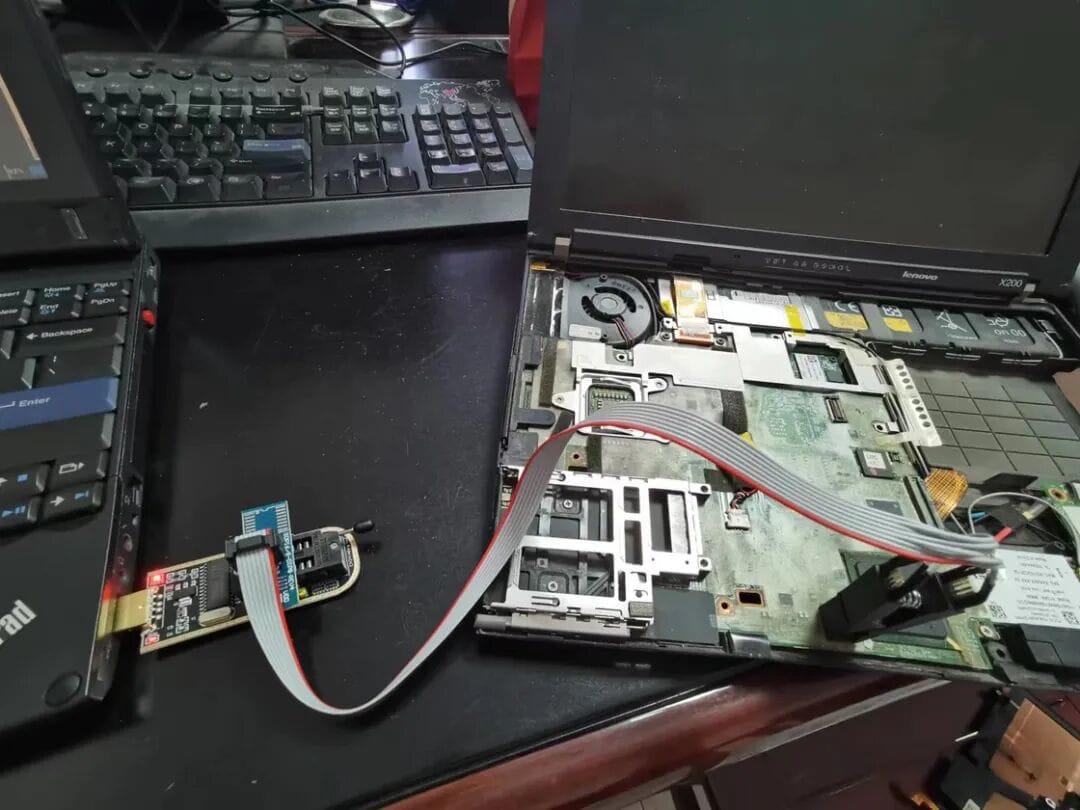
## Disassembly & Programmer Connection
### Steps to access the BIOS chip
1. **Remove screws** marked with a triangle on the bottom (except the HDD bay screw).
2. Remove the battery; locate the **hidden screw** inside the compartment.
3. **Detach the palm rest and keyboard** carefully — watch the keyboard ribbon cable.
4. Disconnect the **fingerprint sensor** (if present) from the motherboard.
### Connect CH341A programmer and clip
1. Unlock the connector lever on the programmer.
2. Insert clip pins into the connector — **match orientation carefully**.
3. Lock the lever; attach the clip to the BIOS chip (red wire towards Intel Southbridge).
4. Plug the programmer into USB and check for the red LED.
---
## Backing Up the Original BIOS
**Always make a backup before flashing.** Coreboot needs certain OEM BIOS components.
### Detect chip modelsudo flashrom -p ch341a_spi
Use the longest match from the detected list (e.g. `MX25L6436E/MX25L6445E/...`).

### Read and save BIOS
sudo flashrom -p ch341a_spi -c "MX25L6436E/MX25L6445E/..." -r x200_bios.rom
Create multiple backups and compare:openssl sha256 x200_bios*.rom
Hashes must match exactly.

---

## Preparing Coreboot

### Clone the source
git clone --recursive https://github.com/coreboot/coreboot.git coreboot
cd coreboot
If --recursive was missed:
git submodule update --init --recursive
### Install GCC Ada toolchain

Coreboot’s `libgfxinit` is written in Ada.
Arch example
sudo pacman -S gcc-ada
### Build cross-compilermake crossgcc-i386 CPUS=$(nproc)
⚠ X200 requires **32-bit** Coreboot builds.

---

## Extract BIOS Components

### Compile `ifdtool`
cd util/ifdtool
make
sudo cp ifdtool /usr/bin/
### Extract required blobsifdtool -x x200_bios.rom
Needed:
- `flashregion_0_flashdescriptor.bin` (**required**)
- `flashregion_3_gbe.bin` (**required**)
- `flashregion_2_intel_me.bin` (optional backup)

Place into:
mkdir -p 3rdparty/blobs/mainboard/lenovo/x200
Rename appropriately
---

## Configuring Coreboot

Run:
make menuconfig
### Mainboard
- **Vendor:** Lenovo
- **Model:** ThinkPad X200 / X200s / X200t

### Chipset options
- **Add Intel descriptor.bin file** → ✔
- **Add gigabit ethernet configuration** → ✔
- **Intel ME firmware** → optional (suggest disabling for stability)

### Drivers
- **Support Intel PCI-e WiFi adapters** → ✔
- **Support Bluetooth on WiFi cards** → ✔

### General setup
- **Option backend to use:** Use CMOS (stores BIOS settings in NVRAM)
- **Security → Always clear all DRAM on regular boot** → ✔

---

## Graphics Configuration

### Option 1: libgfxinit + Linear Framebuffer
- Devices → Graphics initialization → **Use libgfxinit**
- Display → Framebuffer mode → **Linear high-resolution framebuffer**
  - Width: `1280`
  - Height: `800`

Limitations: no scaling, possible incompatibility with graphical Grub.

### Option 2: VGA Option ROM (Recommended)
Extract `OPROM00.ROM` from OEM BIOS using PhoenixTool/phcomp.exe; rename to `vgabios.bin`.
menuconfig:
- Devices → Add a VGA BIOS image → path to `vgabios.bin`
- Graphics initialization → **Run VGA Option ROMs**
Or set to **None** and let SeaBIOS initialise GPU.

---

## Compile & Flash Coreboot

### Build
make -j$(nproc)
ROM output: `build/coreboot.rom`

### Flash with CH341A
sudo flashrom -p ch341a_spi -c "MX25L6436E/..." -w build/coreboot.rom
---

## Internal Flashing (After First Install)

Reconnect keyboard/palm rest, boot into Linux.

Unload `lpc_ich`:
sudo modprobe -r lpc_ich
Flash:Entire chip
sudo flashrom -p internal -c "MX25L6436E/..." -w build/coreboot.rom
Only BIOS region
sudo flashrom -p internal -c "MX25L6436E/..." -w build/coreboot.rom --ifd -i bios
Backup similarly:sudo flashrom -p internal -c "MX25L6436E/..." -r coreboot_backup.rom --ifd -i bios
---

## Troubleshooting

### Grub hangs with libgfxinit
**Cause:** No framebuffer → graphical mode fails.

Solutions:
1. Switch Grub to text mode (`GRUB_TERMINAL=console`)
2. Enable Linear Framebuffer and set `GRUB_GFXMODE=1280x800x32`

### Intel ME issues
Observed:
- Fail to power on after shutdown
- Sleep/wake issues, beeps on reboot

Fix: Disable “Add Intel ME/TXE firmware” in menuconfig.

### Toolchain updates
After `git pull`, run:
make crossgcc-clean
make crossgcc-i386 CPUS=$(nproc)
### Random reboots
Enable “Always clear all DRAM on boot” in Security settings.

---

## Results

With Coreboot:
- Instant SeaBIOS launch
- Boots Arch Linux faster than OEM BIOS
- Fully bypassed BIOS password restrictions

The X200 is once again a daily-use machine — thanks to open source.

---

**Original article:** [sspai.com/post/88834](https://sspai.com/post/88834?utm_source=wechat&utm_medium=social)
**Header image:** Unsplash @foegra