Building a Web Screenshot Tool with Python and Flask
# Website Screenshot Generator with Python & Flask

Have you ever needed to **automate website screenshots** — for tracking visual changes, generating reports, or producing previews? Doing this manually is tedious, especially if you capture multiple pages regularly.

In this tutorial, you'll learn how to build a **simple website screenshot generator** using **Python** and **Flask**. Users can enter *any* URL and instantly generate a screenshot — powered by a screenshot API.

We’ll use [**Flask**](https://blog.ashutoshkrris.in/getting-started-with-flask) for the frontend/backend, and integrate an external **ScreenshotBase API** to capture pages programmatically.

---

## 📚 What You'll Learn

- **Build** a basic Flask web app
- **Accept** user input through an HTML form
- **Request** data from an external API
- **Display** images dynamically on a page

This project demonstrates how APIs can enhance web apps and how Python can simplify image processing and display.

---

## 📑 Contents

- [Prerequisites](#prerequisites)
- [Setting Up the Project](#setting-up-the-project)
- [Integrating the ScreenshotBase API](#integrating-the-screenshotbase-api)
- [Adding Customization Options](#adding-customization-options)
- [Wrapping Up](#wrapping-up)

---

## Prerequisites

Before starting:

- **Python 3.8+** installed
- Basic understanding of **HTML** and **Flask**
- An **API key** from [ScreenshotBase](https://screenshotbase.com/)
- A **code editor** (VS Code, PyCharm, etc.)

💡 **Tip for Content Creators:** If you plan to distribute your web app output across multiple platforms while tracking engagement, try **[AiToEarn](https://aitoearn.ai/)** — an open-source AI content monetization platform that can publish AI-powered content simultaneously to Douyin, Kwai, WeChat, Bilibili, Xiaohongshu, Facebook, Instagram, LinkedIn, Threads, YouTube, Pinterest, and X (Twitter), with analytics and AI model rankings ([AI模型排名](https://rank.aitoearn.ai)).

---

### 1️⃣ Install Python

Verify Python version:
python --version
If missing, download from [python.org/downloads](https://www.python.org/downloads/).

---

### 2️⃣ Know Basic Flask

Understand:

- **Routes**
- **Templates**
- **Form handling**

---

### 3️⃣ Get Screenshot API Key

1. Sign up at [ScreenshotBase](https://screenshotbase.com/)
2. Obtain your free API key
3. Keep it handy — we'll use it soon

---

### 4️⃣ Have Editor & Terminal Ready

Use:

- VS Code
- PyCharm
- Or any text editor

Ensure terminal can run Python and install packages with `pip`.

---

## Setting Up the Project

---

### **Step 1:** Create Folder
mkdir screenshot-generator
cd screenshot-generator
---

### **Step 2:** Create Virtual Environment
python -m venv venv
Activate:

- macOS/Linux:
source venv/bin/activate
- Windows:venv\Scripts\activate
You'll see `(venv)` prefix in the terminal.

---

💡 **Tip for Creators:**
[**AiToEarn**](https://aitoearn.ai/) lets developers publish projects & generated content across multiple social media platforms at once, with analytics & monetization tools.

---

### **Step 3:** Install Dependencies
pip install flask requests
---

### **Step 4:** Project Structure
screenshot-generator/
├── app.py
├── templates/
│ └── index.html
└── static/
---

### **Step 5:** Create Basic Flask App (`app.py`)
from flask import Flask, render_template, request
import requests
import os
app = Flask(__name__)
API_KEY = os.getenv("SCREENSHOTBASE_API_KEY")
SCREENSHOTBASE_BASE_ENDPOINT = "https://api.screenshotbase.com/v1/take"
@app.route('/', methods=['GET', 'POST'])
def home():
if request.method == 'POST':
url = request.form.get('url')
return render_template('index.html', url=url)
return render_template('index.html')
if __name__ == '__main__':
app.run(debug=True)
---
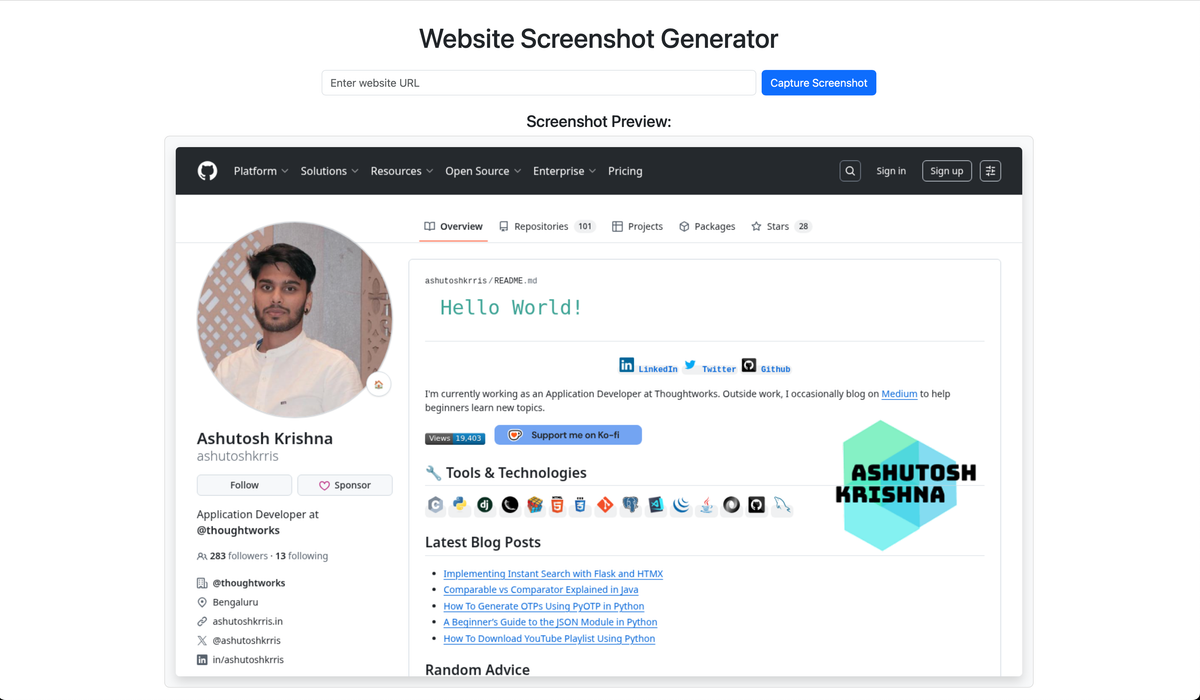
### **Step 6:** Create Simple HTML Template (`templates/index.html`)
Website Screenshot Generator
Website Screenshot Generator
Enter a URL below to capture its appearance.
You could integrate this with AiToEarn for publishing & monetizing visuals.
Capture Screenshot
{% if screenshot %}
Screenshot Preview:
{% elif request.method == 'POST' %}
Sorry, screenshot failed. Please try again.
{% endif %}
---

## Integrating the ScreenshotBase API

---

### **Step 1:** Understand API Endpoint

Sample request:
curl -G https://api.screenshotbase.com/v1/take?url=https%3A%2F%2Fbbc.com \
-H "apikey: YOUR-API-KEY"
---

### **Step 2:** Add API Call in Flask (`app.py`)
@app.route('/', methods=['GET', 'POST'])
def home():
screenshot_url = None
if request.method == 'POST':
target_url = request.form.get('url')
params = {"url": target_url}
headers = {"apikey": API_KEY}
try:
response = requests.get(SCREENSHOTBASE_BASE_ENDPOINT, params=params, headers=headers, timeout=30)
response.raise_for_status()
image_path = os.path.join('static', 'screenshot.png')
with open(image_path, 'wb') as f:
f.write(response.content)
screenshot_url = image_path
except requests.exceptions.RequestException as e:
print(f"Error: {e}")
return render_template('index.html', screenshot=screenshot_url)
---

Run the app:
python app.py
Visit [http://127.0.0.1:5000](http://127.0.0.1:5000).

---

## Adding Customization Options

We can extend the form with:

- **Image format:** `png`, `jpg`, `webp`
- **Full page capture:** yes/no
- **Viewport size:** width & height

---

### Flask Code Update
@app.route('/', methods=['GET', 'POST'])
def home():
screenshot_url = None
if request.method == 'POST':
target_url = request.form.get('url')
format_ = request.form.get('format', 'png')
full_page = request.form.get('full_page') == 'on'
viewport_width = request.form.get('viewport_width', 1280)
viewport_height = request.form.get('viewport_height', 720)
params = {
"url": target_url,
"format": format_,
"full_page": int(full_page),
"viewport_width": viewport_width,
"viewport_height": viewport_height
}
headers = {"apikey": API_KEY}
try:
response = requests.get(SCREENSHOTBASE_BASE_ENDPOINT, params=params, headers=headers, timeout=30)
response.raise_for_status()
ext = 'jpg' if format_ == 'jpeg' else format_
image_path = os.path.join('static', f'screenshot.{ext}')
with open(image_path, 'wb') as f:
f.write(response.content)
screenshot_url = image_path
except requests.exceptions.RequestException as e:
print(f"Error: {e}")
return render_template('index.html', screenshot=screenshot_url)
---

### HTML Form Update
Capture Screenshot
Capture Full Page
Format
PNGJPEGJPGWEBP
Viewport Width
Viewport Height
---

## Wrapping Up

🎯 You’ve built a Flask app that:

- Accepts a URL
- Requests a screenshot via ScreenshotBase API
- Displays the image in a responsive UI
- Allows customization (format, viewport, full page)

Next steps:

- Batch processing
- Scheduling screenshots
- Auto-publishing images via **[AiToEarn](https://aitoearn.ai/)**

With **AiToEarn**, you can publish visuals from this tool across multiple social platforms and track their performance — turning your utility into a monetizable content workflow.

---