How to Check Email Linked to Your Facebook Account
Learn how to find, update, and manage the email linked to your Facebook account on desktop and mobile, while ensuring privacy and account security.

Introduction: How to Check Email Linked to Facebook for Better Security and Access
Your Facebook account is more than just a way to connect with friends — it’s an integral part of your digital identity. The email address linked to your Facebook profile is critical for:
- Security: Verifying account ownership and receiving alerts about suspicious activity.
- Account Recovery: Resetting passwords or restoring hacked accounts.
- Notifications: Receiving friend requests, updates, and messages directly in your inbox.
If you don’t know or keep track of your linked email, logging in or securing your account can become challenging. This guide breaks down how to check email Facebook information on desktop and mobile, update outdated addresses, manage privacy visibility, and safeguard your linked email for long-term protection.
---
How to Check Email Linked to Facebook on Desktop Browser
When you use Facebook on a desktop or laptop, finding your linked email is straightforward. Follow these steps:
Step 1: Log Into Facebook
- Open your web browser.
- Go to facebook.com.
- Enter your username and password, then click Log In.
Step 2: Navigate to Settings & Privacy → Settings
- Click the profile dropdown arrow in the top-right corner.
- Select Settings & Privacy.
- Click Settings to open the account settings.
Step 3: Locate “Contact” in General Settings
- In the left sidebar, choose General.
- Find the Contact section to see all email addresses linked to your account.
Step 4: Identify Primary and Secondary Emails
The section will list:
- Primary Email: Used for login and official communications.
- Secondary Email(s): Backup contacts added to your account.
---
How to Check Email on Facebook Mobile App (iOS/Android)
If you prefer using the Facebook mobile app, the process varies slightly from desktop access but remains simple.
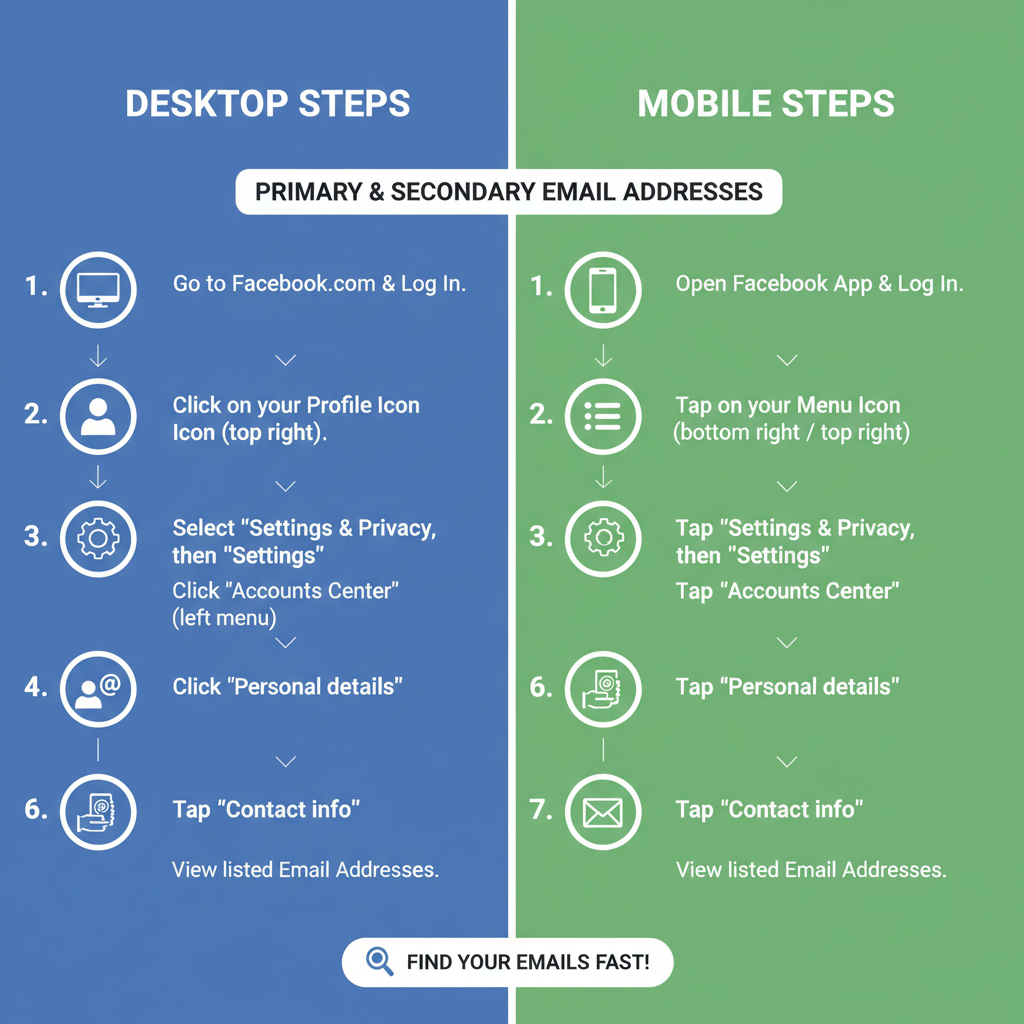
Step 1: Access the Menu
- Open the Facebook app.
- Tap the three horizontal lines — bottom right for iOS, top right for Android.
Step 2: Go to Settings & Privacy → Settings
- Scroll down, select Settings & Privacy.
- Tap Settings.
Step 3: Tap Personal Information → Contact Info
- Open Personal Information.
- Tap Contact Info to display all linked email addresses.
---
How to Check if Email is Hidden on Profile
Even if your email is linked to Facebook, it might not be publicly visible depending on your privacy settings.
Step 1: Visit Your Profile
- Navigate to your Facebook profile page.
Step 2: View Public vs. Private Settings
- Click on About → Contact and Basic Info.
- Look at the visibility setting for your email — options include Only Me, Friends, or Public.
Tip: If privacy is important, keep the visibility set to "Only Me." Adjust settings only if you need certain users to view your email.
---
What to Do If You Can’t Log In
If you’ve forgotten your password or believe your account was compromised, recovering it through your linked email may be your best option.
Step 1: Use “Forgot Password?”
- Go to the Facebook login page.
- Click Forgot Password? below the password box.
Step 2: Enter Your Name or Phone Number
- Provide your account name, username, or registered phone number.
Step 3: Check Possible Email Hints
During recovery, Facebook might display partial email clues (e.g., `j***@gmail.com`) to help you recall your registered email.
---
Updating or Adding a New Email Address to Facebook
An outdated or compromised email should be replaced immediately to prevent security risks.
Step 1: Go to Contact Section
- From settings, navigate to General → Contact.
Step 2: Add Another Email
- Click Add another email or mobile number.
- Enter and save the new email address.
Step 3: Confirm the Addition
- Check your inbox for a verification link from Facebook.
- Click the link to confirm ownership.
Step 4: Set as Primary and Remove Outdated Address
- Designate the new email as Primary.
- Delete old emails if no longer in use.
---
Security Tips for Your Facebook Email
Your email is a critical part of Facebook account security. Follow these guidelines to keep it safe:
Enable Two-Factor Authentication (2FA)
Adds extra security by requiring a second verification code.
Go to Settings → Security and Login → Use two-factor authentication
Choose SMS or an authenticator app
Use Strong, Unique Passwords
- Use combinations of uppercase, lowercase, numbers, and symbols.
- Avoid reusing passwords across different sites.
Beware of Phishing Emails
- Don’t click suspicious links or open unknown attachments.
- Verify senders before engaging with any account-related message.
---
Quick Reference Table for Methods to Check Email on Facebook
| Platform | Steps | Sections to Access |
|---|---|---|
| Desktop Browser | Login → Settings & Privacy → Settings | General → Contact |
| Mobile App (iOS/Android) | Menu → Settings & Privacy → Settings | Personal Information → Contact Info |
| Profile View | Visit profile → About → Contact and Basic Info | Privacy Settings for Email Visibility |
---
Conclusion
Knowing how to check email Facebook information provides you with greater control over your account. Whether you use a desktop browser or mobile app, the steps are easy to follow. If you experience login issues, recovery prompts may give clues to your linked email.
For maximum security, regularly confirm your email, replace outdated contact information, and apply safeguards like two-factor authentication and strong passwords. Keeping this data accurate today protects your Facebook presence and ensures you stay connected without unwanted interruptions.
Take action now — check your linked email settings, update them if necessary, and secure your Facebook account to prevent future issues.