Create a Private Group in Facebook from Desktop and Mobile
Learn how to create a private group on Facebook from desktop and mobile, set privacy options, and customize settings for a secure online community.

How to Create a Private Group in Facebook Effectively
Creating a private group on Facebook is one of the best ways to build a secure, focused online community. Whether you’re cultivating a professional network, running a hobby club, or offering exclusive member benefits, understanding the right privacy settings and setup steps will help you make the most of Facebook’s group features. This guide walks you through everything you need to know to create a private group in Facebook and manage it for maximum engagement.
---
Understanding the Difference Between Private and Public Facebook Groups
Before you create a private group in Facebook, it’s essential to understand what “private” means in Facebook’s community settings.
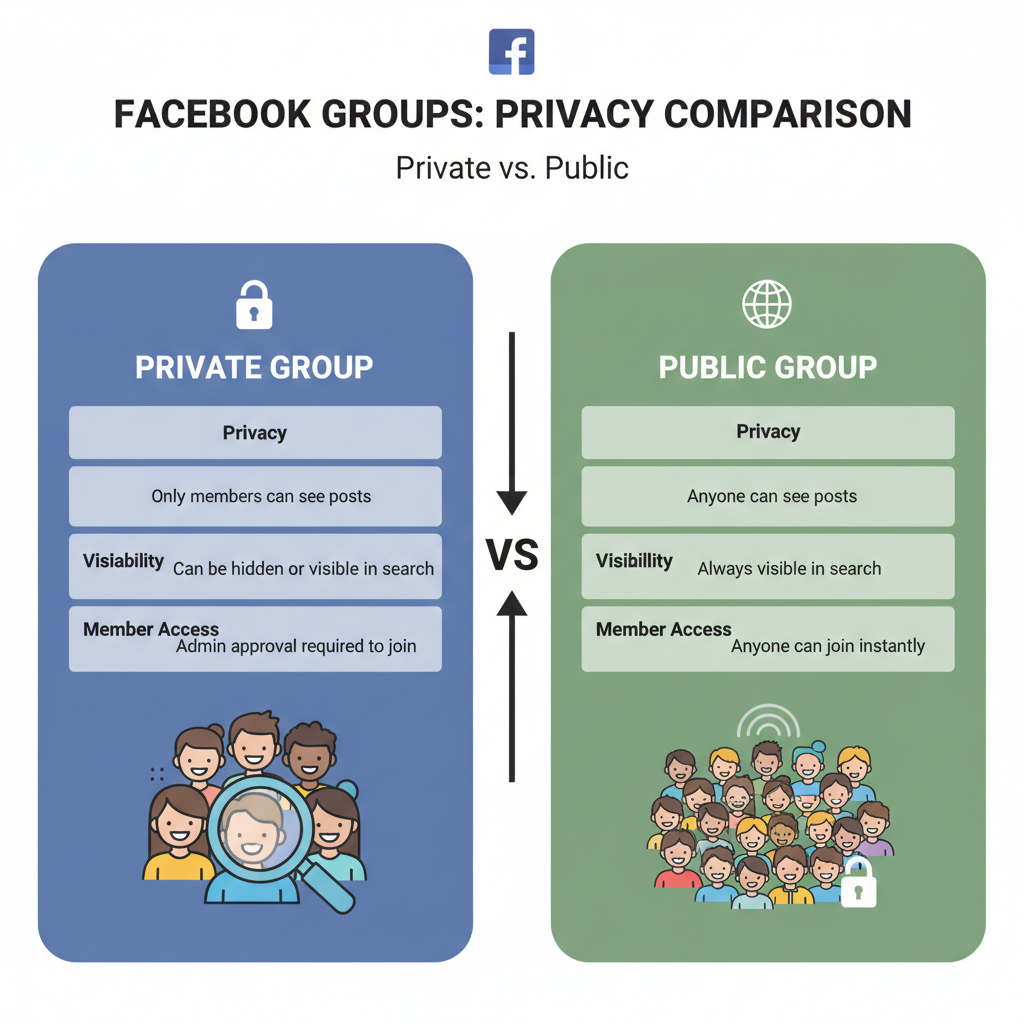
- Public Group: Anyone can find the group in search, see who’s in it, and read posts without joining.
- Private Group: Only members can see posts. Non-members can see the name and description if it’s set as "visible," but cannot access content.
Facebook further differentiates private groups by their visibility in search results:
- Visible (Private): Non-members can find the group in search but must request to join to view posts.
- Hidden (Private): Only invited members can find and access the group.

These distinctions allow you to control privacy and manage expectations for confidentiality.
---
Decide on a Clear Purpose and Name for Your Private Group
Picking the right name and defining your group’s purpose is critical for attracting the right members.
Tips for defining your group:
- Be specific – A clear topic (e.g., “Freelance Writers in New York”) attracts relevant members.
- Use target keywords – Match your group name with terms your audience might search for.
- Create a clear purpose statement – A concise description helps new members instantly understand the group’s vision and goals.
---
Choose Privacy Settings: Private vs Visible/Hidden in Search
When you create private group in Facebook, you’ll select privacy and visibility settings:
| Setting | Who Can See Posts? | Who Can Find Group? |
|---|---|---|
| Private + Visible | Members only | Anyone in search |
| Private + Hidden | Members only | Only invited people |
Choosing correctly balances confidentiality with discoverability.
---
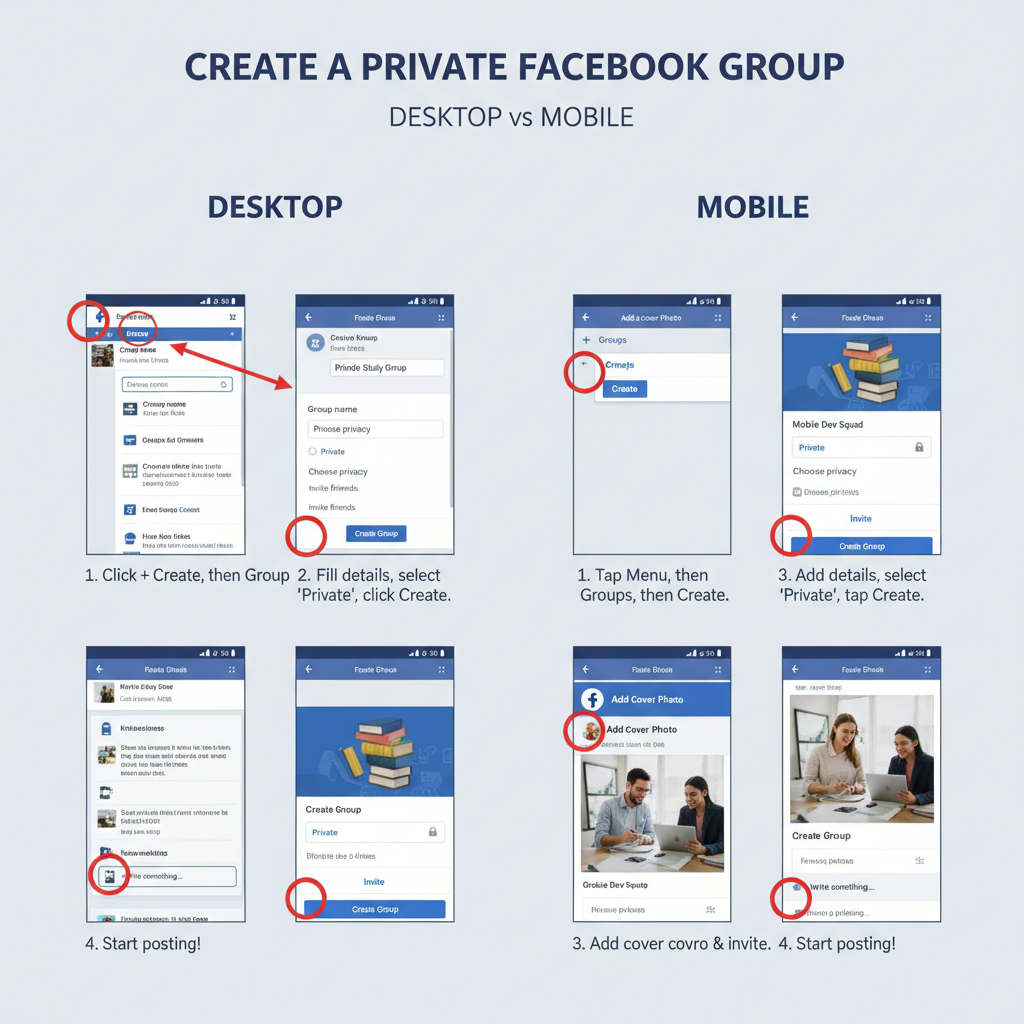
Step-by-Step Guide to Creating a Private Group from Desktop
Follow these steps on your computer browser:
- Log in to Facebook.
- Click Groups in the left sidebar.
- Select + Create New Group.
- Enter your group name.
- Add at least one friend to start.
- Select Private in the Privacy dropdown.
- Decide if your group will be Visible or Hidden.
- Click Create.
- Add a cover photo and description.
Your group homepage will open, ready for further customization.
---
Step-by-Step Guide to Creating a Private Group from Mobile App
From the Facebook mobile app (iOS or Android):
- Tap the menu icon (☰).
- Tap Groups → Create.
- Enter your group name.
- Select Privacy → Private.
- Choose Visible or Hidden.
- Add at least one friend to start.
- Tap Create Group.
- Upload a cover image and write your description.
The flow is similar between devices, with slight icon differences.
---
Customize Group Settings: Description, Cover Photo, Rules
Once the group is live:
- Description: Clearly outline the mission and core guidelines.
- Cover Photo: Choose a high-quality, branded image.
- Group Rules: Set standards for member behavior.
Access these via Manage → Settings.
---
Adjust Membership Approval and Posting Permissions
You control who joins and who posts:
- Membership approval:
- Admin/moderator approval for better vetting.
- Automatic approval based on set criteria (e.g., email domain).
- Posting permissions:
- Anyone can post (default) or admin-only posts.
- Optional post approval before publishing.
These keep discussions relevant and respectful.
---
Invite Members Securely and Manage Join Requests
- Use the Invite button for direct invites.
- Share invite links only in secure channels.
- Avoid public posting of invite links if privacy matters.
Managing requests:
- Check mutual friends, join question answers, and profiles.
- Decline politely if they don’t meet criteria.
---
Moderate Content and Maintain Community Guidelines
Active moderation is vital:
- Appoint at least 2–3 moderators for large groups.
- Review posts and comments daily.
- Use Admin Assist to filter by keywords or block spam.
- Remove inappropriate posts immediately.
Maintaining trust fosters long-term engagement.
---
Update Settings Over Time to Match Group Growth
As your group evolves:
- Adjust visibility to aid growth.
- Refine or relax membership requirements.
- Change rules to address recurring situations.
Example: A hidden reading club may go visible to attract more book lovers.
---
Best Practices for Engaging Members in a Private Group
- Post regularly with valuable content.
- Ask open-ended questions to spark discussion.
- Feature members for their contributions.
- Create polls and host events to drive engagement.
- Welcome new members with an intro post.
---
Common Mistakes to Avoid When Running a Private Group
Steer clear of:
- Poor moderation — allows spam to spread.
- Inconsistent rule enforcement.
- Inviting people with no interest in the group’s purpose.
- Letting descriptions/rules go outdated.
- Failing to post fresh content.
---
Conclusion
When you understand privacy options, pick the right settings, and actively manage engagement, it’s easy to create a private group in Facebook that thrives. Apply these steps from initial setup to ongoing moderation to build a safe, active, and purpose-driven community.
Ready to start your own? Log into Facebook and launch your private group today to connect with the right people in a secure space.