Set a Facebook Web Address for Your Business Page
Learn how to set a custom Facebook web address for your business page to boost branding, SEO, and user experience with clear step-by-step tips.
Understanding a Facebook Web Address for Your Business Page
A Facebook web address for a business page—also referred to as a username or custom URL—is a unique, branded link that allows users to go directly to your page. This concise, memorable link not only improves brand consistency but is also a valuable marketing and SEO asset. By default, Facebook assigns a long, unwieldy URL with random characters, but you can replace it with a short, clean format that reflects your business name.
For example:
`facebook.com/MyBrand` appears much more professional and user-friendly than `facebook.com/pages/mybrand/123456789`.
A custom Facebook URL is important because:
- Branding: Strengthens your brand identity online.
- Marketing: Easier to print, share, and remember.
- SEO: Can improve how search engines display your brand.
- User Experience: Simple to type and recall.

---
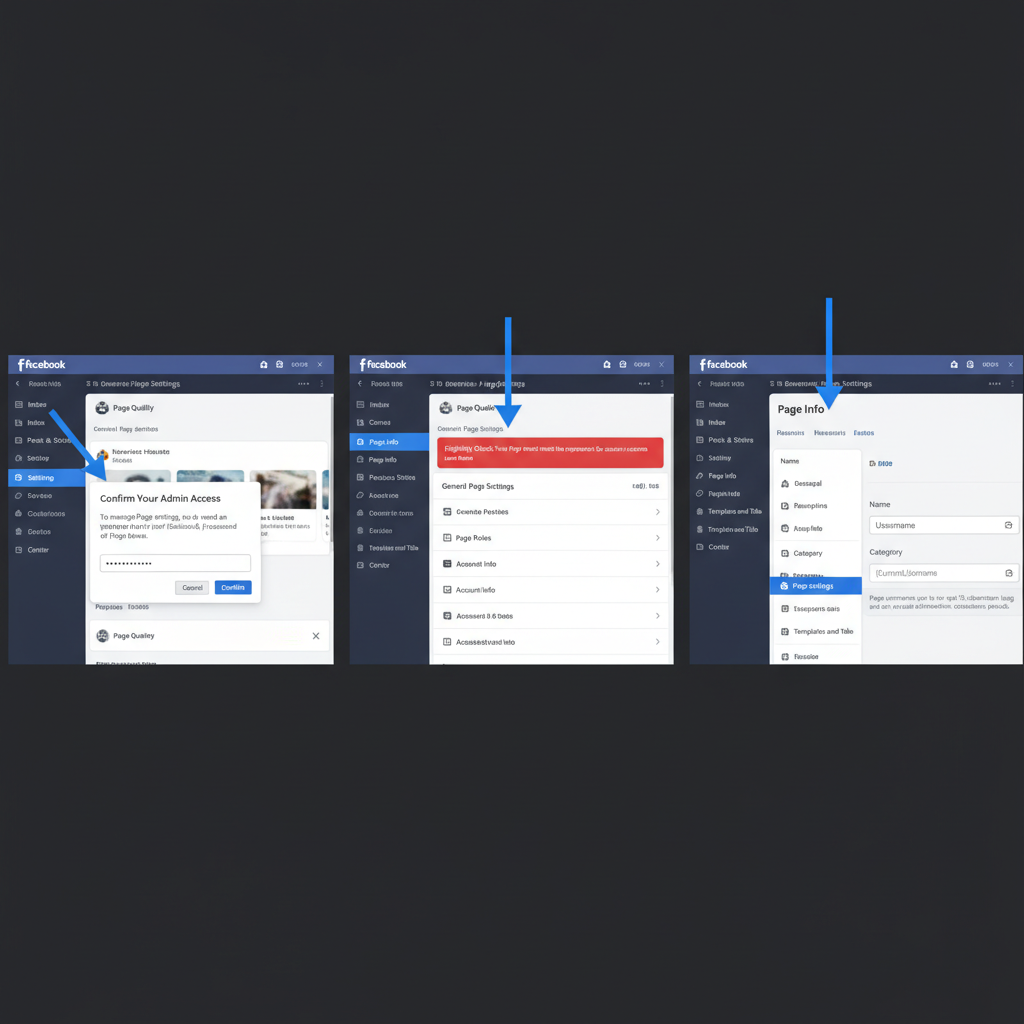
Step 1: Verify You Have Admin Access
Only page admins can create or edit a Facebook web address. To check your role:
- Visit your Facebook page.
- Click Settings.
- Navigate to Page Roles—confirm that your account shows "Admin."
If you aren’t an admin, request this role from the current page manager before proceeding.
---
Step 2: Check Facebook's Eligibility Requirements
Before selecting a username, ensure your page meets Facebook’s criteria:
- Minimum Page Likes: Some pages require at least 25 likes (this may vary).
- Account Age: Your page might need to be active for a set period.
- Page Verification: Not always required but can prevent restrictions.
- Clean Record: Avoid recent violations of Facebook’s terms.
If you don’t meet these benchmarks, focus on growing your page and maintaining compliance before attempting to set a custom URL.
---
Step 3: Navigating to the Username Settings
To set your Facebook web address:
- Log in to your Facebook account.
- Go to your business page.
- In the left sidebar, click Settings.
- Under Page Info, locate the Username field.
Here you can enter and check your preferred custom URL.
---
Step 4: Choosing a Short, Memorable, Brand-Consistent Username
Guidelines for picking an effective username:
- Distinctive: Avoid generic terms.
- Short: Aim for under 20 characters.
- Aligned with Branding: Match other social media handles where possible.
- Easy to Spell: Minimize the potential for typos.
Example for “Bella’s Bakery”:
`BellasBakery` or `BellasBakeryNY` are both solid options.
| Username Idea | Pros | Cons |
|---|---|---|
| BellasBakery | Exact brand match, simple, short | May be taken by others |
| BellasBakeryNY | Location-specific, often available | Restricts brand to one location |
| Bellas_Bakery | Readable with underscore | Some users omit underscores |
---
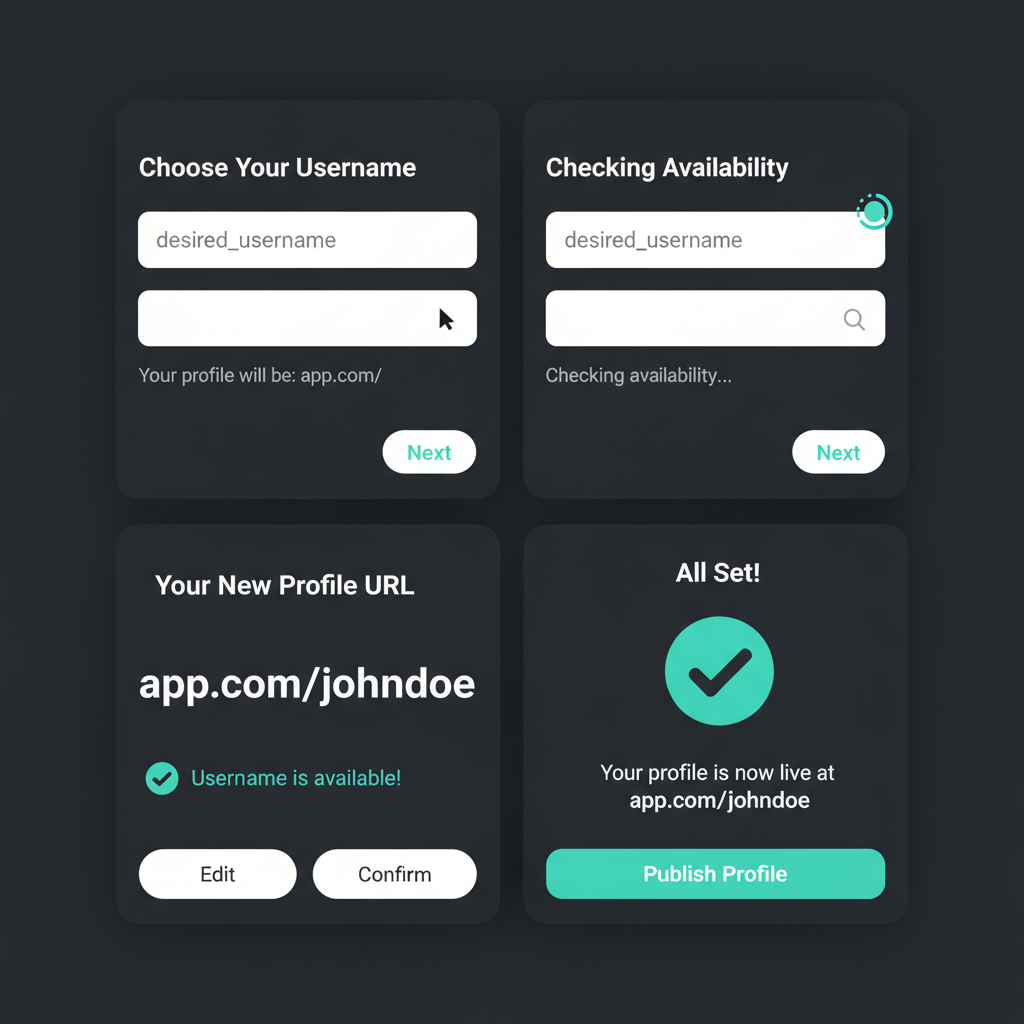
Step 5: Confirm Availability and Compliance with Guidelines
Facebook usernames must:
- Use only letters, numbers, and optional periods (`.`).
- Avoid infringing on trademarks or using another business’s name.
- Be unique—duplicates are not allowed.
- Steer clear of overly generic words like “pizza” alone.
Facebook’s system will tell you instantly if your chosen name is “Available” or “Not Available.”
---
Step 6: Preview Your New Facebook URL
Before saving, check your link’s format:
https://facebook.com/YourChosenUsernameEnsure:
- Correct spelling and readability.
- Proper casing for clarity, even though Facebook URLs are case-insensitive.
---
Step 7: Publish Your New Facebook Web Address
Once satisfied with your choice:
- Click Create Username or Save Changes.
- Wait for Facebook to confirm the new URL.
- Test in a private browser window to ensure functionality.
You now have a shareable, professional Facebook web address for your business.
---
Step 8: Announce Your URL to Customers and Partners
Promote the change to maximize its impact:
- Post about it on your Facebook timeline.
- Include it in your email newsletters.
- Share with partners and collaborators.
- Cross-post on your other social media accounts.
---
Step 9: Update All Marketing Materials
Keep your branding consistent by updating:
- Website: Include your Facebook link in contact info and footers.
- Email Signature: Add a clickable Facebook icon or URL.
- Print Materials: Add to business cards, brochures, flyers.
- Online Directories: Update your listing on Yelp, Google Business Profile, LinkedIn Company Page.
---
Step 10: Troubleshooting if Your Preferred Address Is Taken
If your desired username isn’t available, try:
- Adding your location: e.g., `MyBrandLA`.
- Adding your service/product: e.g., `MyBrandBakery`.
- Using punctuation: `My.Brand` or `My_Brand`.
- Selecting a creative variant: perhaps a tagline.
The key is preserving recognizability.
---
Step 11: Rebranding and Changing Your Facebook URL Later
To change your web address after a rebrand:
- Go to Settings → Page Info → Username.
- Enter a new name, check availability.
- Save changes (verification may be needed).
Tip: Avoid frequent changes to prevent audience confusion.
---
Step 12: Best Practices for Consistency Across Platforms
For a cohesive online identity:
- Match formats: Keep usernames uniform across platforms like Instagram, X (Twitter), LinkedIn, TikTok.
- Secure early: Reserve handles when launching your brand.
- Keep it simple: Stick to alphanumeric characters.
- Audit regularly: Ensure your links are all current.
---
Summary and Next Steps
Creating a Facebook web address for a business page is a straightforward yet impactful branding move. It boosts discoverability, reflects professionalism, and creates a unified online presence. By following each step—from meeting Facebook’s requirements to making your announcement—you’ll set a foundation for better engagement and memorable customer interactions.
Take action today: log in as an admin, secure your custom business page URL, and update your audience—because a strong digital identity starts with a clean, recognizable web address.