How to Post a Picture on Twitter Step by Step
Learn how to post a picture on Twitter step by step, including image upload, alt text for accessibility, and tips for optimizing your tweet.

How to Post a Picture on Twitter Step by Step
If you’ve ever asked yourself, "How do I post a pic on Twitter?", this step-by-step guide will show you exactly how. Posting photos is an excellent way to enhance engagement, share moments visually, and build your online presence. Whether you’re a beginner or simply need a refresher, you’ll learn how to log in, upload the right image format, add alt text for accessibility, and follow best practices for privacy and optimization — so your tweet stands out in the feed.
---
Step 1: Create or Log in to Your Twitter Account
Before posting any picture, you need a Twitter account.
- New users: Visit twitter.com or download the Twitter app from your device's app store. Click "Sign up" and follow the prompts.
- Existing users: Enter your username, email, or phone, and password to log in. You can log in on desktop or mobile.
Always protect your account credentials to keep your profile secure.
---
Step 2: Navigate to the Home Timeline or Your Profile Page
Once signed in, you’ll land on your Home timeline, where you can see tweets from accounts you follow.
You can post a picture from:
- Home timeline: Usually the most common place to share updates.
- Profile page: Useful if you’re reviewing your existing tweets or want to post directly from your own feed.
---
Step 3: Click or Tap the "Post" / "Tweet" Button
On desktop, look for the "Tweet" button labeled with a feather icon in the left navigation menu.
On mobile, tap the + or feather icon at the bottom right corner.
This opens the tweet composition box where you can type text and add media.
---
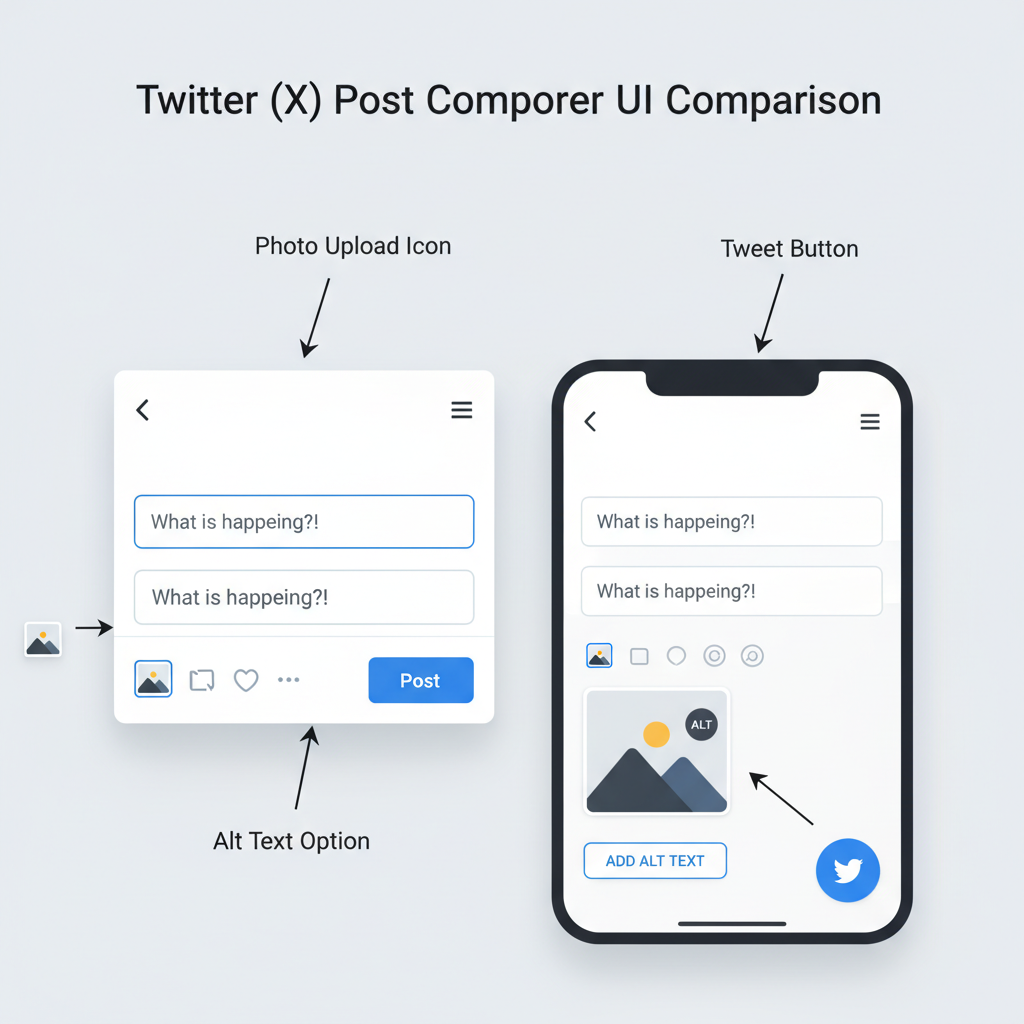
Step 4: Select the Photo Upload Option
Within the tweet compose window:
- Click (desktop) or Tap (mobile) the camera or image icon below the text field.
- This allows you to browse your device’s gallery or take a photo directly.
On some devices, you'll see options to:
- Attach GIFs
- Record short videos
- Upload multiple images (up to 4 per tweet)
---
Step 5: Choose a Photo from Your Device or Take a New One
Once you click the upload icon, you can:
- Select a photo from your gallery.
- Take a new photo using your device’s camera in real-time.
Make sure your file is in a format Twitter supports (JPEG, PNG) and under the size limit (currently 5MB per image).
---
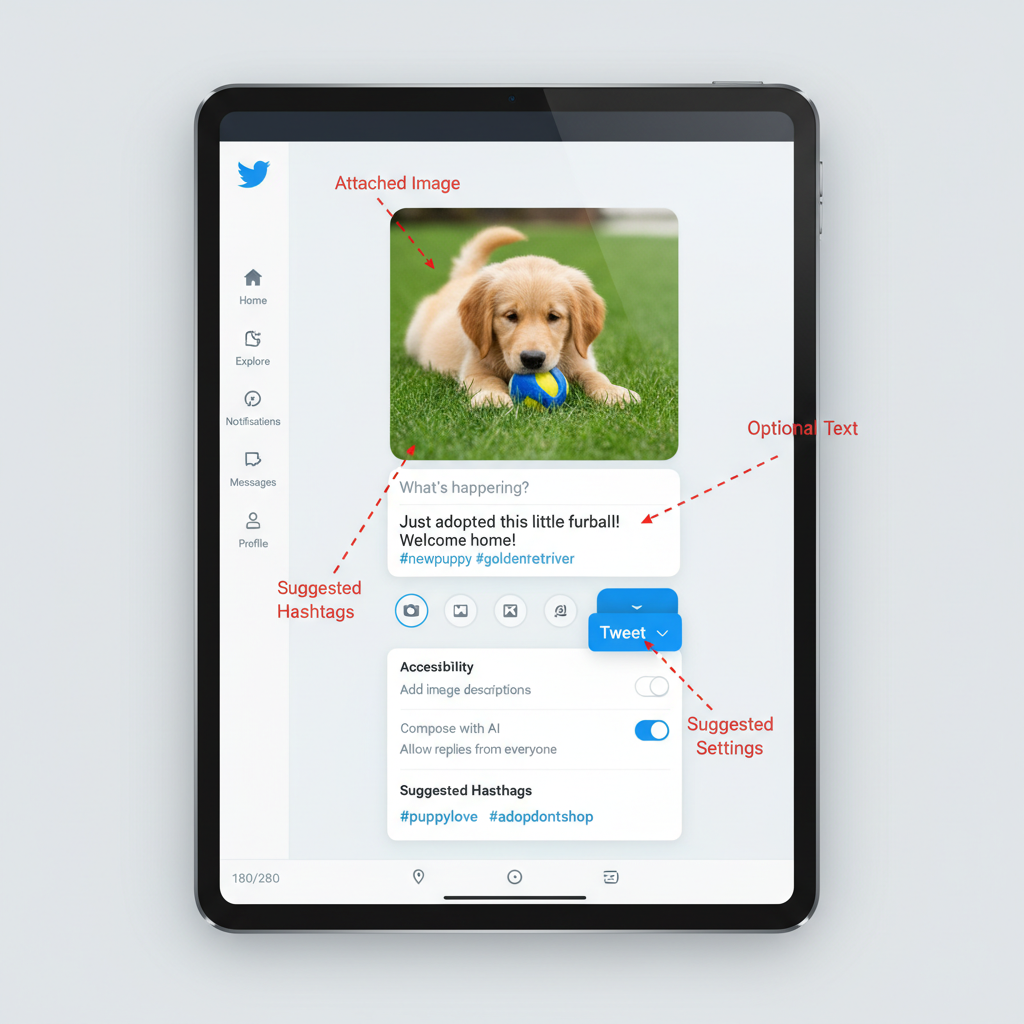
Step 6: Add Accompanying Text, Hashtags, or Mentions (Optional)
You can pair your image with text to boost engagement. For example:
- Hashtags: `#NaturePhotography` or `#EventName`.
- Mentions: Tag other users with `@username`.
Keep the text concise and relevant — it should complement the image rather than overshadow it.
---
Step 7: Use Alt Text for Accessibility
Twitter lets you add alt text (alternative text descriptions) for each image. This improves accessibility for visually impaired users.
Steps to add alt text:
- After selecting your image, look for the "Add description" link (desktop), or tap "Add description" (mobile).
- Enter a brief but clear description, such as “Golden retriever playing in a park.”
Alt text tips:
- Keep it under 420 characters
- Be descriptive, yet concise
- Avoid generic terms like "image" or "photo"
---
Step 8: Preview the Tweet with Photo
Before posting:
- Check the thumbnail displayed in the compose box.
- If it looks cropped or low-quality, consider re-uploading or editing.
Previewing ensures your picture appears as intended in users’ feeds.
---
Step 9: Click or Tap "Tweet" to Publish
Once you’re satisfied:
- Click the Tweet button (desktop) or tap it (mobile).
- Your post will be published immediately, and followers can like, retweet, or reply.
---
Step 10: Check Your Timeline to Verify
Go to your profile or home feed to make sure:
- The image renders correctly and is visible.
- Any hashtags or mentions appear as expected.
- There are no typos or formatting issues.
---
Tips for Optimal Photo Size and Resolution on Twitter
Twitter automatically compresses images, so starting with high-quality files ensures clarity after upload.
| Image Type | Recommended Dimensions | Format |
|---|---|---|
| Single Image | 1200 x 675 pixels | JPEG or PNG |
| Multiple Images | Varies; similar aspect ratio preferred | JPEG or PNG |
| Profile Banner | 1500 x 500 pixels | JPEG or PNG |
Extra tips:
- Avoid overly text-heavy images — text may become unreadable after compression.
- Bright, high-contrast visuals tend to attract more engagement.

---
Privacy and Content Guidelines to Follow
Twitter has strict policies about what can be posted:
- Respect Copyright: Only share images you own or have permission to use.
- No Sensitive Content without Warning: Use the "Mark media as sensitive" setting if applicable.
- Avoid Sharing Personal IDs: Don’t post private addresses, phone numbers, or identification details.
- Follow Community Standards: Avoid hateful imagery or any content violating Twitter Rules.
Pro tip: If you want more control, set your account to private in Settings & Privacy so only approved followers can see your posts.
---
Summary
Posting a picture on Twitter is quick, easy, and impactful when done right. From logging in and selecting the correct image to adding meaningful captions and alt text, every step you take improves engagement and accessibility. By following image size guidelines and respecting privacy rules, your visuals will look professional and help build your brand or personal presence. Start applying these tips today and share your best moments on Twitter with confidence.