Step-by-Step Guide to Add Photo to Instagram Story
Learn how to add a photo to your Instagram Story with step-by-step instructions, customization options, and tips to boost engagement and reach.
Step-by-Step Guide to Add Photo to Instagram Story
Instagram Stories are one of the platform’s most powerful tools for sharing quick, engaging content. Whether you want to broadcast a special moment, promote your brand, or simply keep friends updated, knowing how to add photo to Instagram Story ensures you can share high-quality visuals with maximum impact. This guide offers a clear, step-by-step process so you can master the art of photo storytelling on Instagram.

---
Open the Instagram App and Access the Story Creation Tool
To begin, make sure your Instagram app is downloaded and updated to the latest version for all the newest features.
- Open Instagram — Tap the purple-pink Instagram icon on your device.
- Swipe Right from the Home Feed — Instantly enter Story mode.
- Tap Your Profile Picture at the Top — The “Your Story” circle opens the Story creation tool.
Either method takes you to the Story camera and editing interface where you can start crafting your visual.
---
Choose the Camera or Photo Library Option
Once in the Story interface, decide on your photo source:
- Camera — Capture a fresh photo by pressing the shutter button.
- Photo Library (Gallery) — Swipe up or tap the gallery icon to browse your existing images.
Select based on whether you’re sharing a live moment or revisiting a past memory.

---
Select a Single Photo from Your Gallery or Take a New Picture
From Your Gallery:
- Scroll through the latest images.
- Tap the desired photo.
- Continue to editing or tap Next.
Taking a New Photo:
- Frame your subject within the display.
- Tap the circle shutter button.
- Check lighting and sharpness before continuing.
---
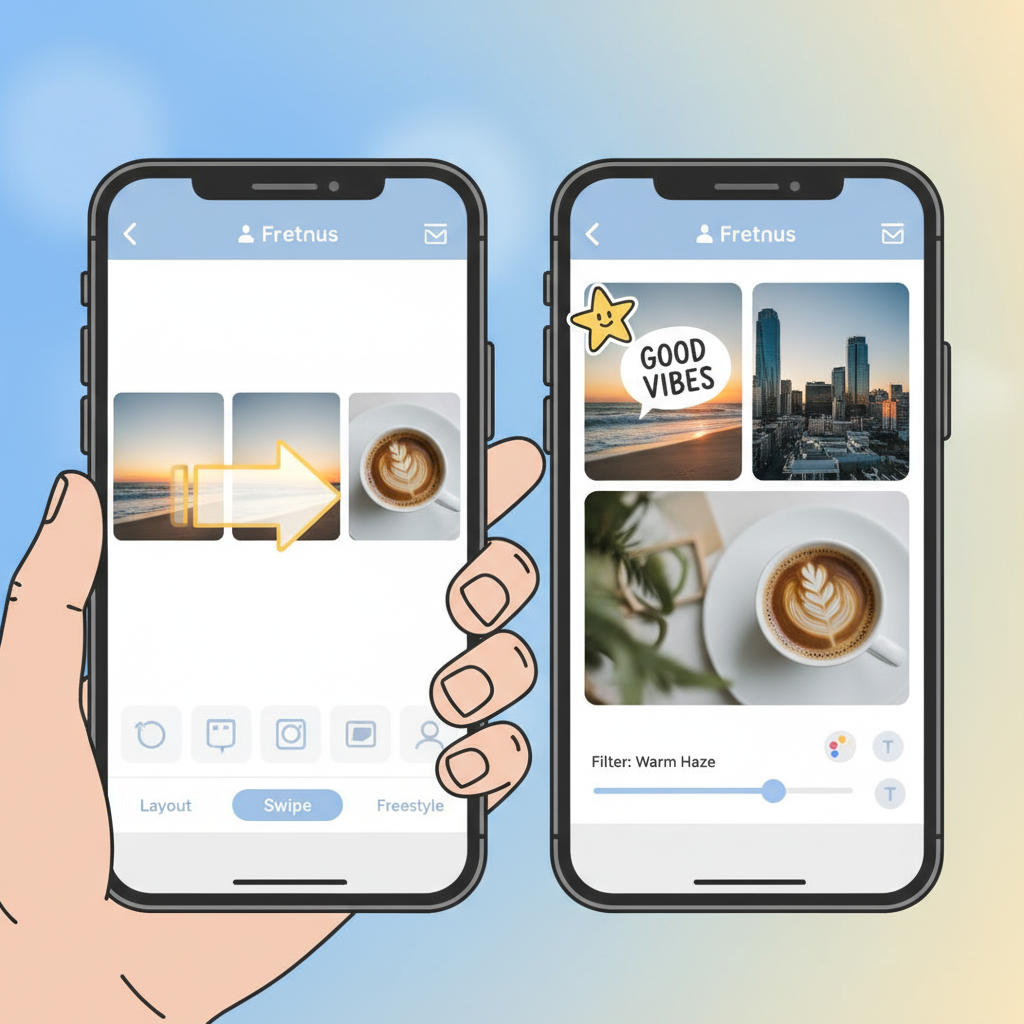
Use Swipe or Layout Features to Add Multiple Photos
Instagram offers creative formats for sharing more than one image:
- Layout Mode — Swipe to “Layout” for multiple photos in one frame.
- Multiple Slides — Add photos sequentially in separate story screens.
Example:
| Feature | How It Works | Benefits |
|---|---|---|
| Layout | Choose a collage template and fill each slot | Creative, space-efficient design |
| Multiple Slides | Upload images one by one on separate screens | Allows linear storytelling |
---
Customize with Stickers, Text, and Filters
Personalization can dramatically improve engagement:
- Stickers — Tap the sticker icon to add emojis, GIFs, polls, or countdowns.
- Text — Tap ‘Aa’ to include captions, hashtags, or quotes.
- Filters — Swipe left or right to shift the mood and tone of your photo.
Pro Tip: Businesses benefit from using consistent colors, branding, and fonts to build recognition.
---
Tag Accounts or Locations for Better Reach
Boost your Story’s discoverability:
- @Mentions — Tag friends, creators, or collaborators.
- Location Tags — Add geographic stickers to help locals find your content.
Both techniques can increase views, comments, and interactions, and may feature your Story on the Explore page.

---
Adjust Privacy Settings Before Posting
Protect your content and control visibility:
- Tap the Settings icon in Story view.
- Use Hide Story From to block specific viewers.
- Enable Close Friends mode for a select audience.
Tailoring privacy ensures your Story is seen by your intended community.
---
Post and Review Your Story
When your Story is ready:
- Tap Your Story to share with all followers.
- Tap Close Friends for limited visibility.
After posting:
- View your Story to confirm formatting and content.
- Swipe up to see view statistics and engagement levels.
---
Save Stories to Highlights for Permanent Placement
Stories vanish after 24 hours unless saved to Highlights:
- Open your active Story before it expires.
- Tap the Highlight icon.
- Choose an existing Highlight or start a new one.
Highlights keep valuable content accessible on your profile at any time.
---
Troubleshoot Common Story Photo Issues
Sometimes, technical hiccups occur:
| Problem | Possible Cause | Solution |
|---|---|---|
| Upload Error | Weak internet connectivity | Switch to strong Wi-Fi or mobile data |
| Quality Loss | Image compression during upload | Use Instagram’s editing tools instead of screenshots |
| Photo Missing | Temporary app glitch | Restart app, clear cache, update software |
---
Tips for Creative Composition and Storytelling
Enhance visual appeal and audience interest:
- Rule of Thirds — Position subjects off-center for balance.
- Consistent Filters — Build a recognizable style.
- Narrative Flow — Sequence your images logically.
- Negative Space — Avoid visual clutter.
- Mixed Media — Combine images with video and text.
Effective composition makes your Story memorable and share-worthy.
---
Summary and Next Steps
Mastering how to add photo to Instagram Story enables you to capture attention, share messages effectively, and strengthen your brand or personal profile. With careful selection, editing, tagging, and use of creative features, you can craft Stories that your followers eagerly anticipate.
Ready to engage your audience? Open Instagram now, follow these steps, and start creating Stories that inspire conversation and connection.