Step-by-Step Guide to Add Photos on Instagram Stories
Learn step-by-step how to add single or multiple photos to Instagram Stories, use stickers and effects, and enhance visuals for better engagement.
Step-by-Step Guide to Add Photos on Instagram Stories
Instagram Stories is one of the most engaging features on the platform, allowing you to share moments that disappear after 24 hours. Whether you're a casual user, a marketer, or a content creator, mastering how to add photos on Instagram Stories is essential to building your brand, showcasing your life, and connecting with your audience in an authentic, visually appealing way.
This comprehensive guide covers everything from opening the Stories camera to using layout and sticker tools, adding multiple images, enhancing visuals with effects, and optimizing stories for maximum reach. Follow these practical steps to make every Instagram Story stand out.

---
Open the Instagram App and Access the Stories Camera
To start, make sure you have the latest version of Instagram installed for full feature access.
- Open the Instagram app on your mobile device.
- From your Home Feed, tap your profile picture in the top-left corner or swipe right anywhere on the feed.
- This opens the Stories camera interface.
> Tip: If you have an app update pending, some features like music or Layout may not appear. Always update your app before starting.
---
Choose Between Capturing a New Photo or Selecting From Camera Roll
Inside the Stories camera, you can:
- Capture a New Photo
- Tap the circular shutter button to take a photo directly.
- Select From Camera Roll
- Swipe up from the bottom or tap the small thumbnail in the lower-left corner to open your gallery.
Switch between front and rear cameras using the flip icon, and adjust flash settings to improve your shots.
---
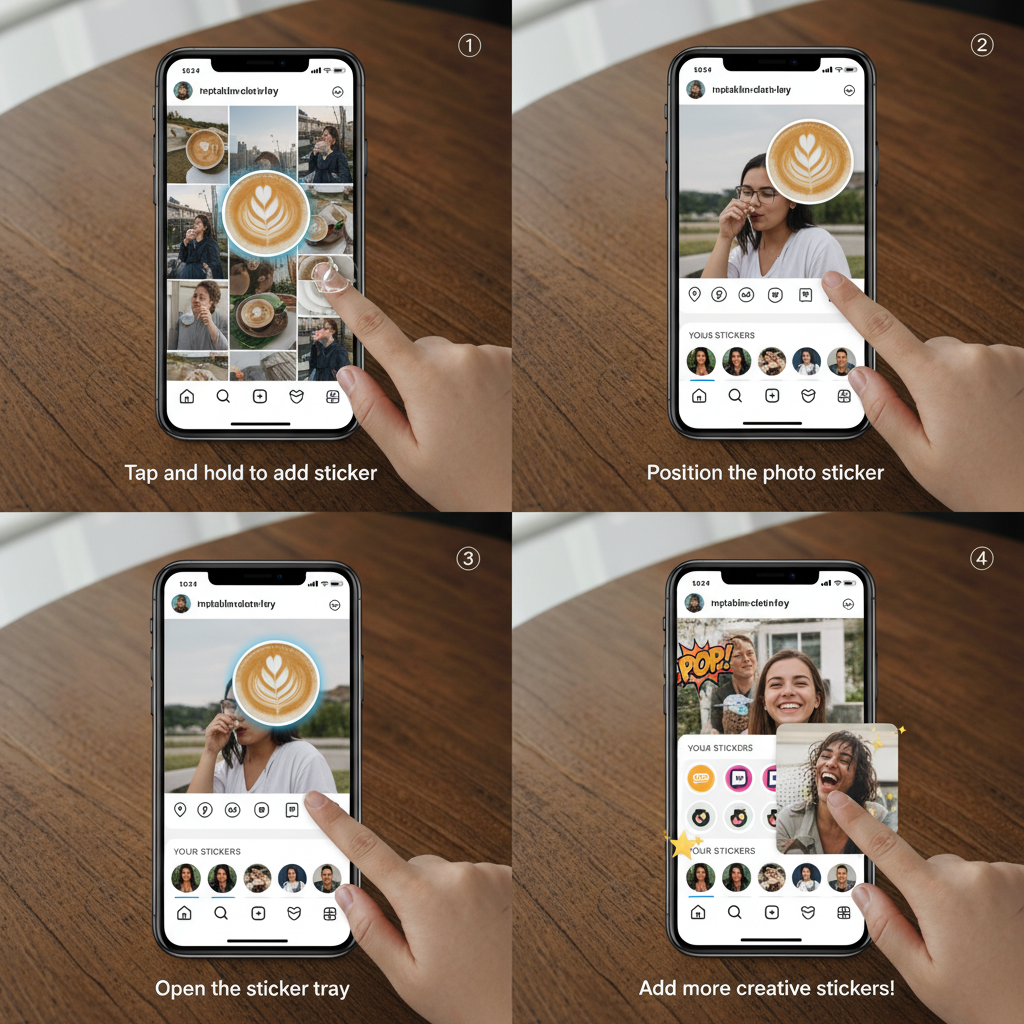
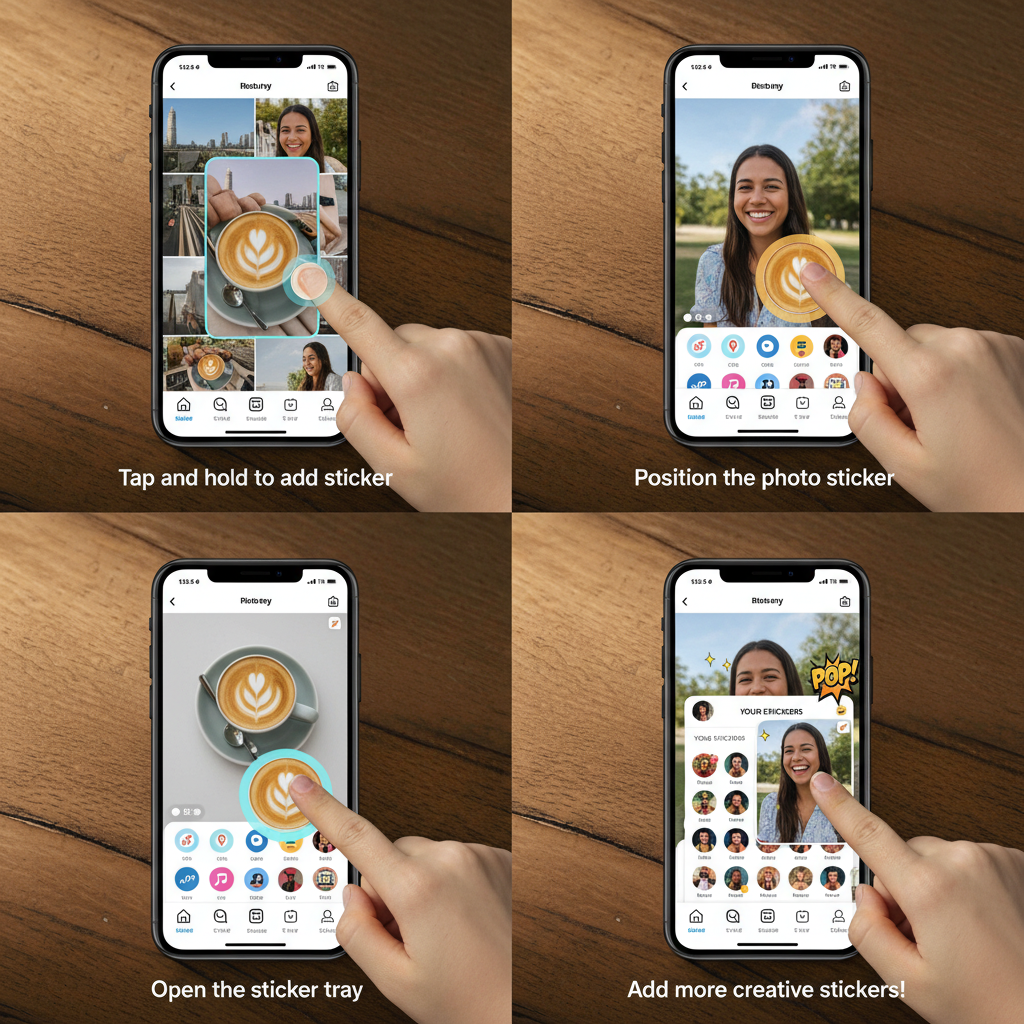
Add a Single Photo to Your Instagram Story (Tap + Hold Method)
Precise placement makes your story look professional. Try the tap + hold method:
- Select your desired image.
- Tap and hold the center of the photo to drag it.
- Arrange it before adding stickers, text, or other overlays.
This method provides much greater control than quick-tapping.
---
Add Multiple Photos to One Story Using Layout or Sticker Tool
If you want multiple images in a single frame, use:
Using Layout Feature
- Swipe through camera modes until you find Layout.
- Select a grid style (2, 3, or 4 photos).
- Capture or place images into each grid slot.
Using Photo Sticker Tool
- Create a base background (photo or solid color).
- Tap the sticker icon (square smiley face).
- Select the photo sticker and choose images from your gallery.
- Position them freely.

---
Use the Photo Sticker to Overlay Images for Creative Effects
The photo sticker tool isn't just for collages — it adds depth and personalization:
- Highlight specific objects or products.
- Add branding elements like logos.
- Position multiple sticker images freely across your frame.
This technique makes your story dynamic and eye-catching.
---
Arrange and Resize Images for Best Visual Impact
Perfect placement matters:
- Pinch to resize.
- Rotate with two fingers to change orientation.
- Drag to reposition.
Apply composition principles like the rule of thirds for balanced, aesthetically pleasing visuals.
---
Add Text, Stickers, GIFs, and Music for Better Engagement
Interactive elements boost viewer retention:
- Text Tool: Tap “Aa” for captions, quotes, or titles.
- Poll Stickers: Increase direct engagement.
- GIFs: Add motion and fun.
- Music Sticker: Search and overlay songs onto your story.
Combining multiple engagement features can lead to higher audience interaction rates.
---
Use Filters and Effects to Enhance Photos Before Posting
Before posting, experiment with:
- Swiping left/right to apply filters.
- Tapping the smiley-star icon to use AR effects.
Well-chosen effects can maintain your brand’s visual identity or create mood for the story.
---
Tag Locations, Accounts, and Use Hashtags for Discoverability
Relevant tags can increase reach beyond your followers.
| Tag Type | Purpose | Example |
|---|---|---|
| Location | Appear in local and venue-specific feeds | #NewYork |
| Account | Notify and connect with tagged users | @yourfriend |
| Hashtag | Reach topical audiences | #FoodieLife |
Use a mix of these tags for maximum discoverability.
---
Save Your Story as Highlights for Long-Term Visibility
Stories naturally disappear after 24 hours. To keep them visible:
- View your story.
- Tap Highlight at the bottom.
- Add to existing highlights or create a new one.
Highlights act as evergreen content hubs on your profile.
---
Check Story View Insights to Understand Audience Engagement
Reviewing insights improves content strategy:
- Tap the bottom-left view count to check who watched.
- Track navigation metrics like taps forward/backward and exits.
- Business accounts can access deeper stats (impressions, reach, and interactions).
---
Troubleshoot Common Upload Issues (Format, Size, Connectivity)
Common problems and solutions:
- File Format: Use JPG or PNG.
- Size & Dimensions: Optimal ratio is 1080px × 1920px.
- Connectivity: Switch to stable Wi-Fi if needed.
- App Cache: Clear cache in settings.
---
Final Tips
- Explore Instagram’s creative tools — they evolve rapidly.
- Sequence frames to tell multi-part stories.
- Keep colors, fonts, and filters consistent to build a recognizable style.
By following this step-by-step guide, you now know exactly how to add photos on Instagram Stories effectively. Use these tips to craft engaging, visually appealing content that resonates with viewers.
Ready to captivate your audience? Start experimenting with these techniques today and make your Instagram Stories unforgettable.