Step-by-Step Guide to Add Someone to Facebook Business Manag
Learn how to add someone to Facebook Business Manager with step-by-step instructions, role assignments, and best practices for secure account access.

Step-by-Step Guide to Add Someone to Facebook Business Manager
If you're managing multiple Facebook Pages, ad accounts, or collaborative campaigns, Facebook Business Manager is your all-in-one hub for keeping everything organized and secure. One of the key admin tasks is knowing how to add someone to Facebook Business Manager — whether that’s a teammate, agency partner, or contractor — and doing it correctly to protect your assets.
This detailed tutorial walks you through prerequisites, step-by-step instructions, role assignments, best practices, troubleshooting tips, and ongoing management for effective collaboration.

---
What is Facebook Business Manager and Why Use It?
Facebook Business Manager is a free platform from Meta, designed for businesses and marketers to manage multiple Facebook Pages, ad accounts, Instagram accounts, and business assets securely in one place.
Key benefits include:
- Clear separation between personal and business Facebook activity.
- Centralized control over access to assets.
- Enhanced security through role-based permissions.
- No need to share personal logins.
Using Facebook Business Manager helps safeguard your marketing infrastructure and keeps campaigns organized.
---
Prerequisites Before Adding a Person
Before inviting someone to collaborate in your Business Manager, ensure you have:
- An active Facebook Business Manager account.
- Admin-level access to that account.
- The correct email address linked to the invitee’s Facebook account.
- Clarity on the role and permissions needed (Admin, Employee, or custom).
Pro Tip: Confirm your admin status by visiting Business Settings > Business Info.
---
How to Add Someone to Facebook Business Manager (Step-by-Step)
Adding a new person is simple once you know the navigation.
Step 1: Log Into Business Manager
- Visit business.facebook.com and log in.
- If you manage multiple businesses, select the correct one from the top menu.
Step 2: Open Business Settings
- Click the Business Settings gear icon in the left menu.
Step 3: Navigate to People
- Go to Users > People in the sidebar.
Step 4: Add the New Person
- Click Add (top right corner).
- Enter the recipient’s work email.
- Assign an appropriate role (Admin, Employee, or Custom).
Step 5: Assign Assets & Permissions
- Specify which Pages, ad accounts, or assets they can access.
- Select the necessary permission level for each.
Step 6: Send the Invitation
- Click Invite. The recipient will receive an email request to join.
---
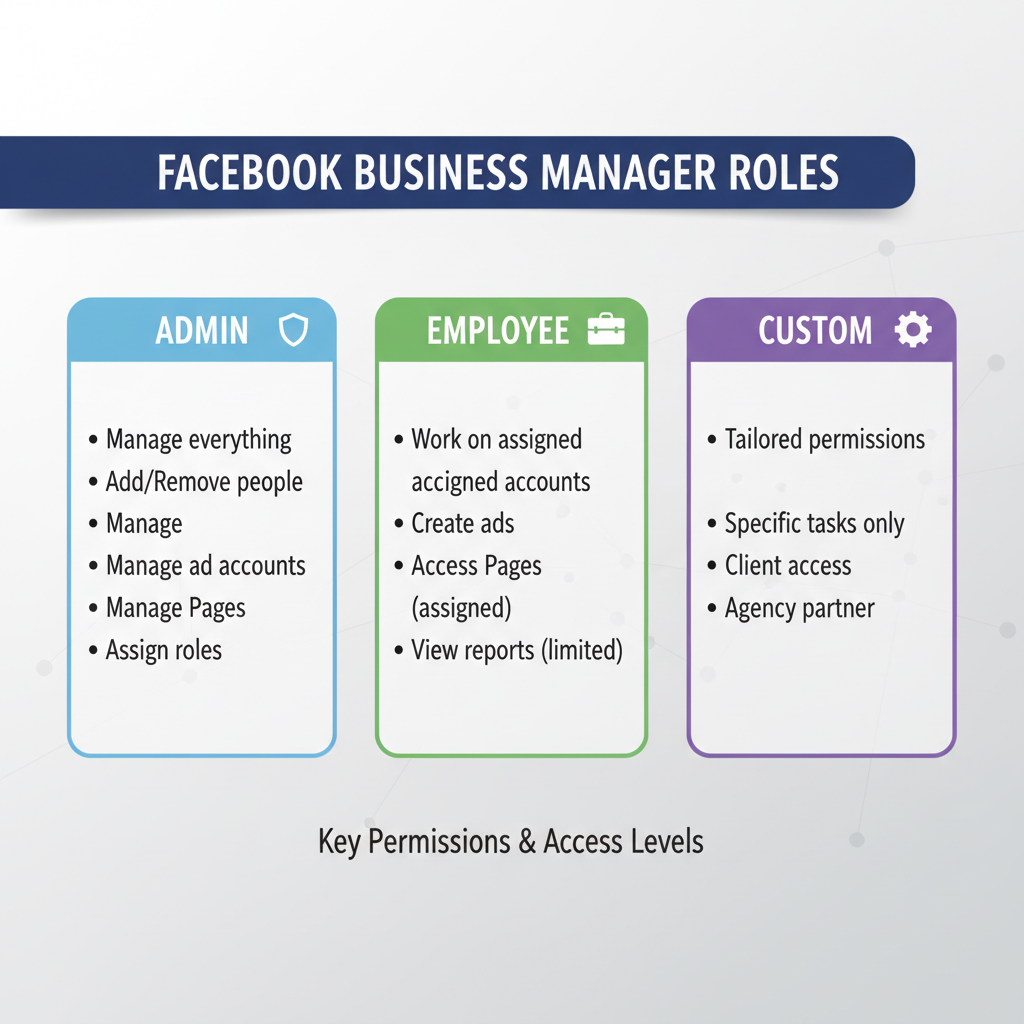
Assigning Specific Roles and Permissions
Roles determine access levels in Facebook Business Manager:
| Role | Description | Use Case |
|---|---|---|
| Admin | Full control over all settings and assets. | Business owners, senior leadership, trusted partners. |
| Employee | Access limited to assigned assets. | Content creators, customer service reps, campaign managers. |
| Custom | Customized permissions per asset. | Specialist contractors, analytics staff. |
Best Practice: Limit Admin rights to key stakeholders for maximum protection.
---
Sending and Accepting the Invitation
Sending:
After following the above steps, Facebook generates an email invite.
Accepting:
- The invitee clicks Join in the email.
- Logs into their Facebook account (linked to the email used).
- Accepts the invitation to gain access.
Note: Invitations expire within 30 days if untouched.
---
Best Practices for Secure Setup
![security]()
- Grant only the permissions needed (Principle of Least Privilege).
- Use professional work email addresses.
- Review user permissions quarterly.
- Require two-factor authentication (2FA) for all admins.
---
Troubleshooting Common Issues
| Issue | Possible Cause | Solution |
|---|---|---|
| Invite not received | Email error or spam filter | Check spelling and spam folder, resend as needed. |
| No "Add" button | Insufficient permissions | Request Admin rights from an existing Admin. |
| Invite not accepted | Email mismatch | Use the email linked to their Facebook profile. |
---
Managing and Removing People
If a team member leaves or changes roles, revoke access promptly:
- Go to Business Settings > People.
- Select the person’s name.
- Click Remove to cut off all access immediately.
---
Ongoing Security and Access Auditing
- Update roles when responsibilities change.
- Monitor Facebook’s Activity Log for suspicious actions.
- Integrate with the Security Center for alerts.
- Maintain clear asset ownership records.
---
Recap & Final Checklist
Before Adding:
- Confirm Admin status.
- Collect the correct email address.
- Define the role and permissions.
During Setup:
- Navigate to Business Settings > People.
- Assign assets and permissions.
- Send invite.
After Setup:
- Confirm acceptance.
- Test access.
- Schedule permission reviews.
---
By learning how to add someone to Facebook Business Manager using this structured process, you’ll safeguard your digital assets, foster smoother onboarding, and maintain professional control over all campaigns.
Take action: Review your current Business Manager user list today and implement any missing security best practices. This simple audit could protect your business from costly errors.