How to Boost an Instagram Post: Step-by-Step, Targeting, Budgeting, and ROI
Learn how to boost an Instagram post step-by-step, set targeting and budgets, choose Boost vs Ads Manager, and track ROI with UTMs and in-app insights.
How to Boost an Instagram Post: Step-by-Step, Targeting, Budgeting, and ROI

If you’re wondering how to boost an Instagram post to get quick, targeted reach without opening Meta Ads Manager, this guide walks you through everything: what “Boost” actually does, how to prepare your content, targeting options, budgeting, measurement, and optimizations to maximize ROI. You’ll learn when to use Boost versus Ads Manager, how to set up a promotion in minutes, and how to track performance using UTMs and in-app insights. By the end, you’ll be able to run compliant, trackable boosts with confidence and a clear plan to scale what works.
Boost vs. Ads Manager
“Boost” turns an existing post into an ad in a few taps. It’s built for simplicity and speed inside the Instagram app.
Use Boost when:
- You want fast amplification of an already-strong post.
- You don’t need complex targeting or conversion tracking.
- You want to test interest before building a full campaign.
Use Meta Ads Manager when:
- You need conversion objectives, advanced placements, or pixel-based optimization.
- You want retargeting, lookalikes, exclusions, or detailed reporting.
- You’re coordinating multiple ad sets and creative variations at scale.
| Feature | Instagram Boost | Meta Ads Manager |
|---|---|---|
| Setup Speed | Very fast, in-app | Longer, web-based |
| Objectives | Profile visits, website visits, messages | Traffic, Conversions, Sales, Leads, App, Awareness, and more |
| Targeting | Automatic or simple manual (location, age, interests) | Custom audiences, lookalikes, exclusions, detailed demographics |
| Placements | Instagram surfaces; limited control | Full control across IG/FB/Audience Network/Messenger |
| Budgeting | Daily budget + duration | Daily/lifetime budgets, dayparting, bid strategies |
| Reporting | Basic post insights | Granular breakdowns, attribution, pixel events |
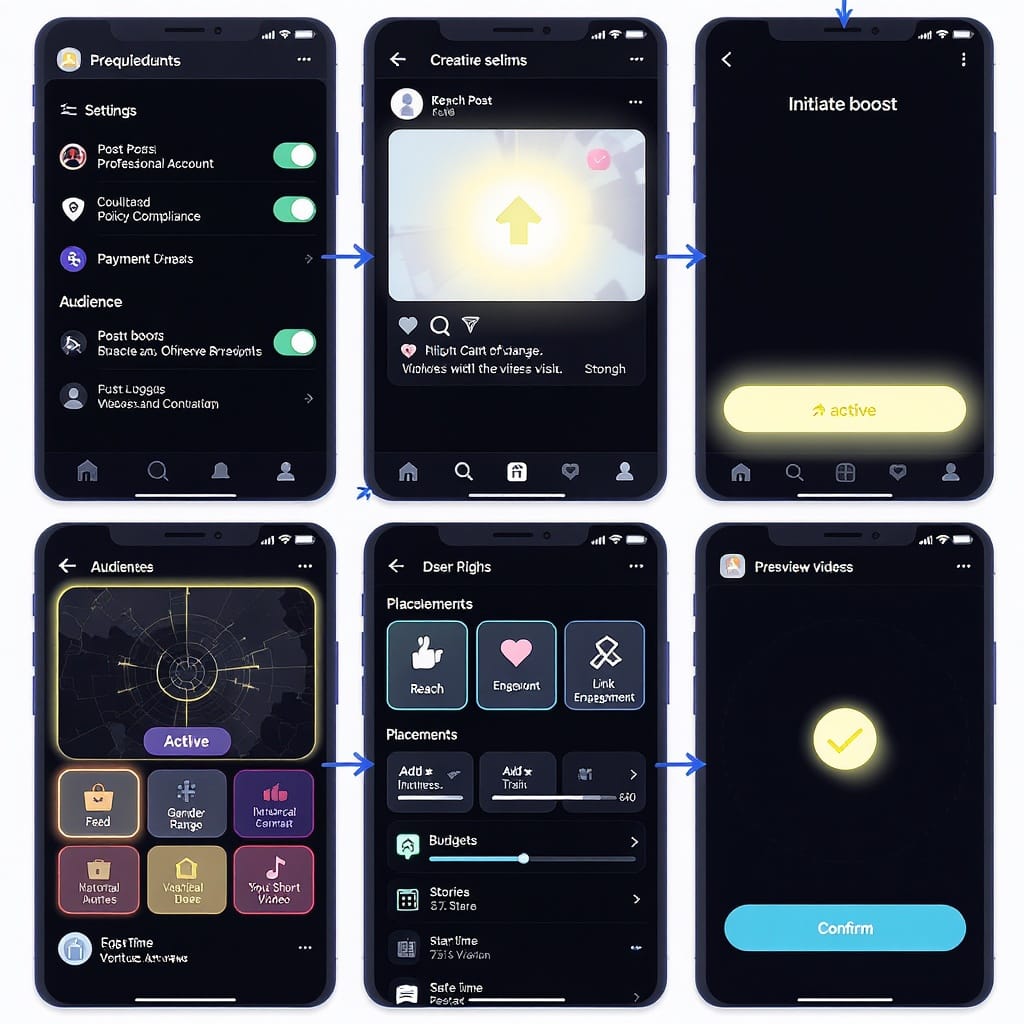
Prerequisites and Eligibility
Before you boost:
- Professional account: Switch to a Business or Creator account (Settings → Account → Switch to professional).
- Payment: Add a valid payment method in-app.
- Policy compliance: Ad content must follow Meta’s advertising policies (e.g., no misleading claims, prohibited products, discriminatory content, or references to personal attributes).
- Connected accounts: Linking your Instagram to a Facebook Page/Meta account unlocks better billing and audience options.
- Boostable posts:
- You can boost feed posts, carousels, and eligible Reels.
- You cannot boost posts with certain music rights issues, copyrighted content you don’t own, or ineligible content categories. Branded content must be properly tagged.
- Some categories (housing, employment, credit) require Special Ad Category selection with restricted targeting.
Creative Readiness
Picking the right post is half the battle. Choose content that already has above-average engagement; Boost then adds paid fuel to organic proof.
Consider:
- Captions and CTAs: Clear, action-oriented text. Put the “why” first; the “how” (link, button) next.
- Reels vs. Photos: Reels often deliver low CPMs and high reach; carousels can deliver strong engagement. Test both.
- Specs and safe zones:
- Square: 1080×1080 (1:1)
- Portrait: 1080×1350 (4:5) for feed
- Full-screen vertical: 1080×1920 (9:16) for Stories/Reels
- Video: MP4/MOV, recommended under 4 GB, Reels up to 90s work well
- Keep key text and logos away from edges; avoid heavy text overlays.
- Social proof: Comments, likes, and shares on the original post carry over, adding credibility.
Step-by-Step: How to Boost an Instagram Post
- Open the Instagram app and go to your profile.
- Pick a post (photo, carousel, or eligible Reel) and tap Boost post.
- Choose your goal:
- More profile visits
- More website visits (enter URL; add UTMs—see below)
- More messages (Instagram or WhatsApp)
- Select your CTA button:
- Learn More, Shop Now, Contact Us, Sign Up, Call Now, Get Directions, Send Message, etc.
- Audience:
- Automatic (people similar to your followers) or create your own with location, age, and interests.
- Duration and budget:
- Set daily spend and number of days.
- Review placements and preview (feed, Stories, Reels where eligible).
- Confirm payment and submit for review.
Tip: If website visits are your goal, add UTM tracking to measure post-click performance in analytics.
https://example.com/?utm_source=instagram&utm_medium=boost&utm_campaign=spring_sale&utm_content=post123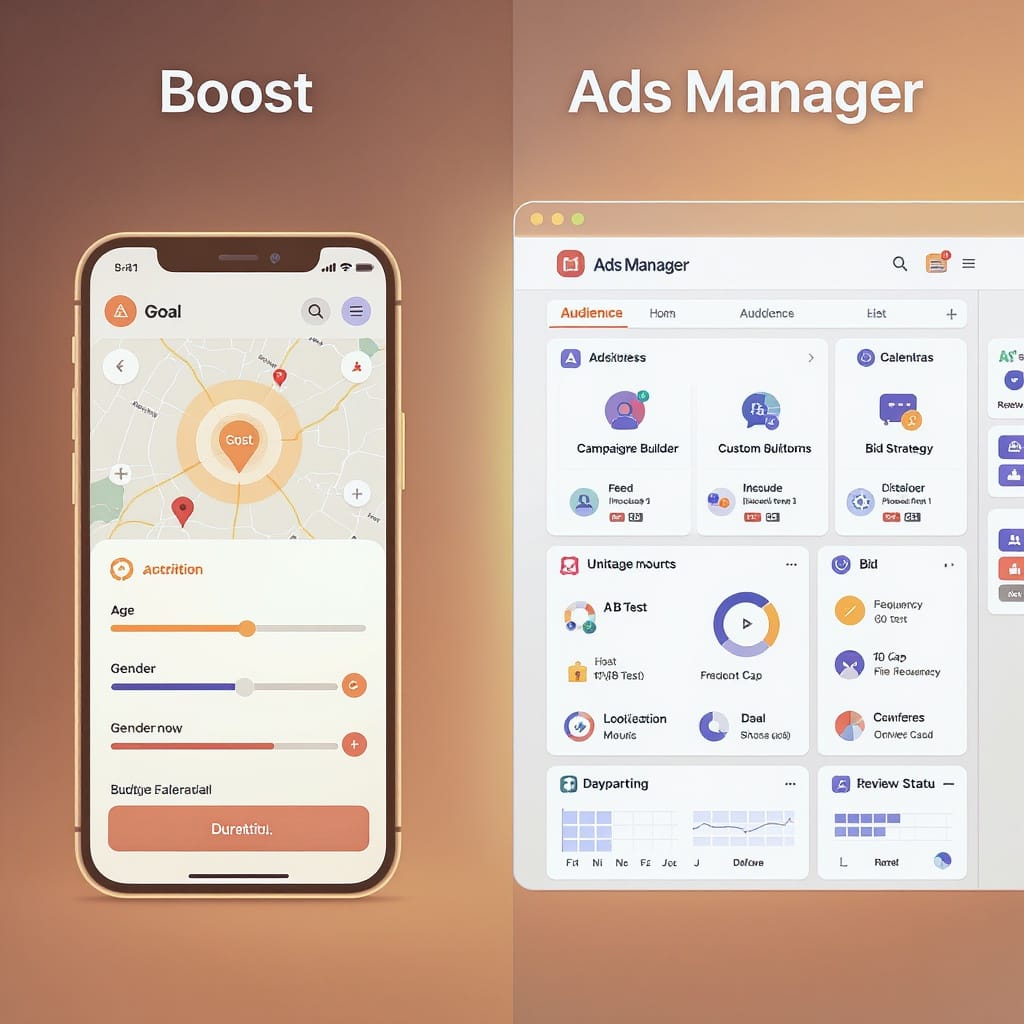
Audience Targeting Deep Dive
- Automatic: Great starting point; Instagram finds people like your followers.
- Manual:
- Locations: Countries, regions, cities, or a radius.
- Age/Gender: Basic demographics; note category restrictions may limit options.
- Interests: Choose themes related to your offer (e.g., “running,” “fitness apparel”).
- Saved audiences: You can save manual audiences for reuse in future boosts.
- Exclusions and advanced: In-app Boost has limited exclusions. For custom audiences (site visitors, purchasers) or lookalikes and precise exclusions, use Ads Manager.
Pro tip: Build one focused audience per boost to learn faster. Avoid stuffing too many interests into a single audience.
Budgeting and Scheduling
How much to spend depends on your market and goals, but these guardrails help:
- Starter daily budgets:
- Local SMB: $5–$20/day
- DTC brand: $20–$100/day
- Enterprise test: $100–$300/day
- Flight length:
- Minimum 3–7 days to stabilize delivery and collect enough data.
- Pacing:
- Boost uses automatic pacing; you cannot daypart. If timing matters, start boosts when your audience is typically online.
- Best times to boost:
- Launch early in the week and during your peak engagement windows (check Insights → Audience → Most active times).
- Scaling:
- If results are strong, increase budget gradually (e.g., 20–30% increments) to avoid volatility.
Estimate forecast with a simple CPM model:
Estimated Impressions = Budget / (CPM / 1000)
Example: $50 budget, $10 CPM → 5,000 impressions
Measuring Performance
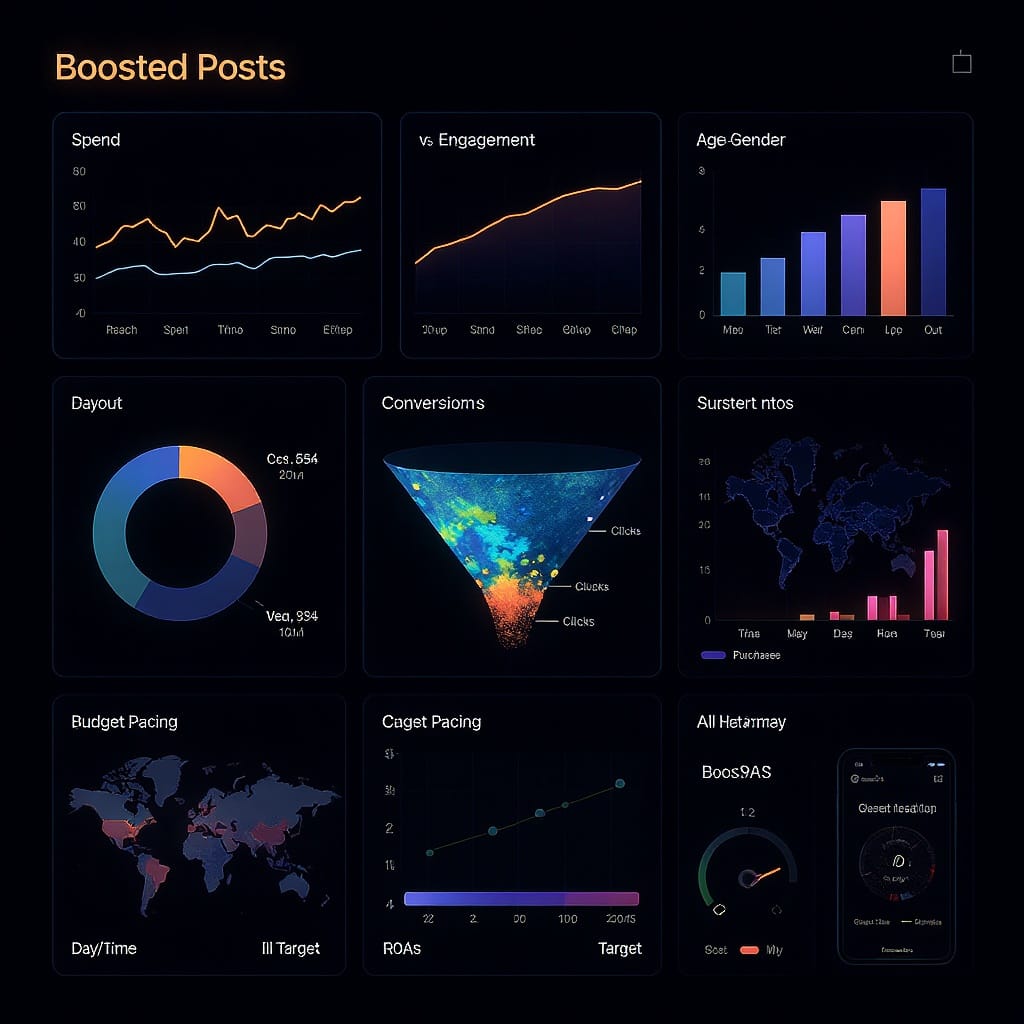
Track both in-app metrics and off-platform outcomes (via UTMs/analytics).
| Metric | What it Means | Why it Matters |
|---|---|---|
| Reach | Unique accounts that saw your ad | Audience scale and uniqueness |
| Impressions | Total views (includes repeats) | Delivery volume; used for CPM |
| CTR | Clicks ÷ Impressions | Creative/audience relevance |
| CPC | Cost per click | Traffic efficiency |
| CPM | Cost per 1,000 impressions | Inventory cost; benchmark vs. norms |
| Profile actions | Visits, follows, taps | Upper-funnel interest |
| Messages | Conversations started | Lead/prospect intent |
Interpreting results:
- High CPM, low reach: Narrow audience, competitive inventory, or low-quality creative.
- High CTR, poor conversions: Landing page friction; mismatched promise vs. page.
- Low CTR: Refresh creative, tighten targeting, or clarify CTA.
Optimization and Testing
Boost doesn’t have native multivariate testing, but you can still test methodically:
- A/B testing approach:
- Duplicate boosts with one variable changed: creative, caption, CTA, audience, or placement emphasis (e.g., Reel vs. photo).
- Run for the same timeframe and budget.
- Mid-flight tweaks:
- Edit budget/duration; small increments minimize disruption.
- Update audience if performance stalls.
- Pause underperformers:
- If CPC/CPM is trending up and CTR down after 48–72 hours, consider pausing and reallocating.
- Scale winners:
- Increase budgets gradually and expand audiences outward from what’s working (e.g., add adjacent interests).
- Creative rotation:
- Swap in fresh visuals every 7–14 days to prevent fatigue.
Troubleshooting and Compliance
Common issues and fixes:
- Disapproval:
- Review policy violations (e.g., restricted products, sensational claims, personal attributes like “people like you have diabetes”).
- Adjust copy/creative and resubmit. For political/issue ads, complete authorization and add disclaimers.
- Limited reach or slow spend:
- Increase budget, broaden audience (age/interests/location), or use Automatic audience.
- Use higher-contrast visuals; move key value to the first 3 seconds for Reels.
- Comment moderation:
- Use keyword filters, hide or delete toxic comments, and enable limits if you face spam.
- Placement quirks:
- Ensure vertical-safe design; text within 4:5 center “safe area” to work across Feed, Stories, Reels.
- Music rights:
- Use licensed audio or original sound for Reels; some tracks are not eligible for ads.
- Special Ad Categories:
- For housing/employment/credit, declare the category; targeting will be restricted by policy.
Quick Checklist Before You Tap Boost
- Professional account set up and payment attached.
- High-performing post selected with clear CTA.
- URL with UTMs added for website goals.
- Audience chosen (Automatic to start; Manual for control).
- Daily budget and 3–7 day flight set.
- Comment filters and moderation ready.
- Compliance check passed.
Final Thoughts
Boost is the fastest way to learn how to boost an Instagram post and get more eyes on content that’s already resonating. Use it to validate creatives, find baseline audiences, and build momentum. When you need deeper control—conversion optimization, retargeting, exclusions—graduate campaigns to Ads Manager, carrying over the insights you gained from boosts.
Summary
- Start with a strong, compliant post, set a clear goal and CTA, and use UTMs to track results beyond Instagram.
- Keep targeting simple at first, invest for at least 3–7 days, and judge success by both in-app metrics and downstream outcomes.
- Iterate by pausing underperformers, scaling winners gradually, and moving to Ads Manager when you need advanced targeting or conversion optimization.