How to Cancel a Scheduled Post on Instagram Step by Step
Learn how to cancel a scheduled Instagram post using the app, Meta Business Suite, Creator Studio, or popular third-party scheduling tools.

Introduction: How to Cancel a Scheduled Post on Instagram
Instagram post scheduling has transformed the way creators, influencers, and brands manage their content calendars. By pre-planning posts, you can maintain a consistent presence, boost engagement, and optimize posting times for your audience. But even the best-planned schedules sometimes require changes.
Whether due to sudden marketing shifts, content errors, or sensitive events, knowing how to cancel a scheduled post on Instagram is a vital skill for protecting your brand’s image and staying relevant. This guide walks you through cancellation methods across Instagram’s in-app tools, Meta’s platforms, and leading third-party schedulers.
---
Overview of Instagram Scheduling Tools
Before you can cancel a scheduled post, you need to know which platform was used to set it up. Instagram scheduling can be done natively or via third-party applications, each with its own interface and steps.
Popular scheduling methods include:
- Instagram App (Mobile) – New built-in scheduling option for posts and Reels.
- Meta Business Suite – Free, full-featured scheduling, publishing, bulk editing, and analytics tool.
- Creator Studio – Legacy Meta platform still available to some accounts.
- Third-Party Apps – Such as Later, Hootsuite, Buffer, or Sprout Social.
Locating your scheduled post within the right platform is the first step toward deleting, unscheduling, or moving it.
---
Canceling a Scheduled Post in the Instagram App
The Instagram app now supports native scheduling, removing the need for external tools for many users. If you scheduled directly in-app, follow these steps to cancel:
Step-by-Step Instructions
- Open Instagram on iOS or Android.
- Tap your profile icon (bottom-right corner).
- Tap the hamburger menu (top-right).
- Select Scheduled Content.
- Scroll to find your scheduled post.
- Tap the post to preview it.
- Tap the three-dot menu, then choose Delete or Cancel Schedule.
- Confirm your choice.
💡 Pro Tip: If you’d prefer to keep the post for later, select Edit and move it to Drafts instead of deleting.
---
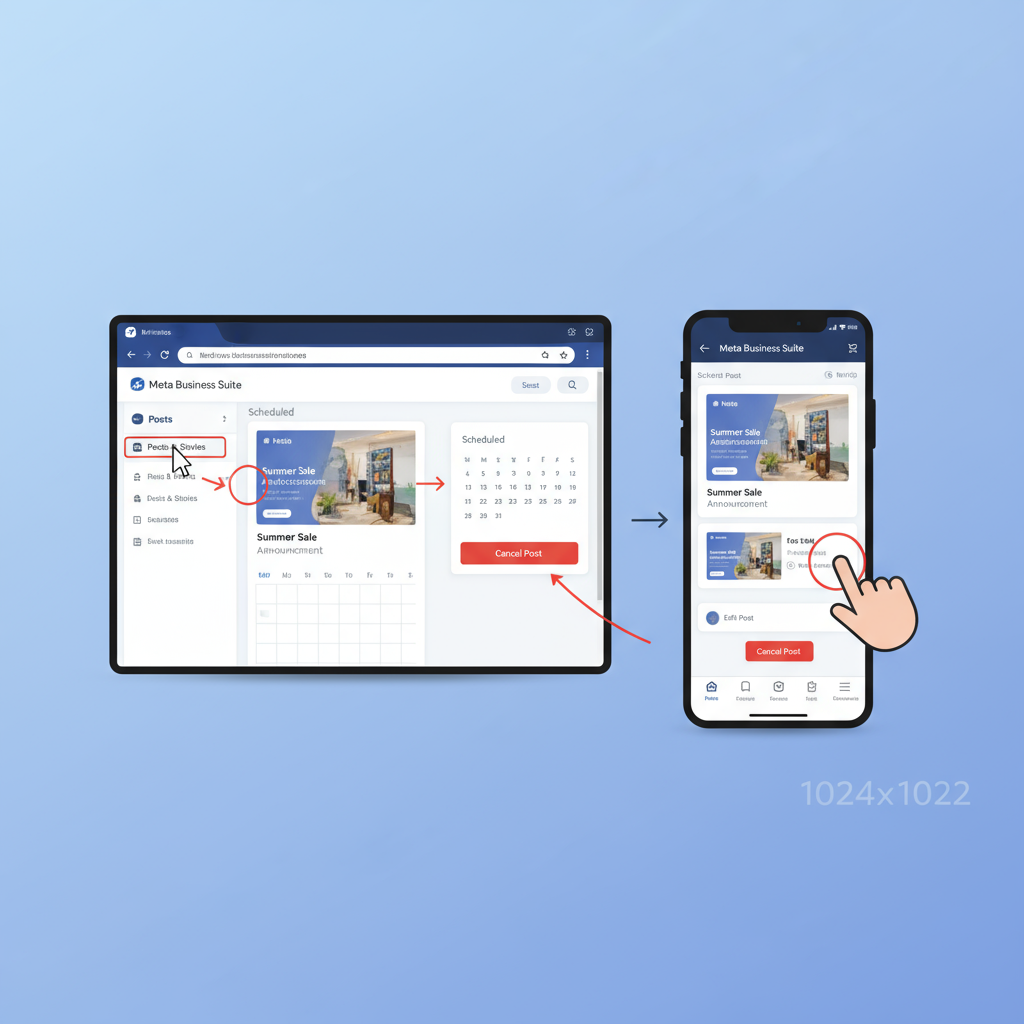
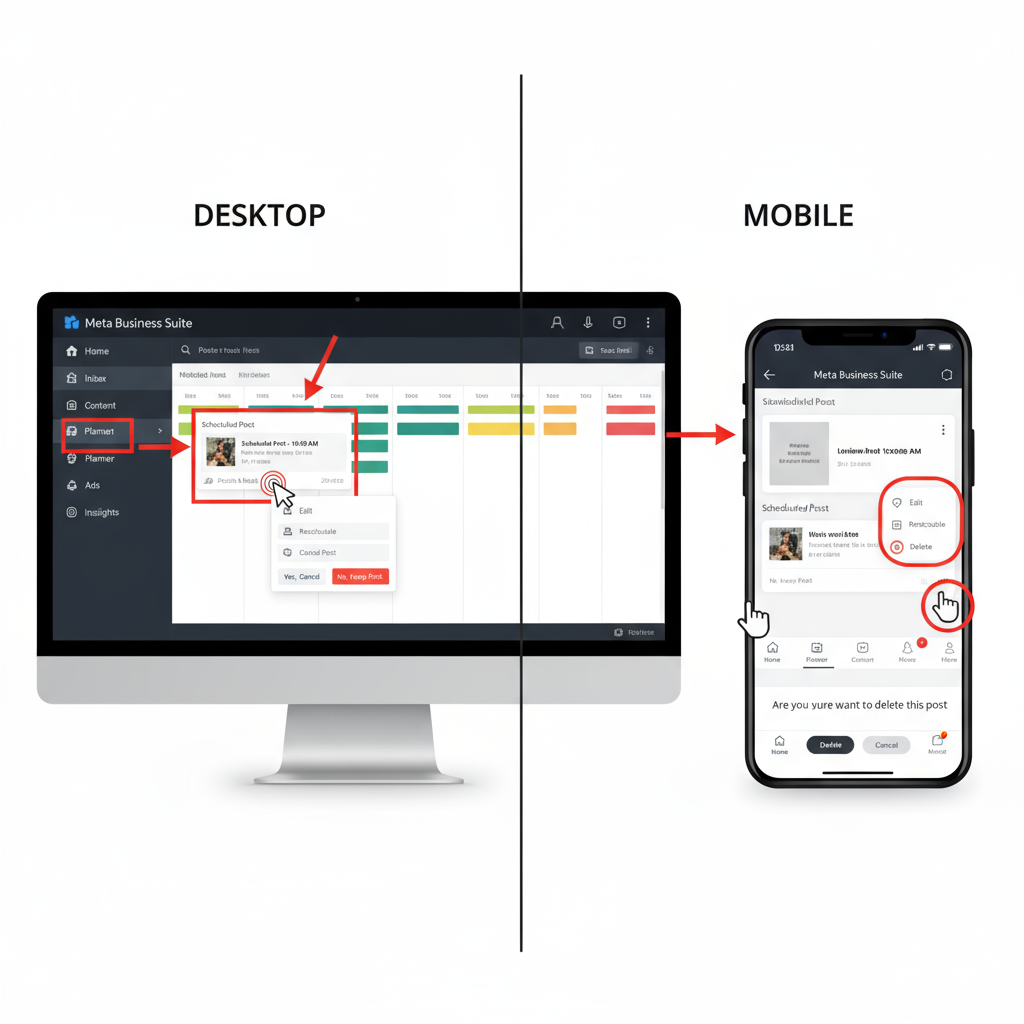
How to Cancel a Scheduled Post in Meta Business Suite
Meta Business Suite is widely used for Instagram Business and Creator accounts and offers clear scheduling and cancellation tools.
Desktop Method
- Sign in at business.facebook.com.
- Select your Instagram profile from the left-hand panel.
- Open the Planner tab.
- Locate the scheduled post in the calendar or list view.
- Click the post to open details.
- Go to Actions > Delete Post or choose Unschedule.
- Confirm.
Mobile Method
- Open the Meta Business Suite app.
- Navigate to Planner.
- Tap the scheduled post.
- Choose Delete or Unschedule and confirm.
---
How to Cancel via Creator Studio
Although Creator Studio has been partially integrated into Meta Business Suite, some users still manage Instagram content here.
Steps to Cancel:
- Visit creatorstudio.facebook.com.
- Click the Instagram tab.
- Go to Pre-published or Scheduled in the left menu.
- Select your scheduled post.
- Use the arrow menu beside Publish to choose Delete or Cancel Schedule.
- Confirm.
---
Canceling Scheduled Posts in Third-Party Scheduling Tools
Many marketers use external schedulers for advanced workflows. Here’s how to cancel in popular tools:
Later
- Log into Later.
- Open the Calendar view.
- Click on the scheduled Instagram content.
- Select Delete or Remove from Schedule.
- Confirm.
Hootsuite
- Sign into Hootsuite.
- Navigate to Planner or Publisher.
- Click your Instagram post.
- Select Delete.
- Confirm.
Buffer
- Log into Buffer.
- Go to the Instagram Queue.
- Find your post and click the three dots.
- Choose Delete and confirm.
---
Tips to Ensure Your Cancellation Goes Through
Cancelling a scheduled post may seem straightforward, but technical or syncing issues can sometimes get in the way.
| Best Practice | Why It Matters |
|---|---|
| Confirm deletion immediately | Prevents unintended auto-publishing |
| Clear mobile app cache | Fixes glitches and ensures an updated view |
| Use official tools | Reduces errors when syncing with Instagram |
Other tips:
- Refresh the dashboard/app after making changes.
- Check on a second device to confirm cancellation.
- Make sure your internet connection is stable during edits.
- Verify time zones in scheduling tools to avoid accidental early posting.
---
Managing Drafts and Rescheduling
Instead of deleting a post entirely, consider moving it to Drafts:
On Instagram App:
- Tap Edit in the scheduled post menu.
- Select Move to Drafts.
- Access drafts later via your post creation tools to re-edit and reschedule.
This way, valuable content is not lost—you can adjust copy, visuals, or hashtags, then publish later.
---
Common Problems and Fixes
- Post already published: If you miss the window, delete it directly from your feed.
- App bugs or sync delays: Log out, refresh, or reinstall the app.
- Incorrect time zone settings: Adjust in your scheduling platform.
- Revoked permissions: Reconnect your Instagram account in the scheduling app’s settings.
---
Best Practices to Minimize Future Cancellations
- Plan an editorial calendar with tools like Trello or Notion.
- Batch-create content for efficiency but remain adaptable.
- Review posts before scheduling to catch typos or wrong captions.
- Stay culturally aware to avoid posting at inappropriate times.
- Schedule a regular content audit to ensure ongoing alignment with brand goals.
---
Conclusion: Stay Flexible and in Control
Understanding how to cancel a scheduled post on Instagram keeps your content strategy agile and your brand voice consistent. Whether you use Instagram’s in-app scheduling, Meta tools, or third-party apps, always:
- Double-check cancellations in the relevant tool.
- Use drafts for posts you might adapt later.
- Monitor your content queue regularly.
By mastering these cancellation techniques, you safeguard brand reputation, stay responsive to real-world events, and maintain full control over your publishing schedule.
Ready to refine your scheduling workflow? Start by auditing your current queue and practicing a cancellation in each platform you use—so you’re prepared before you ever need it.


