How to Check Scheduled Posts on Instagram Step by Step
Learn how to check scheduled Instagram posts step-by-step using Meta Business Suite or Creator Studio for timely, optimized content publishing.

Introduction to Instagram Post Scheduling and Its Benefits
Instagram post scheduling is an invaluable tactic for brands, influencers, and content creators seeking efficient social media management. By scheduling Instagram posts in advance, you can maintain a consistent publishing rhythm, plan campaigns seamlessly, and free up time for other creative or business tasks. This guide explains exactly how to check scheduled posts on Instagram, ensuring your content is timely, relevant, and optimized for engagement.
With post scheduling, you can target strategic publication times to reach your audience when they’re most active — without being tied to your device. This is especially powerful for global audiences and businesses handling multiple accounts.
Key benefits include:
- Consistency in your posting schedule.
- Improved engagement via optimal timing.
- Better planning for product launches and seasonal promotions.
- Batch content creation, reducing daily workload.
---
Overview of Instagram Scheduling Tools
To manage and check your Instagram scheduled posts, you can use:
- Meta Business Suite – Meta’s native scheduling and analytics tool.
- Creator Studio – Meta’s legacy scheduling platform for Facebook and Instagram.
- Third-party apps – Examples are Later, Buffer, and Hootsuite.
Each option varies in features and interface, but all provide calendar or queue views for upcoming content.
| Tool | Platform | Best For | Cost |
|---|---|---|---|
| Meta Business Suite | Web & Mobile | Full-feature scheduling, analytics | Free |
| Creator Studio | Web Only | Scheduling feed posts and IGTV | Free |
| Later | Web & Mobile | Visual content planning | Freemium |
| Buffer | Web & Mobile | Multi-platform scheduling | Freemium |
| Hootsuite | Web & Mobile | Social team collaboration | Paid |
---
Accessing Scheduled Posts via Instagram’s Native Tools
Instagram does not provide a dedicated “scheduled posts” view inside its mobile app for personal or creator accounts. Instead, scheduled post management is done through Meta Business Suite or Creator Studio.
You can access them via:
- A desktop browser logged into your Facebook page (linked to your Instagram account).
- The Meta Business Suite mobile app.
- The Creator Studio web interface.
---
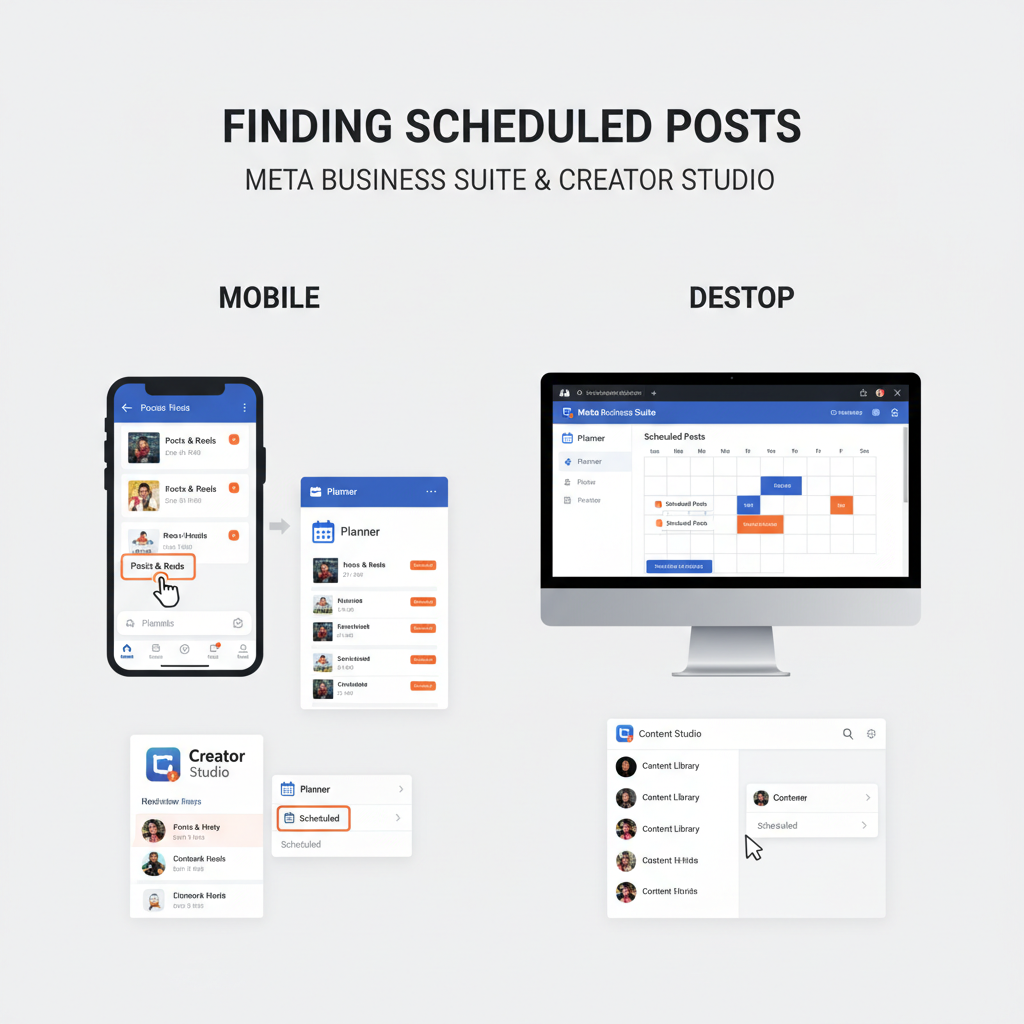
Step-by-Step Guide to Checking Scheduled Posts in Meta Business Suite
Meta Business Suite (MBS) serves as the hub for scheduling across Facebook and Instagram. Follow these steps to check your scheduled Instagram posts.
On Desktop
- Log In
- Visit business.facebook.com and log in with your Facebook account connected to your Instagram profile.
- Select Your Business Account
- Ensure the right Instagram account is connected.
- Go to “Planner”
- From the left-hand menu, click Planner.
- View Scheduled Posts
- Scan the calendar for upcoming dates. Scheduled posts appear with thumbnail previews.
- Click Any Post
- Select a post to view its caption, image/video, scheduled time, and editing options.
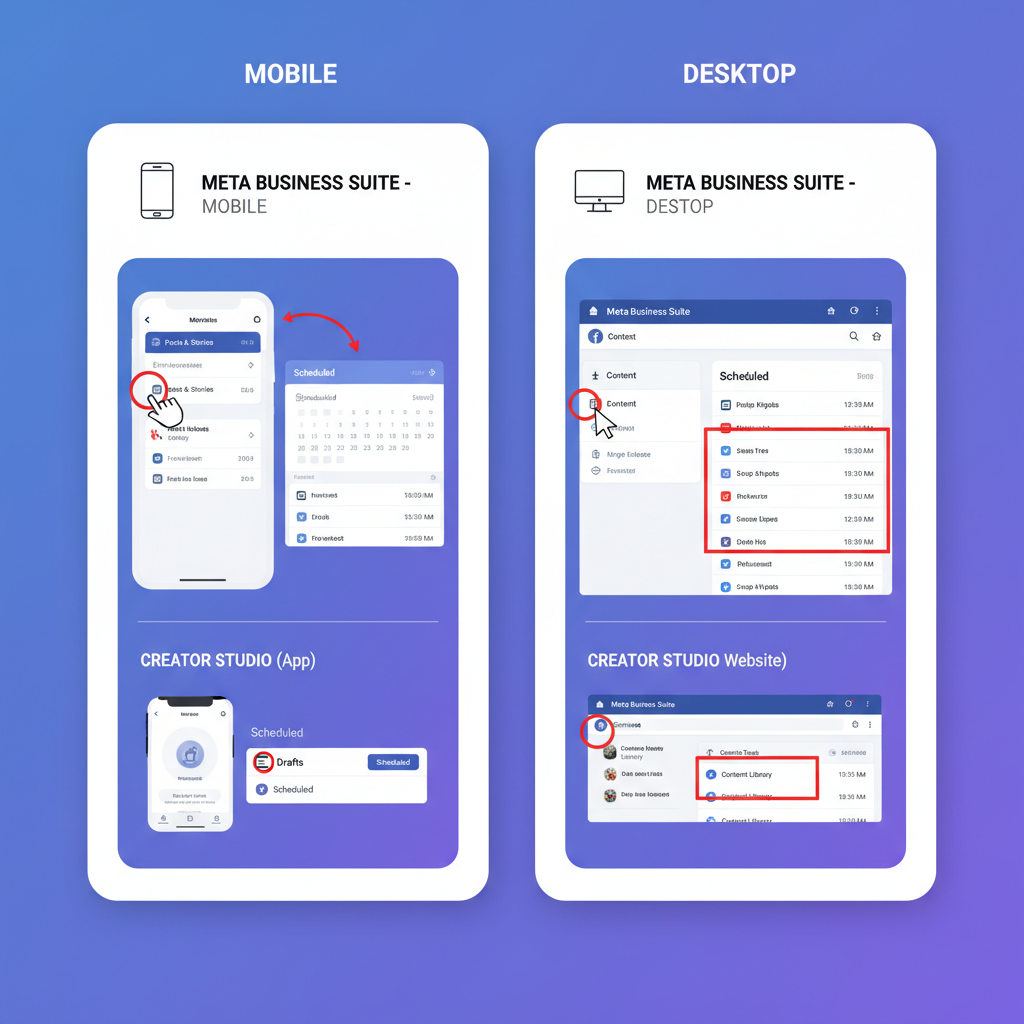
On Mobile (Meta Business Suite App)
- Download and Open the App (iOS or Android).
- Select Your Account.
- Tap Planner or Calendar.
- Scroll to find scheduled Instagram posts.
- Tap to preview or edit.
---
Checking Scheduled Posts in Creator Studio
Creator Studio remains functional for many users, though Meta is migrating features to Business Suite.
Steps:
- Go to facebook.com/creatorstudio and log in.
- Switch to Instagram view:
- Click the Instagram icon at the top.
- Select the correct Instagram account.
- Navigate Content Library → Scheduled.
- View all scheduled feed posts and IGTV videos.
- Click a post for full details and to make edits.
---
Managing and Viewing Scheduled Posts in Third-Party Apps
Popular third-party scheduling tools have convenient interfaces for checking Instagram posts.
Later
- Open your Content Calendar.
- Filter for Instagram.
- Click on a scheduled slot to view or edit.
Buffer
- Access your “Queue”.
- Select Instagram from the channel list.
- Posts appear in chronological order.
Hootsuite
- Go to the Planner tab.
- Filter by Instagram account.
- Select a post for editing options.

Pro Tip: Always verify timezone settings in your scheduler to ensure posts go live at the intended time.
---
Troubleshooting Missing Scheduled Posts
If a scheduled post doesn’t appear:
- Check for account disconnects between Instagram and the scheduling tool.
- Renew expired permissions by re-authenticating.
- Confirm the post isn’t just a draft.
- Verify media complies with format requirements.
Fixes:
- Reconnect your Instagram account.
- Scan drafts for unsent posts.
- Review error notifications.
- Adjust media formats and aspect ratios as needed.
---
Best Practices for Editing or Rescheduling Scheduled Posts
Make changes strategically:
- Edit Early to prevent publishing errors.
- Reschedule Strategically during peak activity.
- Update Media where allowed.
- Keep branding consistent in captions and visuals.
---
Why Regularly Reviewing Scheduled Content Matters
Frequent reviews help you:
- Maintain brand and campaign alignment.
- Optimize timing based on analytics.
- Catch mistakes and broken links.
- Adjust quickly to trending topics.
---
Summary and Next Steps
Regularly checking scheduled posts on Instagram is a smart way to protect your content strategy from errors and missed opportunities. Whether you rely on Meta Business Suite, Creator Studio, or a trusted third-party app, scheduling tools give you the visibility and control needed for success.
Actionable Steps:
- Pick a scheduling tool that complements your workflow.
- Connect your Instagram account and verify permissions.
- Use the planner/calendar views to monitor your queue.
- Analyze engagement, then edit or reschedule accordingly.
- Troubleshoot proactively to prevent surprises.
By mastering how to check scheduled posts on Instagram, you ensure consistent, timely, and high-quality output that keeps your audience engaged. Start reviewing your scheduled content today to maximize your brand’s reach and impact.


