Step-by-Step Guide to Create a Place on Facebook
Learn how to create, customize, and optimize a Facebook Place to boost local visibility, attract visitors, and enhance your business’s online presence.

Step-by-Step Guide to Create a Place on Facebook
If you are looking for how to create a place on Facebook, this step-by-step guide will help you set up, customize, and optimize a local listing that drives awareness. A Facebook “Place” lets people find and check in to your physical location — whether that's a café, retail store, public park, or tourist site. Done correctly, it enhances your local visibility, attracts more visitors, and strengthens your digital presence in both Facebook and search engine results.
---
Understanding What a "Place" Means on Facebook
In Facebook’s ecosystem, a Place differs from a Page or Group:
- Places: Physical locations where users can check in when visiting; include a map marker, address, and check-in count.
- Pages: Online entities representing a business, brand, celebrity, or cause; may also contain location info.
- Groups: Communities centered on interests or topics, not tied to a specific physical location.
Why Create a Facebook Place?
Having a place enables users to tag your location in posts, photos, and stories. For local businesses, this translates into valuable organic exposure, word-of-mouth marketing, and authentic visibility through check-ins and user reviews.
---
Prerequisites Before You Create a Place
Before starting, make sure you have:
- A public physical location accessible to visitors
- A complete and accurate street address
- Access to your personal Facebook account
- Stable internet connectivity
---
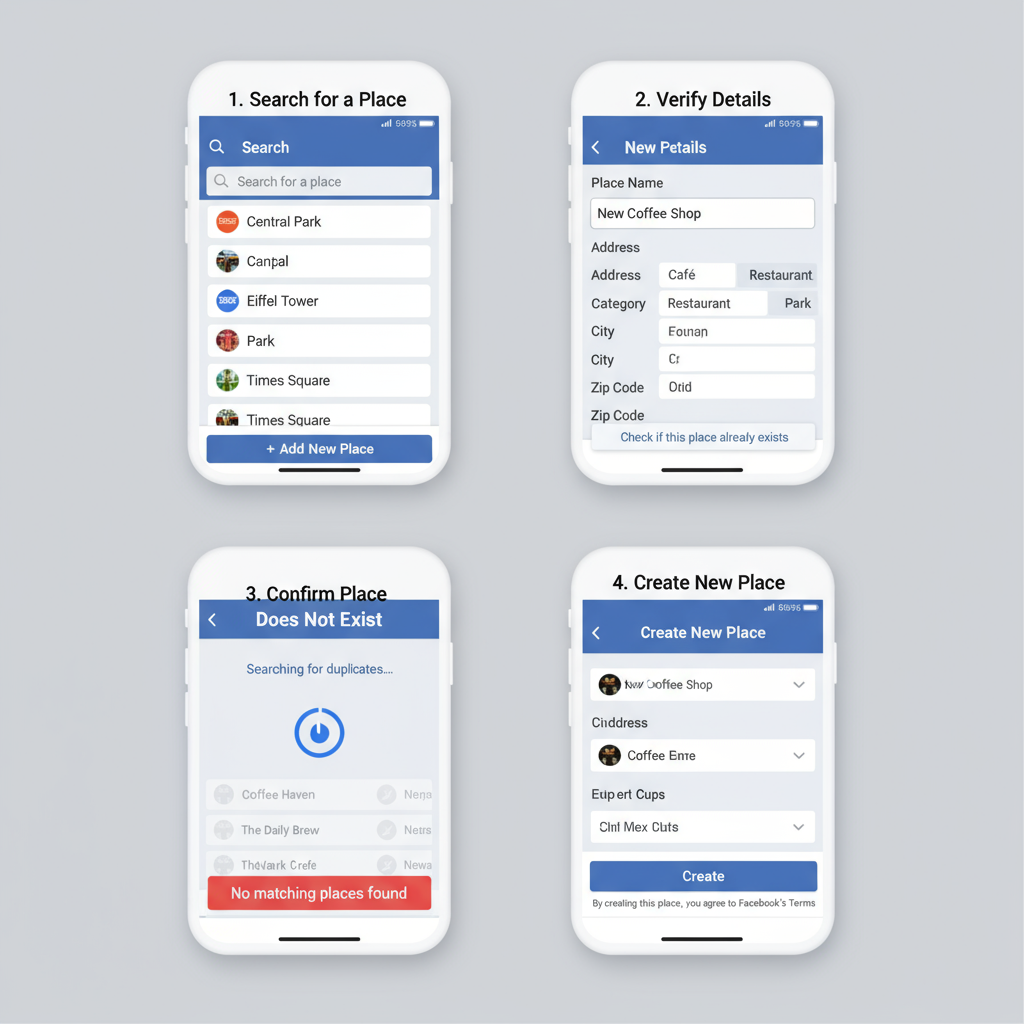
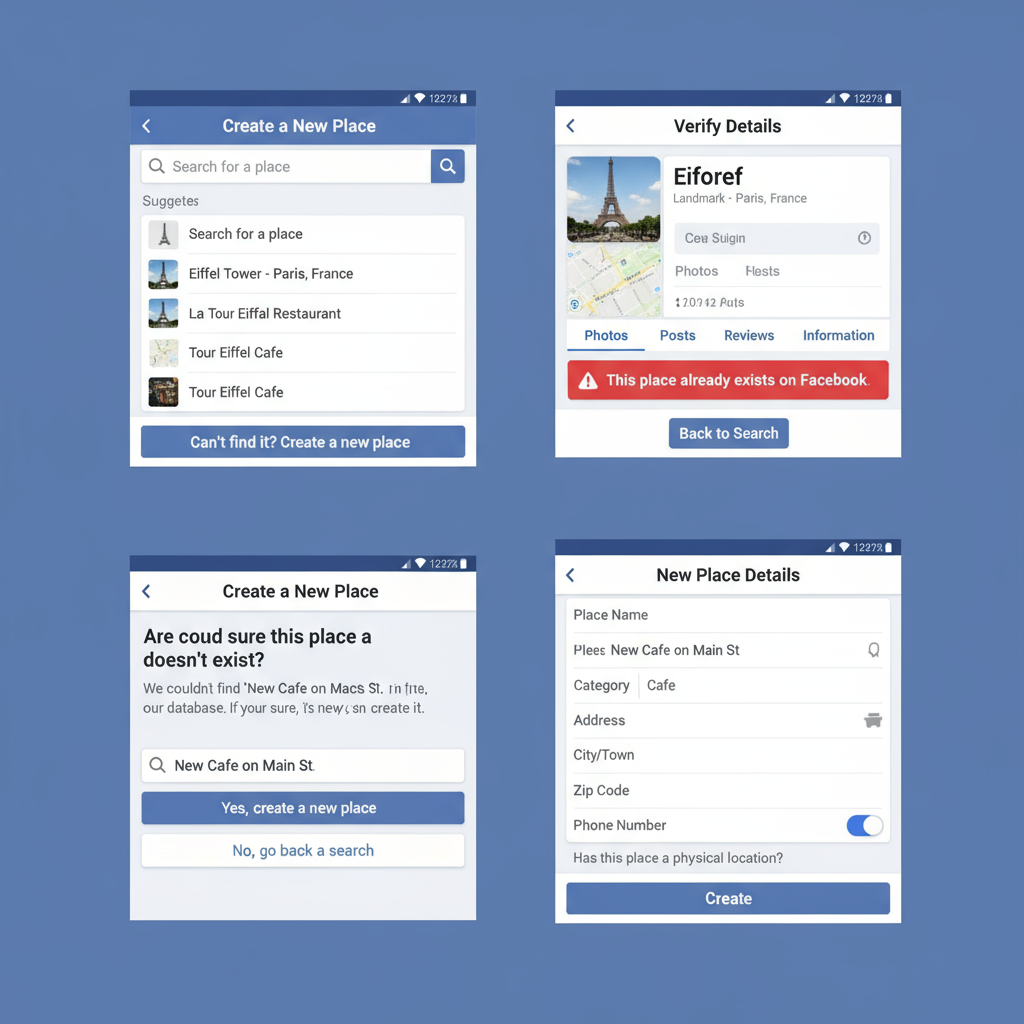
Step 1: Check if the Place Already Exists
Avoid creating duplicates:
- Use Facebook’s Search bar.
- Type your location or business name.
- Browse results under Places.
If the place already exists, claim and optimize it rather than creating a new one.
---
Step 2: Prepare Essential Details
Before adding your place, gather the following information:
| Field | Example |
|---|---|
| Name | Coffee & Co. |
| Category | Café / Coffee Shop |
| Full Address | 123 Baker Street, London, UK |
| Phone | +44 20 1234 5678 |
| Website | www.coffeeandco.com |
| Hours | Mon-Sat: 8am-8pm, Sun: 9am-6pm |
---
Step 3: Open Facebook and Locate "Add a Place"
Ways to start:
- Via Check-In: Begin a post, tap Check In, then add a new location if not found.
- Via Pages Interface: In some regions, “Add a Place” is accessible in Facebook’s location-based menu.
---
Step 4: Add Your Place via Mobile App
To add via mobile:
- Tap What’s on your mind?
- Select Check In.
- Search for the place name. If absent, scroll down to Add [Place Name].
- Enter category, address, and description fields.
- Drop the map pin precisely on your location.
- Save.

---
Step 5: Add Your Place via Desktop Browser
Desktop method:
- Log into Facebook.
- Type the place name in the search bar.
- If not found, click Add a Place (under the Places tab).
- Complete all required fields.
- Position the map pin carefully.
- Submit for Facebook review.
---
Step 6: Add and Verify the Map Pin
Accurate map pins improve check-in usability and local SEO.
Tips for precision:
- Zoom in to street/building level before placing.
- Cross-check against Google Maps or other map tools.
- Use the exact coordinates over estimates.
---
Step 7: Upload High-Quality Visuals
Enhance your place’s appeal with:
- Cover Photo: A wide image of the venue or signature item.
- Profile Picture: Your logo or a recognizable brand mark.
Photos increase user trust and engagement.
---
Step 8: Optimize the "About" Section
Include natural keyword phrases for better discoverability:
> "Coffee & Co. is a cozy café in downtown London serving handcrafted coffee and fresh pastries."
Optimization here helps in Facebook and organic search rankings.
---
Step 9: Claim Your Place
If you own the location:
- Click Is this your business?
- Fill out the verification form.
- Verify via:
- Phone call code
- Document upload (business license, bill)
- Email to a business domain
---
Step 10: Manage User-Generated Content
After launch, expect:
- Reviews
- Customer photos
- Check-ins
Respond professionally, encourage photo shares, and monitor your brand image.
---
Step 11: Tips for Local SEO
Maintain consistent NAP (Name, Address, Phone) details across platforms, including your website, Google Maps, Instagram, and Yelp.
More tips:
- Request satisfied customers leave Facebook reviews.
- Post updates tagging your place.
- Use relevant local hashtags.
---
Step 12: Troubleshooting – Why You Can’t Create a Place
Possible roadblocks:
- Restricted region: Place creation not available in certain areas.
- Duplicate listing: Already exists — claim it instead.
- Missing data: Key info like address or phone is absent.
- Disabled GPS: Ensure mobile location services are on.
---
Step 13: Best Practices to Promote Your New Facebook Place
Increase reach by:
- Offering a "Check-In Special" promotion.
- Featuring your place link on your website and newsletters.
- Partnering with local influencers.
- Hosting events encouraging attendees to tag your location.
---
Summary and Next Steps
Creating a place on Facebook is a straightforward but essential process for physical businesses and attractions. By following this how to create a place on Facebook tutorial, you’ll not only establish a functional presence but also optimize it for maximum visibility, engagement, and community reach.
Take action today — set up your place, claim ownership, and start engaging with local customers to grow your presence both on and off Facebook.