Step-by-Step Guide to Create a Private Facebook Group
Learn how to create a private Facebook group step-by-step, from choosing privacy settings to inviting members and setting clear community rules.

Step-by-Step Guide to Create a Private Facebook Group
Creating a private Facebook group is an excellent way to build a loyal community, share exclusive content, and control who can join and participate. Whether it's for a hobby, professional mastermind, or a private club, knowing how to create a private Facebook group properly is key to fostering a safe, high-quality space for interaction.
This guide walks you through the process step by step—from understanding privacy settings to promoting and keeping your group active—so you can set your community up for long-term success.

---
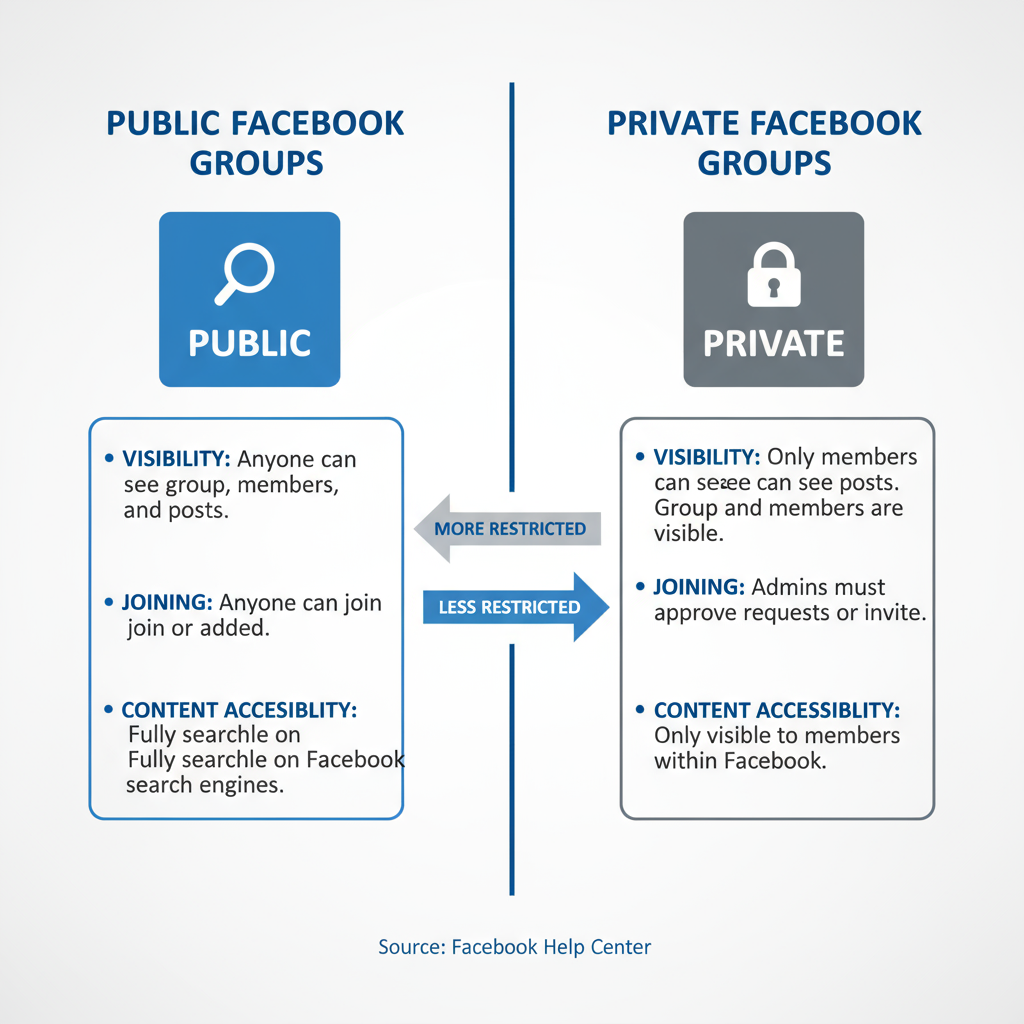
Understanding the Difference: Public vs Private Facebook Groups
Before you start, it’s vital to understand the differences between public and private Facebook groups so you can choose the right setup for your needs.
| Feature | Public Group | Private Group |
|---|---|---|
| Visibility of posts | Anyone on Facebook can see | Only members can see posts |
| Membership | Open, no approval required (unless set) | Requires approval or invitation |
| Searchability | Always discoverable | Can be visible or hidden in search |
| Privacy level change | Can be changed anytime | Cannot be changed to public once private |
Tip: Choose a private group if you want conversations and member details to remain hidden from non-members.
---
Decide on the Group’s Purpose and Rules
A successful group begins with a clear vision. Take time to determine:
- The main focus or theme of your group.
- The target audience you want to attract.
- Types of discussions encouraged and those prohibited.
- Rules about promotions, links, or self-promotion.
Document these group rules before you create the group. This helps:
- Maintain quality engagement.
- Set member expectations.
- Reduce disputes and potential conflicts.
Structured rules set the tone for the community and improve member trust.
---
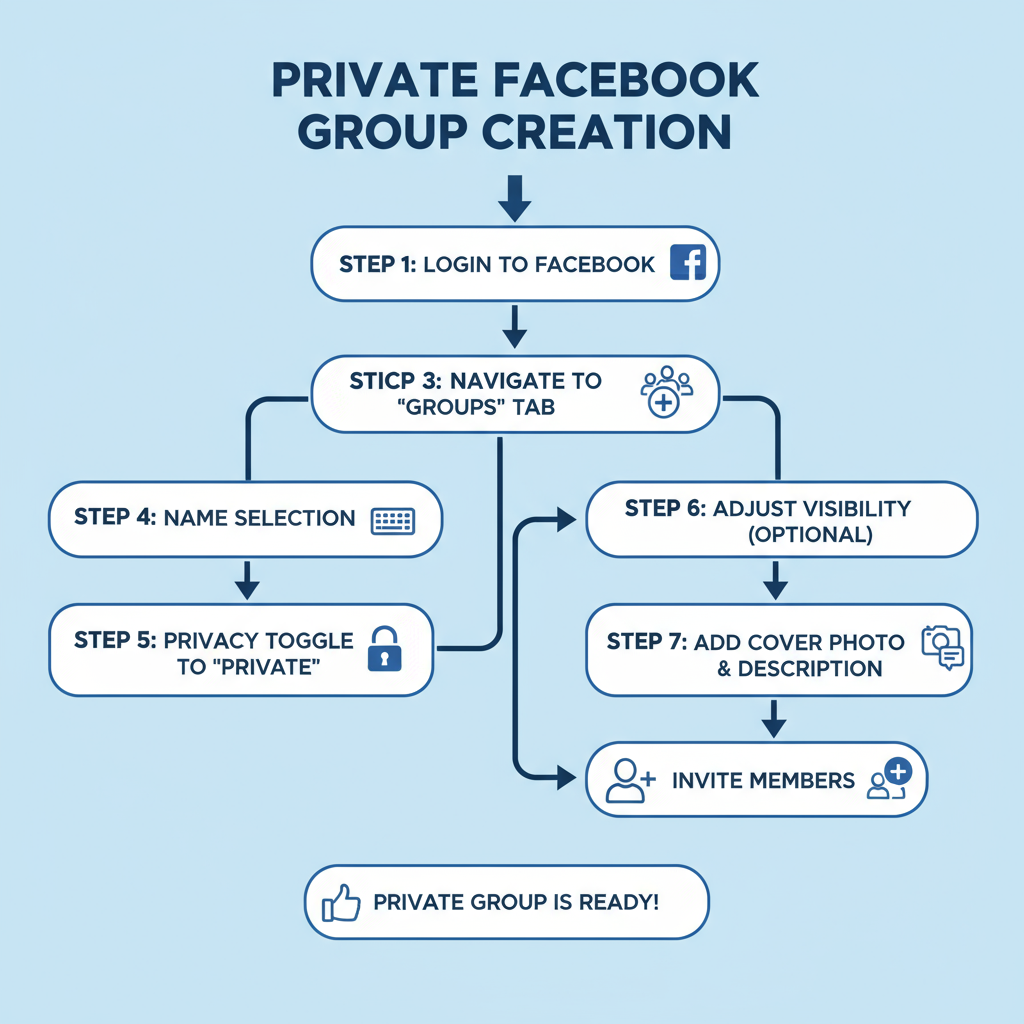
Log in to Facebook and Navigate to "Groups"
To create your group:
- Log in to your Facebook account.
- In the left-hand navigation menu on your homepage, click “Groups”.
- On the Groups page, click “+ Create New Group”.
---
Click “Create New Group” and Choose a Search-Friendly Name
When you select "Create New Group," a setup window will appear. Choosing a clear, keyword-friendly, and descriptive name is essential for discoverability (if the group is visible in search).
Naming best practices:
- Incorporate keywords that match your group’s purpose.
- Avoid overly long or confusing titles.
- Keep the name unique but easy to understand.
---
Set Privacy to “Private” and Adjust Visibility
You’ll then set the group’s privacy:
- Privacy: Select Private to ensure only members can see content.
- Visibility:
- Visible: Appears in search results; non-members can request to join.
- Hidden: Only invited people can find it.
Note: Once a group is private, it cannot be changed back to public.
---
Customize the Cover Photo and Description
Your cover photo is the group’s visual centerpiece. Choose a relevant image that reflects your topic or values.
Cover image tips:
- Use 1640 x 856 pixels for best quality.
- Choose high-resolution, on-brand visuals.
- Optionally, add text overlays for branding.
In the description section, clearly outline:
- The group’s purpose and benefits.
- Who the group is for.
- Expectations and etiquette reminders.
---
Add Initial Members and Invite Trusted People
Start by adding members who share your vision and will be active contributors.
Benefits of inviting trusted members:
- Sets a quality tone for discussions.
- Encourages respectful engagement.
- Helps model appropriate content for newcomers.
Aim for 5–10 active members at the start.
---
Configure Group Settings for Control
In Group Settings (left-side admin menu), you can:
- Require admin/moderator approval for new members.
- Decide who can post (everyone, or admins/moderators only).
- Set keyword alerts to filter unwanted content.
These settings protect your group from spam and keep discussions on topic.
---
Post a Welcome Message and Pin Guidelines
Post a pinned welcome message to introduce yourself and the group.
Welcome post ideas:
- Share your story or reason for starting the group.
- List the top 3 rules prominently.
- Invite members to introduce themselves.
Pinned posts stay at the top so every new member sees them.
---
Promote Your Private Facebook Group
Even a private group needs thoughtful promotion to attract the right members.
Tactics:
- Share a personal invite link with context on your profile.
- Mention the group in relevant online communities.
- Include it in newsletters or blog posts.
Focus on inviting people who will add value to the discussions.
---
Maintain Engagement Over Time
Member retention relies on ongoing interaction.
Ideas to sustain activity:
- Themed conversation days (e.g., “Tip Tuesday”).
- Polls to gather input or plan activities.
- Exclusive perks like downloadable resources or live Q&As.
---
Moderate Effectively
Active moderation ensures your group stays a safe space:
- Remove spam immediately.
- Apply rules consistently.
- Handle disputes privately when possible.
As the group grows, appoint moderators to share the workload.
---
Review and Update Group Settings Regularly
As your group’s dynamics evolve:
- Revisit the description and update it when needed.
- Rotate cover images for a fresh feel.
- Adjust settings to suit new group goals.
Stay observant to keep your group aligned with member expectations.
---
Quick Recap: How to Create a Private Facebook Group
- Understand group type differences.
- Define your goals and rules.
- Go to Groups → Create New Group.
- Choose a search-friendly name.
- Set it to Private (Visible or Hidden).
- Customize cover and description.
- Invite trusted initial members.
- Configure privacy and posting rules.
- Pin a welcome post and guidelines.
- Promote thoughtfully.
- Keep members active.
- Review and adjust settings often.
---
Final Thoughts
Creating a private Facebook group is more than clicking “Create”—it’s about intentional community building. By starting with clear goals, selecting the right settings, and fostering consistent engagement, you’ll build a thriving online hub where members feel safe and valued.
Start your group today, follow these steps, and watch your community grow into a vibrant, supportive space.