How to Edit Instagram Photos for Stunning Results
Learn how to edit Instagram photos with pro-level apps, composition tips, and color correction techniques to create stunning, consistent visuals.

How to Edit Instagram Photos for Stunning Results
If you want to grab attention on Instagram and elevate your visual storytelling, learning how to edit Instagram photos is essential. From selecting the right editing app to fine-tuning colors and composition, the editing process can dramatically improve the quality of your posts. This guide walks you through proven steps to create polished, engaging images that look professional while staying true to your style.

---
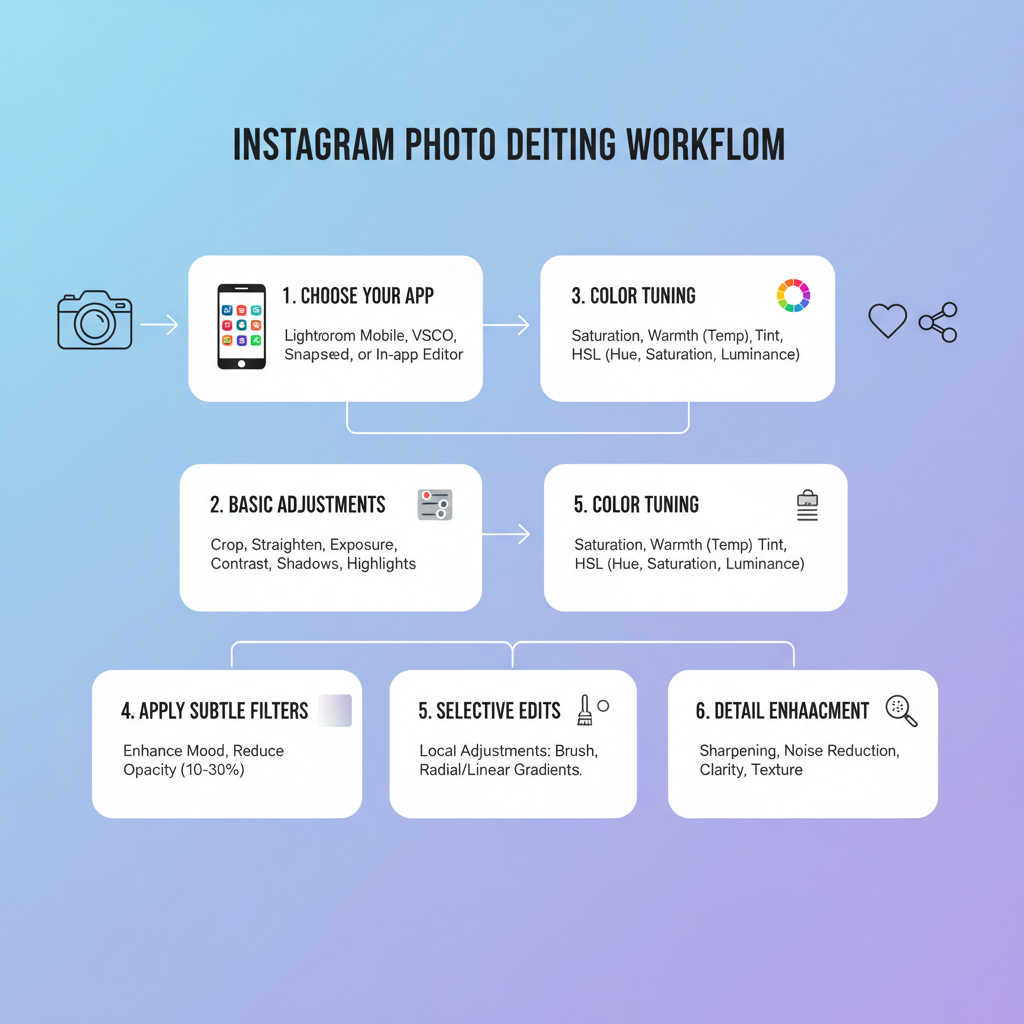
Choose the Right Photo Editing App
Your journey to stunning Instagram photos starts with selecting the right tool. These popular apps offer different strengths:
- Adobe Lightroom – Ideal for precise adjustments, professional-grade tools, and batch editing.
- VSCO – Minimalist interface with excellent film-style filters.
- Snapseed – Powerful free app with advanced features like selective editing and healing.
| App | Best For | Cost |
|---|---|---|
| Lightroom | Professional adjustments, presets | Free with in-app purchases |
| VSCO | Filters and quick edits | Free with premium membership |
| Snapseed | Comprehensive, free toolset | Free |
---
Understand Basic Editing Tools
Before diving into advanced techniques, master the fundamental controls:
- Exposure – Controls overall brightness.
- Contrast – Adjusts the difference between light and dark areas.
- Highlights – Manages the brightest parts.
- Shadows – Reveals detail in darker regions.
Balanced use of these ensures your photo looks true-to-life yet more visually captivating.
---
Crop and Straighten for Best Composition
Composition is as important as color or lighting. Cropping removes distractions, while straightening corrects tilted horizons.
Tips:
- Follow the rule of thirds.
- Give your subject breathing space.
- Align vertical and horizontal lines for a professional look.
---
Adjust Colors with White Balance, Saturation, and Vibrance
Color work can make photos pop without being overdone:
- White Balance – Adjusts warmth/coolness and tint.
- Saturation – Boosts all colors equally.
- Vibrance – Targets muted tones, preserving skin tones.
When unsure, opt for subtlety to maintain realism.
---
Apply Filters Subtly
Filters can define your style, but heavy use can look artificial. Apply lightly, and refine with brightness or contrast adjustments afterward for a balanced finish.
---
Use Selective Editing for Specific Areas
Selective edits let you tweak parts of an image without affecting the whole:
- Brighten just the subject’s face.
- Warm up skies while keeping the foreground intact.
Lightroom’s radial and gradient tools or Snapseed’s selective functions excel here.
---
Enhance Details without Overdoing It
Clarity, sharpness, and texture settings can bring images to life:
- Clarity – Boosts midtone contrast.
- Sharpness – Defines edges.
- Texture – Accentuates fine details.
Push too far, and you risk noise or harshness.
---
Retouch Imperfections While Keeping Authenticity
Keep edits natural:
- Remove temporary blemishes.
- Avoid reshaping features unless intentional.
- Retain skin texture for realism.
---
Maintain a Consistent Style for a Cohesive Feed
Recognition fosters connection on social media:
- Stick to the same presets or filter families.
- Keep exposure and color schemes consistent.
- Use recurring subjects and compositional styles.
---
Save the Highest-Quality Version before Posting
Export at the top resolution Instagram supports. This preserves clarity and avoids compression artifacts. Adjust output settings in your editing app to prevent unnecessary downsizing.
---
Test Edits across Different Devices and Screens
Different screens display images differently. Preview edits on a phone, tablet, and desktop to ensure brightness, contrast, and colors remain balanced.
---
Use Instagram’s Built-in Editing Tools for Minor Adjustments
Instagram’s own sliders can do quick touch-ups:
- Adjust brightness or warmth.
- Fix tone shifts from compression.
Ideal for last-minute refinements.
---
Add Creative Effects Sparingly
Special effects can enhance mood:
- Vignette to draw focus.
- Grain for a film-like texture.
- Light leaks for retro charm.
Keep it understated to avoid an outdated aesthetic.
---
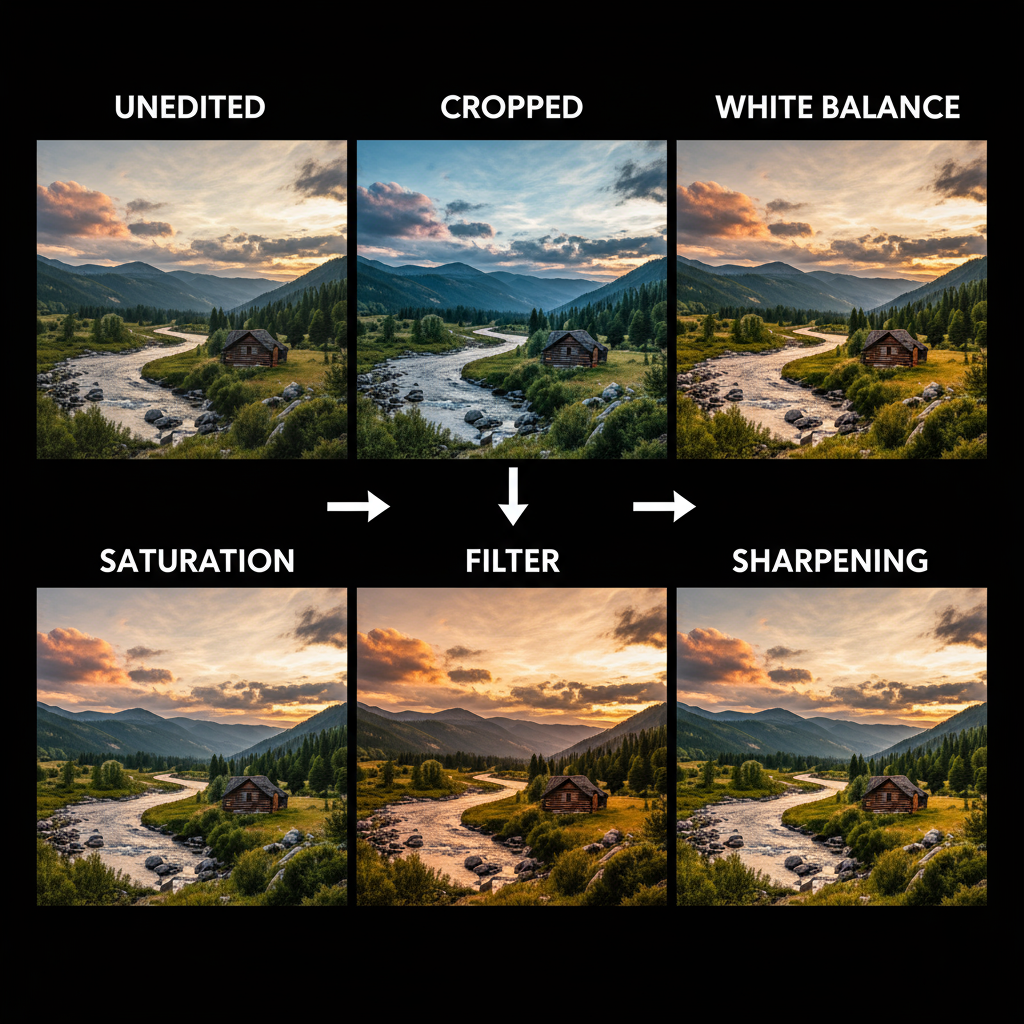
Review Before-After to Ensure Improvement
Compare your final edit to the original:
- Are colors aligned with your vision?
- Is the subject more prominent?
- Have you improved the photo without over-processing?
---
Final Checklist before Posting
A last scan ensures visual integrity:
| Check | Why It Matters |
|---|---|
| Alignment | Keeps horizons and lines straight |
| Text Legibility | Ensures overlays or captions are clear |
| Color Accuracy | Prevents strange tints or oversaturation |
| Consistency | Unified feeds attract and retain followers |
---
Summary
Mastering how to edit Instagram photos is about enhancing each image’s story with skill and subtlety. By using the right tools, refining your technical control, and staying consistent in style, you’ll produce posts that both stand out and feel authentic. Start applying these techniques to your next uploads and see the difference in engagement and overall feed quality. Ready to give your Instagram a professional edge? Start editing like a pro today.


