How to Edit Photos on Instagram After Posting Step by Step
Learn how to edit Instagram posts after publishing, change captions, tags, locations, alt text, and when to delete or use carousel edits.
How to Edit Photos on Instagram After Posting – Step-by-Step Guide
Instagram is one of the most popular platforms for sharing visual content, but mistakes can happen — whether it’s a typo in your caption, a missing tag, or an inaccessible alt text. Knowing how to edit photos on Instagram after posting is crucial for influencers, brands, and everyday users who want to keep their feed looking polished and professional without losing engagement.
This comprehensive guide explains exactly what you can and can’t edit, detailed step-by-step instructions, workarounds for visual changes, and tips for maintaining image quality while optimizing for Instagram’s algorithm and discoverability.

---
Understanding Instagram’s Editing Limitations
Instagram does not currently allow visual edits to an existing photo once it’s live. This means you cannot change brightness, filters, cropping, or replace the image in a single-image post. However, some important elements can still be edited without sacrificing likes, comments, or other engagement metrics.
You Can Edit:
- Captions
- Tags (people)
- Locations
- Alt text for accessibility
- Advanced settings such as comment controls
You Cannot Edit:
- The original image or video
- Filters or effects applied at upload
- Cropping or arrangement in single-image posts
If your concern is strictly visual, you’ll need to delete and repost, or make adjustments using the carousel editing feature.
---
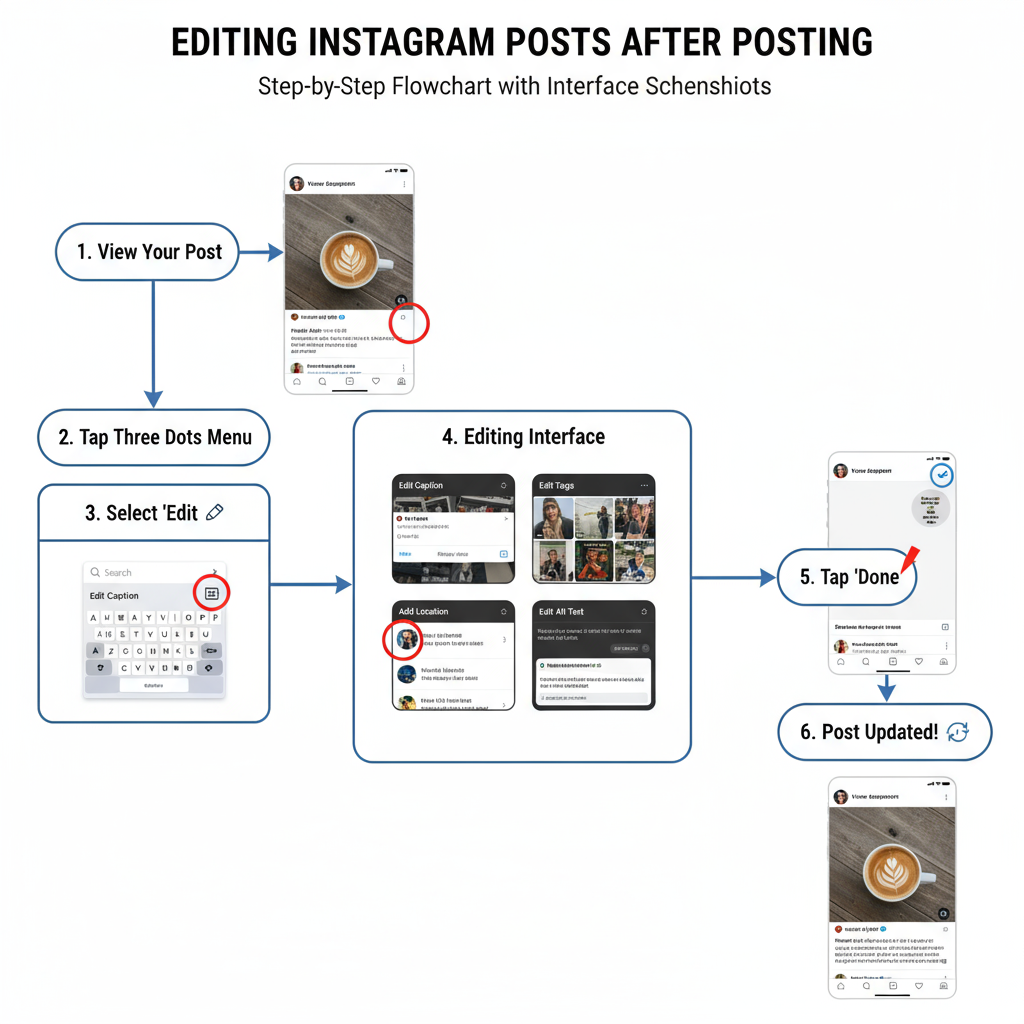
Editing Captions, Tags, Locations, and Alt Text
Once your photo is published, follow these steps to make non-visual edits:
- Open Instagram and go to the post.
- Tap the three-dot menu (•••) in the top-right corner.
- Select Edit.
- Make your updates:
- Caption: Fix typos, add hashtags, or update mentions.
- Tags: Tap “Tag People” to add/remove tags.
- Location: Tap “Add Location” or change current location.
- Alt Text: Scroll to “Advanced Settings” > “Edit Alt Text.”
- Tap Done (iOS) or ✔ (Android) to save.

---
Enhancing Accessibility with Alt Text
Alt text makes Instagram content accessible for users with visual impairments. You can add or update it after posting:
- Navigate to your post.
- Tap ••• > Edit.
- Select Edit Alt Text (scroll down if needed).
- Write a clear, concise description of the image, including colors, actions, or text in the image.
- Save changes.
Not only does this improve inclusivity, but accurate alt text may also enhance discoverability through Instagram’s AI-driven search.
---
Using Third-Party Apps When Visual Updates Are Needed
When the problem is with the actual photo (e.g., poor lighting, incorrect filter), Instagram doesn’t let you adjust it in place. Your options:
- Use the Original File: Re-edit in apps like Lightroom, Snapseed, VSCO, or Photoshop Express.
- Screenshot and Crop: If the original isn’t available.
- Match Previous Edits: Re-apply the same filter settings to maintain consistency.
Workflow:
- Download or access the original image/video.
- Edit in your preferred third-party app.
- Upload via delete-and-repost, or update within a carousel if applicable.
---
Delete and Repost vs. Carousel Edit
Carousel posts offer more flexibility than single-image posts. For multi-image posts, Instagram allows removal or addition of images after publishing (though changing the first image is limited). Single-image posts require deletion and reposting.
| Method | Advantages | Drawbacks |
|---|---|---|
| Delete & Repost | Full visual control; correct image issues | Lose all likes/comments; possible audience confusion |
| Carousel Edit | Fix select images without losing engagement | Limited to multi-image posts; first image remains the same in feed |
---
Pros and Cons of Reposting
Pros:
- Improve image quality for branding
- Refresh captions and hashtags from scratch
- Align visuals with updated brand aesthetics
Cons:
- Loss of original engagement metrics
- Timing may impact reach
- Risk of followers ignoring repeated content
From an Instagram SEO standpoint, improved visuals may drive more engagement long term, but losing initial traction could hurt short-term discoverability.
---
Tips to Maintain Quality When Re-Uploading
- Use correct resolution: 1080px width for best results
- Color profile: Upload in sRGB
- Minimize compression: Save once in high quality before upload
- Mobile preview: Ensure images look sharp and bright on phone screens

---
Mistakes to Avoid
- Over-editing posts too often (which may reduce reach)
- Making drastic caption changes after many interactions
- Removing tags without notifying collaborators
- Skipping alt text updates and ignoring accessibility
---
Tools to Plan and Pre-Edit Content
To avoid mid-post edits, prepare in advance with scheduling and preview tools:
- Later – Drag-and-drop grid planning
- Buffer – Cross-platform scheduling and analytics
- Canva – Edit, design, and publish from one platform
- Planoly – Caption drafting and visual grid arrangement
---
Final Editing & Optimization Checklist
- Fix typos and improve hashtags/caption
- Update tags for collaborators
- Add a relevant location for discoverability
- Edit alt text for accessibility
- Choose between in-place edit, carousel update, or re-upload
- Maintain optimal resolution and quality
- Confirm all changes before saving
---
By knowing exactly how to edit photos on Instagram after posting and when to opt for a delete-and-repost approach, you can keep your feed visually cohesive, accessible, and optimized for engagement. Whether you’re tweaking captions or re-uploading a high-quality version, making strategic edits ensures your content continues to perform — and your brand image remains sharp.
Want more Instagram growth tips and editing tutorials? Follow our guide archive and start optimizing your posts today.


