How to Edit Scheduled Posts on LinkedIn Step by Step
Learn how to edit scheduled posts on LinkedIn with step-by-step instructions, review limitations, and explore tools for better content management.
How to Edit Scheduled Posts on LinkedIn Step by Step
Managing your LinkedIn presence effectively often requires planning content in advance. LinkedIn’s post scheduling feature lets you queue updates to publish at the best possible times. However, it’s common to discover you need to adjust content after scheduling. This guide explains how to edit scheduled posts on LinkedIn step by step, explores native and third‑party tools, covers limitations, and shares time‑saving tips so you can optimize your workflow without compromising post quality.

---
Understanding LinkedIn Post Scheduling Functionality
LinkedIn offers two primary ways to schedule posts:
- Native LinkedIn Scheduler – Built into LinkedIn itself, allowing you to set a future date and time when composing a post on desktop or mobile.
- Third-Party Scheduling Tools – Platforms like Hootsuite, Buffer, Sprout Social, and Later integrate with LinkedIn to queue, edit, and manage posts.
The native scheduler is a relatively new feature and has fewer editing capabilities compared to full‑service social media management tools.
---
How to Locate Your Scheduled Posts on LinkedIn
Before you can edit, you need to find your scheduled posts. LinkedIn’s interface differs slightly between desktop and mobile.
On Desktop
- Click Start a post as though creating a new one.
- Select the clock (“Schedule”) icon in the lower‑right corner.
- A pop‑up will display your upcoming scheduled posts — choose the one you want to update.
On Mobile App
- Tap the Post button.
- Tap the clock icon in the post composer.
- Open the “Scheduled posts” tab to see your queued items.
---
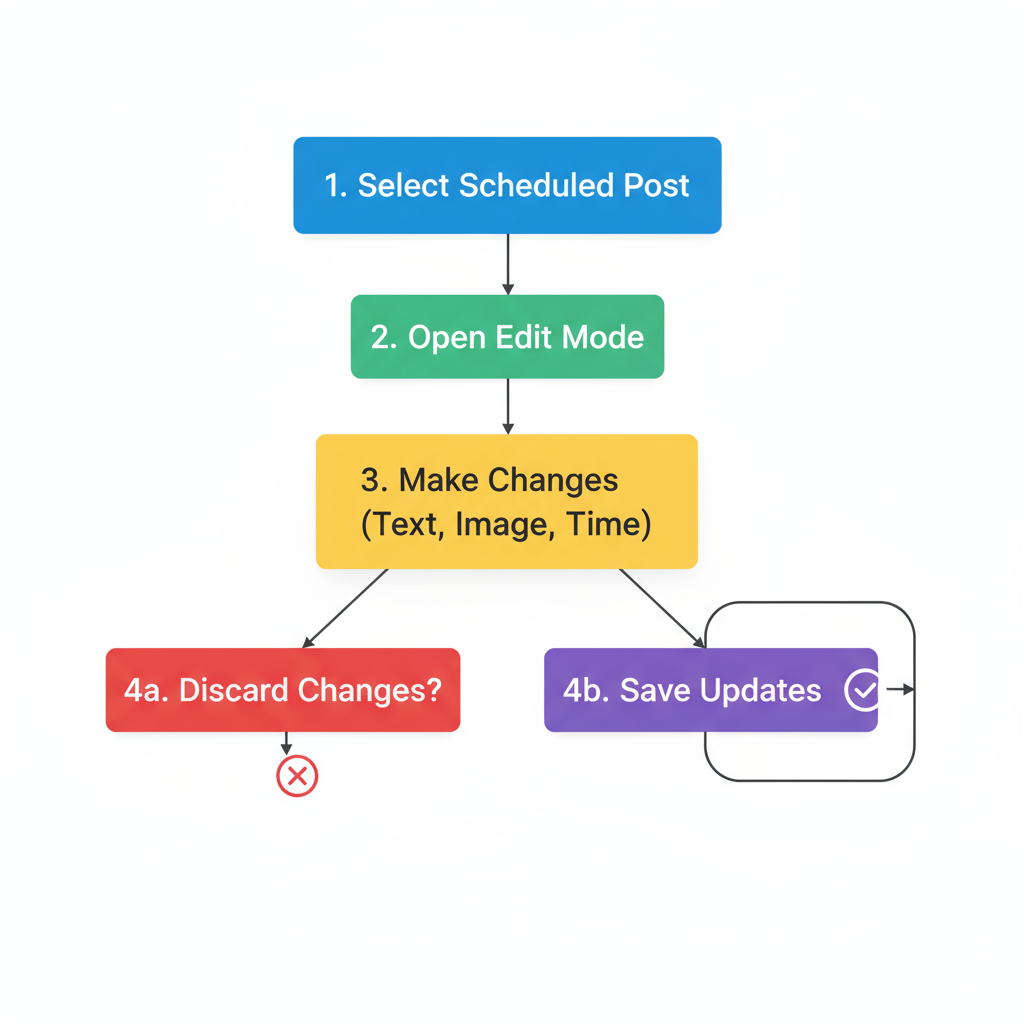
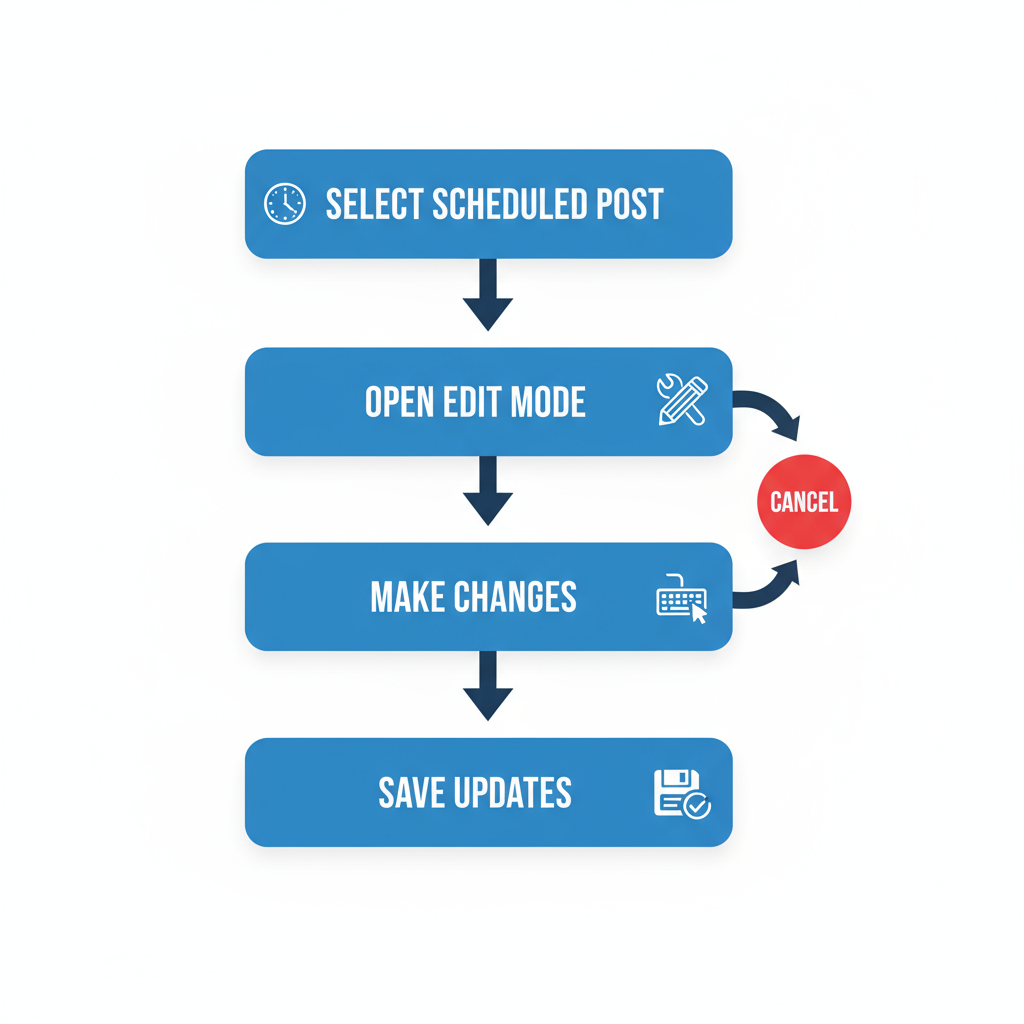
Step-by-Step Guide: Editing in LinkedIn’s Native Scheduler
Editing via LinkedIn’s built‑in scheduler is simple, but note the restrictions.
Steps:
- Access Scheduled Posts
- Use the method above to open your scheduled list.
- Select the Post
- Click the post entry to view a preview.
- Edit the Content
- Tap or click the pencil icon to adjust the text, add/remove hashtags, mention new users, or swap media.
- Save Changes
- Confirm and save your edits. The date/time remains unless you change it.
- Reconfirm Scheduling
- Review the preview to verify your publishing settings.
> Note: Some post types, like polls, cannot be edited after scheduling.
---
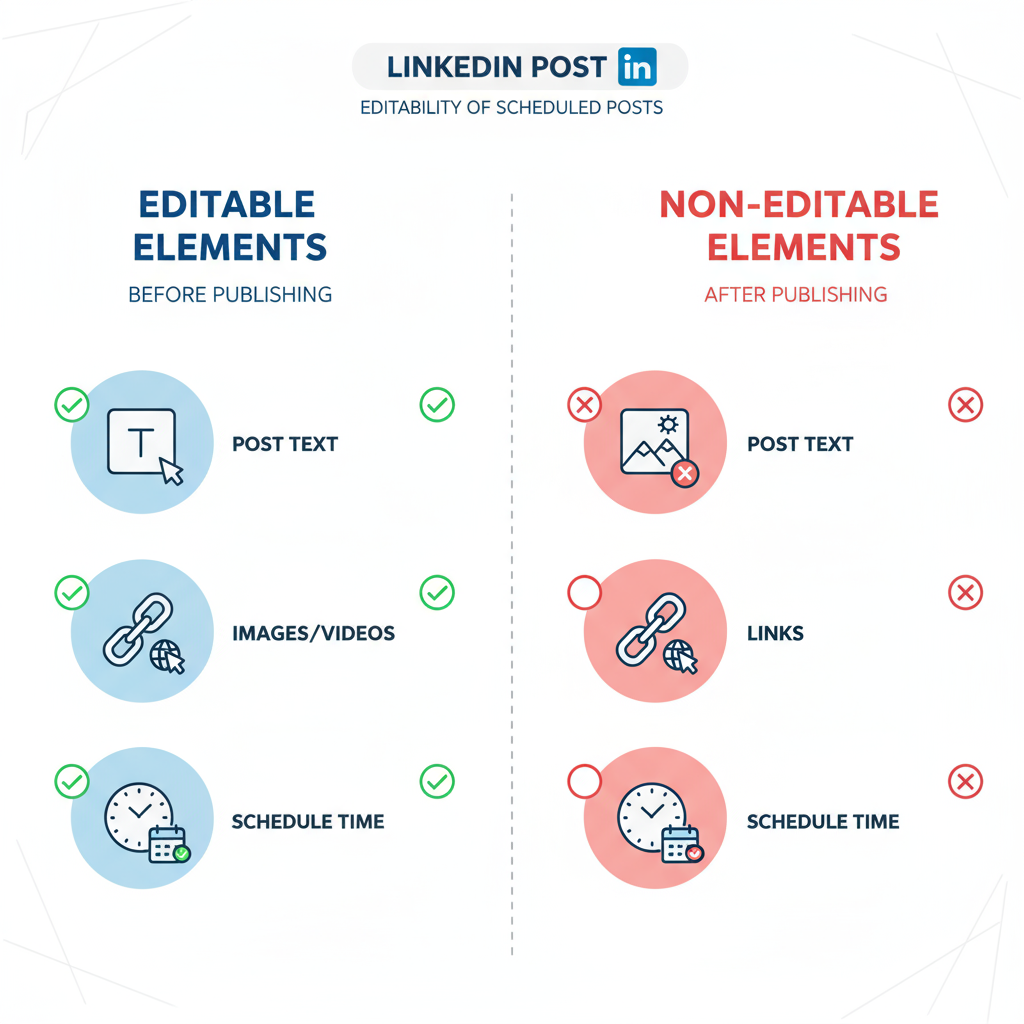
Limitations: What You Can and Cannot Edit
| Can Edit | Cannot Edit |
|---|---|
| Post text content | Poll questions/responses |
| Media (images, videos, documents) | Event posts date/time |
| Hashtags & @mentions | Attached articles’ metadata |
| Scheduled date/time | Audience targeting (for company pages after post creation) |
When editing is blocked, the only option is to delete and recreate the post.
---
How to Reschedule Without Editing Content
If the text and media are correct but the publish time needs adjusting:
- Go to your scheduled post list.
- Select the target post.
- Change the date/time in the schedule pop‑up.
- Save changes — LinkedIn will update accordingly.
Rescheduling saves time by avoiding full re‑entry of content.
---
Using Third-Party Scheduling Tools for More Flexibility
Many third‑party tools offer a richer editing experience and added features:
- Bulk editing
- Advanced analytics and insights
- Team workflow and approval pipelines
Example: Hootsuite
- Access “Publisher” view.
- Find the post in your queue.
- Click “Edit,” make changes, then save.
Example: Buffer
- Open the calendar view.
- Select the post and adjust copy, media, hashtags, or timing.
These tools can often apply edits directly to LinkedIn or republish through their API.
---
Tips for Optimizing Post Content Before and After Scheduling
Reduce the need for last‑minute changes by:
- Writing a compelling hook in the first two lines.
- Staying within LinkedIn’s 3,000‑character post limit.
- Adding 3–5 relevant hashtags.
- Tagging people and organizations for extended reach.
- Incorporating visuals like images, videos, or PDFs.
---
Best Practices to Minimize Emergency Edits
- Create a Content Calendar – Plan several weeks ahead.
- Secure Approvals Early – Especially for corporate or client accounts.
- Draft and Proofread in Docs – Refine before inserting into the scheduler.
- Test Formats – Learn what content types your audience prefers.
- Leave Buffer Time – Schedule with enough lead time to adjust if needed.
---
Troubleshooting Editing Issues
Possible Problems & Fixes:
- No Edit Option – Certain formats (polls, events) can’t be edited; delete and rebuild.
- Unsaved Changes – Refresh and try again; check for session timeouts.
- Media Upload Errors – Re‑upload matching LinkedIn size/format requirements.
- Time Zone Mismatch – Confirm and adjust your account time zone in settings.
- Third‑Party Sync Issues – Re‑auth and resync integrations.
---
Summary & Next Steps
Editing scheduled posts on LinkedIn is doable with both native and external tools, although the degree of control varies. LinkedIn’s built‑in option is fastest for small tweaks, but tools like Hootsuite or Buffer provide more robust editing, scheduling, and collaboration features.
Remember:
- Start by locating your scheduled posts.
- Be aware of what’s editable.
- Use rescheduling to correct timing rather than rebuilding content.
- Plan ahead to prevent rushed, low‑quality edits.
By combining proactive planning with the right scheduling method, you can efficiently manage and adjust your LinkedIn content — ensuring it delivers maximum impact. Ready to streamline your social posting? Test both native and third‑party schedulers to find the best fit for your workflow.


