How to Make a Photo Fit Instagram Without Cropping
Learn how to make photos fit Instagram without cropping using correct dimensions, free apps, and border techniques to keep images sharp and complete.

How to Make a Photo Fit Instagram Without Cropping
Sharing your creative work on Instagram should not mean losing important parts of your photo. Many creators search for how to make photo fit Instagram without sacrificing quality or composition. Whether you’re posting to the feed, stories, or reels, understanding the right dimensions and applying smart editing techniques ensures your entire photo displays perfectly — and stays sharp.
In this guide, you’ll learn Instagram’s size requirements, discover free tools for resizing images, and explore design tips like borders and composition adjustments. By following these steps, you can post your content with no unwanted cropping, maintain high resolution, and keep your visual style consistent.
---
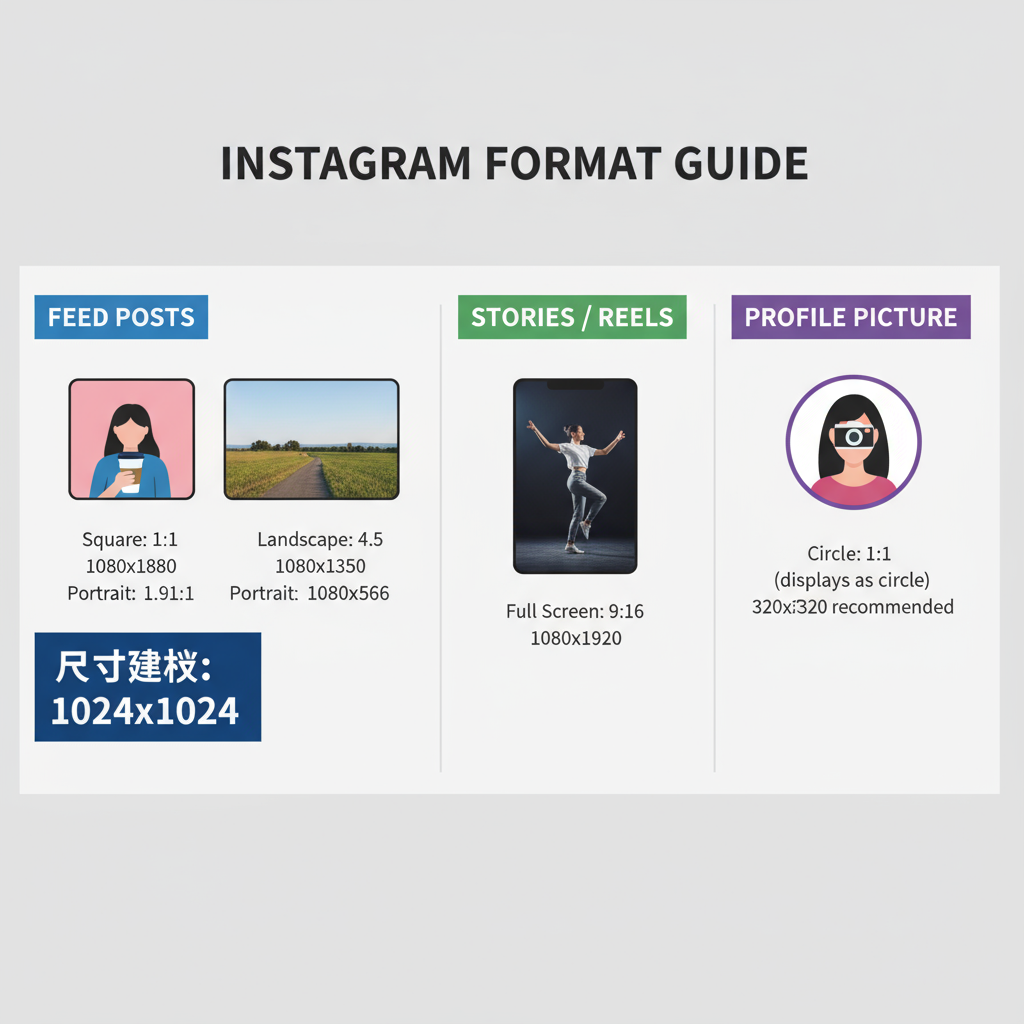
Understanding Instagram Image Size Requirements
Instagram supports several content types, each with its own optimal dimensions. Knowing these specifications before you edit saves you time and avoids frustrating re-uploads.
Feed Posts
- Square: 1080 x 1080 px (aspect ratio 1:1)
- Portrait: 1080 x 1350 px (aspect ratio 4:5 — maximum for portrait)
- Landscape: 1080 x 566 px (aspect ratio 1.91:1)
Stories and Reels
- Full-screen vertical: 1080 x 1920 px (aspect ratio 9:16)
- Keep vital elements inside the central safe zone (~1080 x 1420 px) to prevent UI overlap.
Profile Pictures
- Display size: 110 x 110 px — but upload at 320 x 320 px for maximum clarity.
| Type | Recommended Size | Aspect Ratio |
|---|---|---|
| Feed Square | 1080 x 1080 px | 1:1 |
| Feed Portrait | 1080 x 1350 px | 4:5 |
| Feed Landscape | 1080 x 566 px | 1.91:1 |
| Story/Reel | 1080 x 1920 px | 9:16 |
| Profile Pic | 320 x 320 px | 1:1 |
---
Checking Aspect Ratios for Different Post Types
Aspect ratio describes the relationship between width and height. If your photo doesn’t match Instagram’s supported ratios, the platform will crop it automatically.
Standard Instagram ratios include:
- Landscape: 1.91:1
- Portrait: 4:5
- Square: 1:1
- Full-screen vertical: 9:16
Photos from DSLR cameras often have a 3:2 ratio, which may require adjustment to avoid losing parts of the frame.
---
Using Instagram’s Built-in Crop and Zoom Tools Effectively
When uploading, use the size icon in the bottom-left of the preview to fit more of your photo. If the photo falls outside the supported aspect range, Instagram will crop it anyway.
Tips to maximize visible area:
- Pinch and zoom out within the preview.
- For tall portraits beyond 4:5, crop strategically to avoid cutting off heads or important details.

---
Resizing Photos Using Free Mobile Apps (No Watermark)
Several free apps can resize and pad your photo for Instagram without watermarking.
Top free choices:
- Snapseed – Resize and use the Expand tool (iOS/Android).
- Canva – Free custom dimension templates for Instagram.
- InShot – Add borders or blurred backgrounds.
- Adobe Express – Quick resize presets for different formats.
Workflow example using Snapseed:
- Open photo in Snapseed.
- Tap Tools > Expand to add space evenly.
- Save at the highest resolution.
---
Adding White, Colored, or Blurred Borders
Borders are a proven way to fit images inside Instagram’s frame while keeping the whole picture.
- White borders – Clean and minimal, perfect for art-focused feeds.
- Blurred borders – Use a blurred version of your image as background for a cinematic vibe.
- On-brand colored borders – Boosts your branding and feed consistency.
Apps like InShot and Canva make border size and style customization straightforward.
---
Optimizing Images for High Resolution
Instagram compresses media upon upload, which can dull details. Reduce visible compression by:
- Starting with the highest quality file.
- Exporting feed images at 1080 px width, stories/reels at 1920 px height.
- Saving JPEGs at 80–90% quality, or PNG for graphics/text-based images.
- Staying within the sRGB color space.
---
Editing Composition to Keep the Subject Central
Resizing can unintentionally shift the subject within the frame.
- Activate grid lines in your editor and use the rule of thirds.
- Keep important focal points away from the extreme edges.
- In portraits, position eyes about one-third from the top.
---
Previewing Across Devices
Instagram renders differently on iOS, Android, and desktop. To avoid surprises:
- Save the edited image to your device.
- Open it in Instagram’s preview before publishing.
- Test on multiple devices if possible.

---
Exporting With the Right Formats and Sizes
Recommendations:
- JPEG (.jpg) for photos — good balance of quality and file size.
- PNG (.png) for images with text, line art, or graphics.
- Keep image file sizes under 30MB (Instagram max).
For feed posts, limit width to 1080 px; for tall formats like stories, match 1080 x 1920 px exactly.
---
Troubleshooting Common Issues
| Issue | Cause | Solution |
|---|---|---|
| Blurry Images | Large file uploaded without resizing; compression applied | Resize to 1080 px width before posting; export at high JPEG quality |
| Color Shift After Upload | Instagram color processing differences | Edit in sRGB; avoid extreme saturation that may clip |
| Borders Cut Off | Aspect ratio mismatch | Use correct ratios (1:1, 4:5, 9:16) during export |
| Subject Off-Center | Canvas expansion without repositioning main subject | Re-align subject using editing grids and centering tools |
---
Final Thoughts
Mastering how to make photo fit Instagram without cropping comes down to planning your aspect ratio, using borders and padding when needed, and exporting at the right resolution. With today’s free editing tools, there’s no reason to compromise your photo’s composition or quality.
Test different methods, preview your posts before publishing, and ensure consistency in your feed. This not only keeps your content looking professional but also helps you stand out in the crowded Instagram landscape. Start applying these tips today and watch your visual branding improve with every post.