How to Make a YouTube Channel Public on Desktop and Mobile
Learn how to make your YouTube channel and videos public on desktop and mobile, adjust default settings, and verify visibility for better reach.

How to Make a YouTube Channel Public (Step-by-Step Guide)
Making your YouTube channel public is essential if you want your videos to reach a wider audience and be discoverable via search and recommendations. This guide explains exactly how to change your YouTube privacy settings, verify visibility, avoid common pitfalls, and optimize for growth—perfect for anyone asking "how do you make a YouTube channel public?".

---
Understanding YouTube Channel Privacy Settings
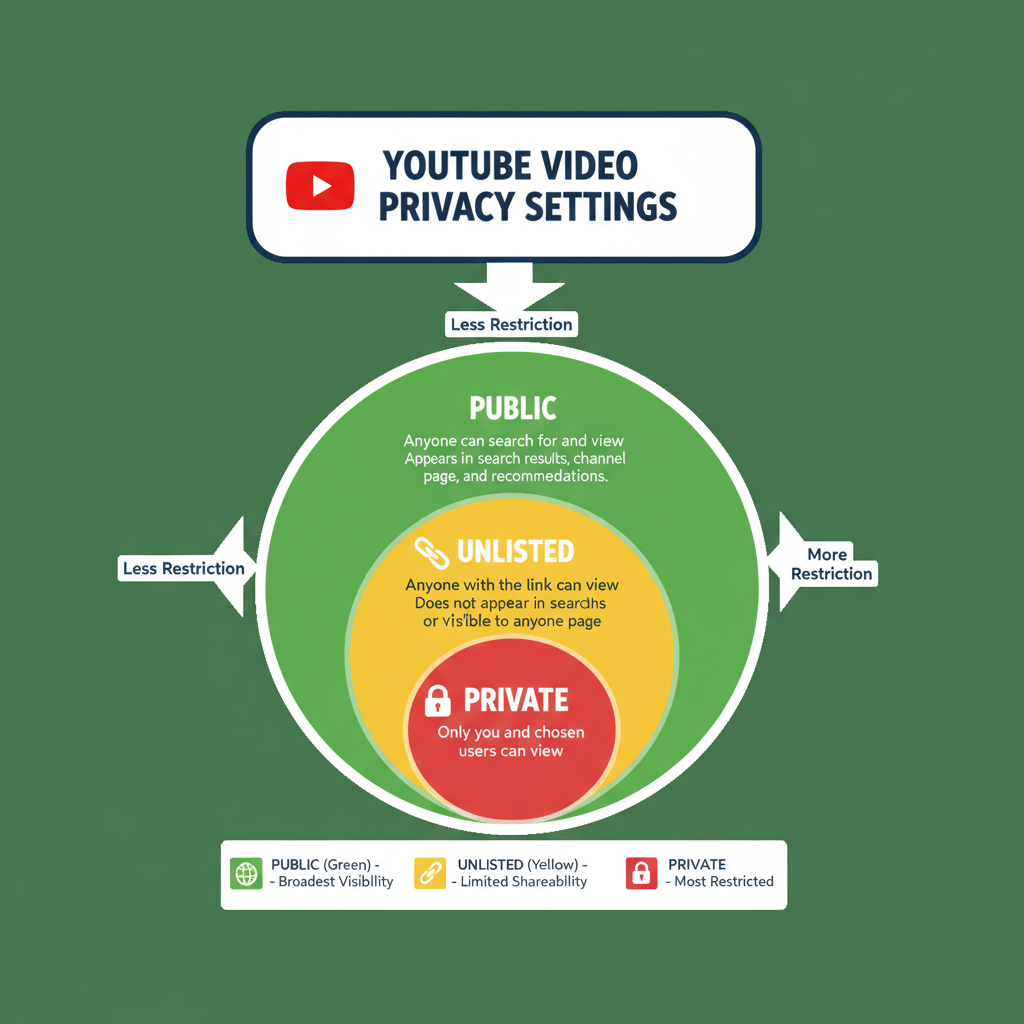
When you create a new YouTube channel, you can choose who can see it and its content. Your videos and playlists can be Public, Unlisted, or Private.
- Public – anyone can find and watch your videos.
- Unlisted – only people with the link can view them.
- Private – only you (and invited Google accounts) can see them.
If you’re asking, “How do you make a YouTube channel public?”, the answer lies in adjusting privacy settings both at the channel and video level. This ensures all content is discoverable through search and recommendations.
---
Step 1: Check if Your Channel Is Private or Unlisted
Before changing settings, confirm your current channel visibility:
- Open YouTube and click your profile icon.
- Select Your Channel.
- Look for a message that says “This channel is not visible to other users.”
- If there’s no such message, check your default video privacy in YouTube Studio.
Also, browse your own videos to see if they are marked as Private or Unlisted. This will influence how effective your changes will be.
---
Step 2: Sign In to Your YouTube Account
You must be signed in to the Google account linked to your channel:
- Desktop:
- Go to YouTube.com and click Sign In at the top right.
- Mobile App:
- Open the YouTube app, tap your profile photo, and sign in.
If you manage multiple channels, make sure you’re using the correct account. Switching can easily be done via the account menu.
---
Step 3: Open YouTube Studio and Access Customization
Once signed in:
- On Desktop:
- Click your profile picture.
- Select YouTube Studio.
- In the left menu, choose Customization.
- On Mobile (browser or app link):
- Visit studio.youtube.com.
- Tap the menu ☰ icon.
- Select Customization.
In Customization, manage branding, layout, and—most importantly—Basic Info where you can find the channel visibility settings.
---
Step 4: Change Channel and Video Privacy to Public
To make the channel public:
- In YouTube Studio → Customization → Basic Info:
- Find Channel visibility.
- Choose Publish instead of keeping the channel hidden.
- Set existing videos to public:
- Go to Content in the left menu.
- Select multiple videos using checkboxes.
- Click Edit → Visibility → Public.
This makes your channel appear in YouTube search results and allows access to all public videos.
---
Step 5: Update Default Upload Settings
To ensure new videos are public automatically:
- Go to YouTube Studio → Settings → Upload defaults.
- Under Visibility, select Public.
- Save changes.
Now every upload will default to public status, saving time and maintaining consistency.
---
Step 6: Verify Channel Visibility
After making changes, verify both on desktop and mobile.
| Device | How to Verify | Expected Result |
|---|---|---|
| Desktop | Open an incognito window, search for your channel by name | Channel appears in results; videos are playable |
| Mobile | Sign out or use Incognito mode, search in the YouTube app | Channel is visible; videos marked as Public |
---
Step 7: Troubleshoot Common Restrictions
Sometimes, even a public channel may face limited visibility due to:
- Age Restrictions – flagged videos won’t appear to all viewers.
- Copyright Claims – certain regions may be blocked from viewing.
- Community Guidelines Strikes – some features disabled temporarily.
- Regional Restrictions – licensed content may vary by country.
Solutions include:
- Reviewing YouTube’s notification emails.
- Appealing incorrect restrictions.
- Editing content to comply with YouTube policies before re-uploading.
---
Step 8: Improve Discoverability After Going Public
Once public, grow your channel by:
- Optimizing Titles & Descriptions – use relevant keywords naturally.
- Custom Thumbnails – attract more clicks.
- Creating Playlists – boost watch time.
- Cross-Promoting – share videos on social channels and forums.
- Engaging with Viewers – reply to comments, pin valuable responses.
---
Step 9: Maintain Channel Optimization
Visibility is just the start. Maintain performance with:
- Consistent Upload Schedule to keep viewers engaged.
- Analytics Review to identify top-performing videos.
- Metadata Updates for older content.
- Community Engagement via polls, posts, and live streams.
- Accessibility Features like captions to reach a broader audience.
---
Summary and Next Steps
Making your YouTube channel public is straightforward: go to YouTube Studio, set channel visibility to Published, change all videos to Public, and update default upload settings. Always verify visibility from a signed-out view and troubleshoot restrictions as needed.
Once your channel is public, shift focus to SEO optimization, consistent publishing, and audience engagement to maximize growth.
Start now and make sure your content gets the visibility it deserves—log in to YouTube Studio and publish your channel today.