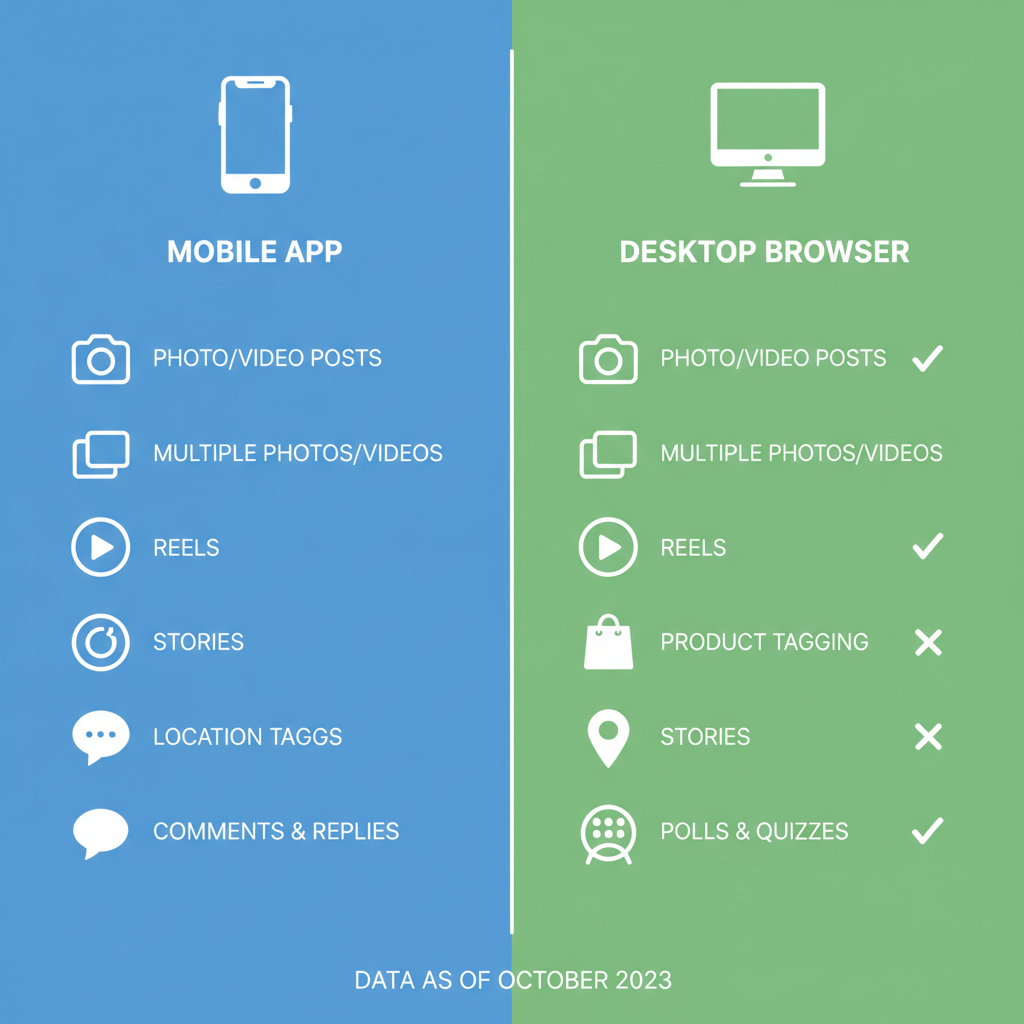
Convert files to JPEG for images or MP4 for videos
Slow editor performance
Browser extension interference
Disable extensions temporarily and reload Instagram
Factor
Desktop
Mobile
Media source
Easy import from hard drive
Instant camera shots
Editing tools
Basic but functional
Advanced creative tools
Convenience
Suited for high-res, large uploads
Perfect for quick updates
Accessibility
Use of large screen and keyboard
Portable posting anywhere
## How to Post on the Instagram Website from Your Computer
If you’ve ever wondered how to post on the **Instagram website** directly from a laptop or PC, you’ll be pleased to know Instagram now supports desktop uploads. This means you can publish high-quality, large-format photos and videos without transferring files to your phone. In this guide, you’ll learn exactly **how to post on the Instagram website from your computer**, complete with step-by-step instructions, optimization tips, troubleshooting advice, and best practices for consistent engagement.
---
## Understanding Instagram’s Desktop Posting Capabilities
While Instagram’s mobile app still offers the most robust set of creative tools, its desktop version has improved considerably. Today you can:
- Upload images and videos directly from your computer.
- Add captions, hashtags, tags, and locations.
- Apply built-in editing tools and filters.
- Control comment permissions and accessibility options.
**Limitations include:**
- Certain stickers and story features are mobile-only.
- Advanced reel editing remains restricted.
- Some direct messaging features may work better on mobile devices.
---
## Ensure Your Browser and Instagram Are Updated
Before posting from the desktop version of Instagram, make sure your setup is compatible to avoid upload errors or sluggish performance. This includes:
- **Updating your browser** (Chrome, Edge, Firefox, or Safari) to its latest version.
- Clearing cookies or caching issues if pages seem slow or broken.
- Logging out and back in if the Instagram layout appears distorted.
**Pro Tip:** Avoid heavily customized or unsupported browsers, as they may block scripts necessary for media uploads.
---
## Log In to Instagram.com
Posting requires access to your account via the official site:
1. Go to [Instagram.com](https://www.instagram.com).
2. Enter your username or email and password.
3. Use two-factor authentication for enhanced security.
Once logged in, you can head to your **home feed** or **profile page** to get started.
---
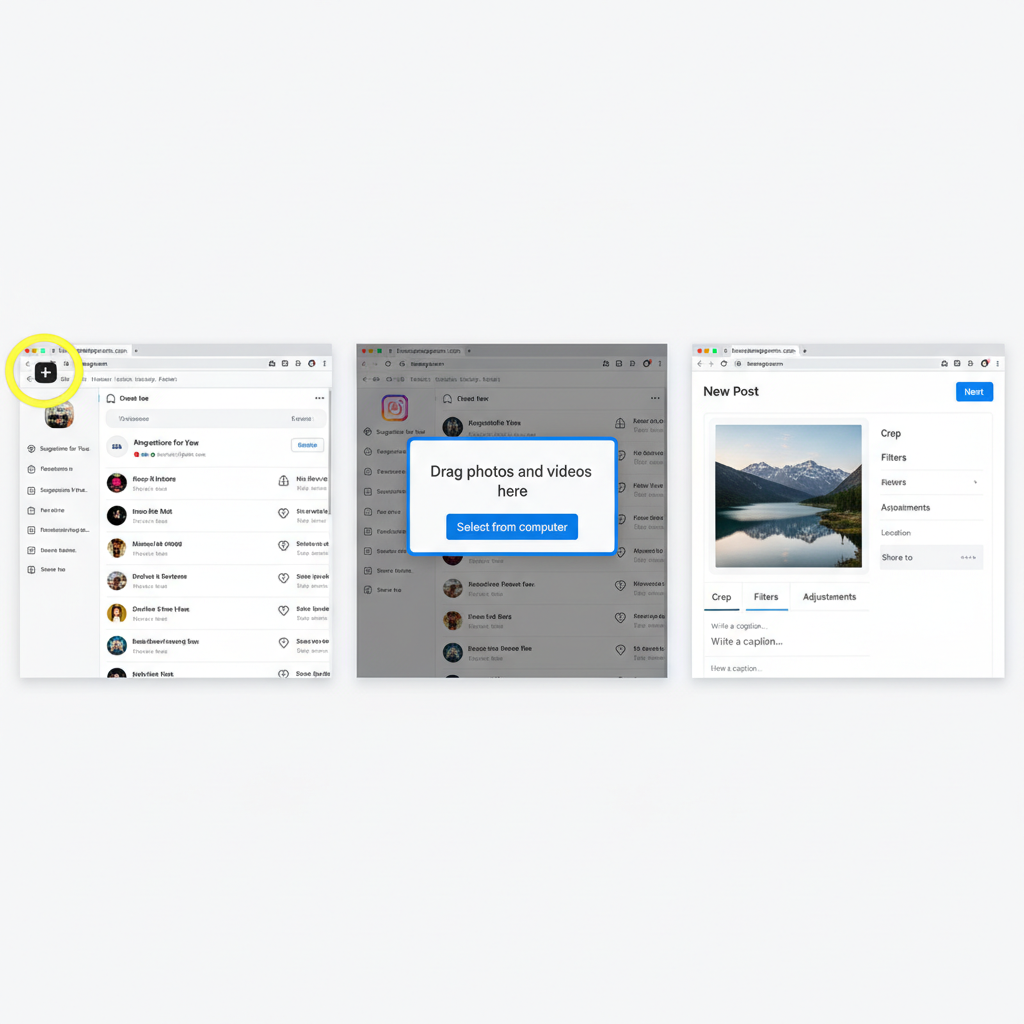
## Click the "+" Icon in the Top Navigation
Instagram has introduced a **“+”** icon in its top navigation bar on desktop:
1. Look for the “+” button between Direct Messages and Explore icons.
2. Click it to access the post creation tool.
---
## Upload an Image or Video from Your Computer
When the post creation window opens:
- Drag and drop files directly into the upload area.
- Or click **Select from computer** to browse your file system.
Supported formats are:
---
## Crop, Rotate, and Adjust Media
Within Instagram’s desktop editor, you can:
- **Crop** to square, portrait, or landscape.
- **Rotate** to fix orientation issues.
- **Zoom** for framing.
Typical Instagram aspect ratios:
- **Square (1:1)**: Standard format for feed posts.
- **Portrait (4:5)**: Best visual impact in mobile feeds.
- **Landscape (1.91:1)**: Ideal for wider visuals.
---
## Apply Filters and Adjustments
The desktop platform offers popular filter styles and adjustment sliders:
- Filters like Clarendon, Juno, and more.
- Brightness, contrast, and warmth controls.
- Saturation adjustments to enhance colors.
Subtle use of these tools can make your content pop while keeping it natural-looking.
---
## Add a Compelling Caption
Your caption should capture attention and invite engagement:
- Share a quick story or relevant context.
- Include **relevant hashtags**—5 to 15 targeted tags is ideal.
- Format with line breaks and emojis for visual appeal.
Example:
> “New design launch 🚀 #WebDesign #BrandIdentity #CreativeSolutions”
---
## Tag People and Set a Location
Boost reach by:
- Tagging collaborators, influencers, or friends related to the post.
- Adding a location to appear in local discovery results.
**Tip:** Keep tagging authentic to avoid looking spammy.
---
## Review Post Settings
Before you share:
- **Comment controls**: Decide who can comment or disable comments entirely.
- **Accessibility options**: Provide descriptive alt text.
Alt text supports accessibility for visually impaired users and can improve discoverability.
---
## Click “Share” to Publish
After reviewing everything:
- Click the **Share** button to publish.
- Your post will display in your profile grid, followers’ feeds, and in searches tied to hashtags or locations.
---
## Tips for Optimizing Desktop Uploads
To make the most of this feature:
1. **Image resolution**: Use at least 1080px width.
2. **Aspect ratio**: Stay within Instagram’s accepted ratios to avoid awkward cropping.
3. **Compression**: Optimize file size for faster loading without losing much detail.
---
## Troubleshoot Common Posting Errors
Here are some common issues and how to fix them:
---
## Desktop vs. Mobile Posting: Pros & Cons
---
## Best Practices for a Consistent Posting Schedule
Consistency builds audience trust and engagement:
- Plan desktop uploads in weekly batches.
- Maintain a content calendar.
- Ensure brand consistency in design and captions.
- Use Instagram Insights to refine timing and content strategy.
---
## Summary & Next Steps
Now you know **how to post on the Instagram website from your computer**—from signing in and selecting media, to editing and optimizing for maximum reach. Desktop posting is ideal for high-quality uploads and can streamline your workflow when managing content libraries stored locally.
Start experimenting with these steps today, and integrate desktop posting into your routine to gain more control over your Instagram presence. Want to boost engagement even further? Try pairing these techniques with a consistent hashtag strategy and thoughtful caption writing for lasting results.