Publish Tableau Dashboard: Step-by-Step Guide
Learn how to publish Tableau dashboards step-by-step, from preparing and optimizing performance to managing permissions across server, online, and public.

Publish Tableau Dashboard: Step-by-Step Guide
Publishing a Tableau dashboard is a crucial step in sharing valuable insights with your audience and stakeholders. Once your visualizations are complete, knowing how to publish Tableau dashboard content effectively ensures it is secure, accessible, and optimized for performance. In this guide, you'll learn the main publishing options, how to prepare your dashboard, optimize load times, manage permissions, and address common issues.
---
Understanding Publishing Options in Tableau
When you publish Tableau dashboard content, you have three primary destinations to choose from, each with unique benefits and constraints.
1. Tableau Server
- On-premises solution installed on your organization’s infrastructure.
- Ideal for internal sharing with tight security controls.
- Integration with Active Directory for authentication.
2. Tableau Online
- Cloud-hosted version of Tableau Server maintained by Tableau.
- Requires no hardware setup.
- Secure, accessible from anywhere with internet access.
3. Tableau Public
- Free, publicly accessible platform for sharing visualizations.
- Suitable for open data projects, blogs, and portfolios.
- All data and dashboards are publicly visible—no sensitive data.
| Platform | Hosting | Security | Best Use Case |
|---|---|---|---|
| Tableau Server | On-premises | High (customizable) | Enterprise internal reports |
| Tableau Online | Cloud | High (managed by Tableau) | Dispersed teams & remote work |
| Tableau Public | Cloud (public) | None | Open data sharing |
---
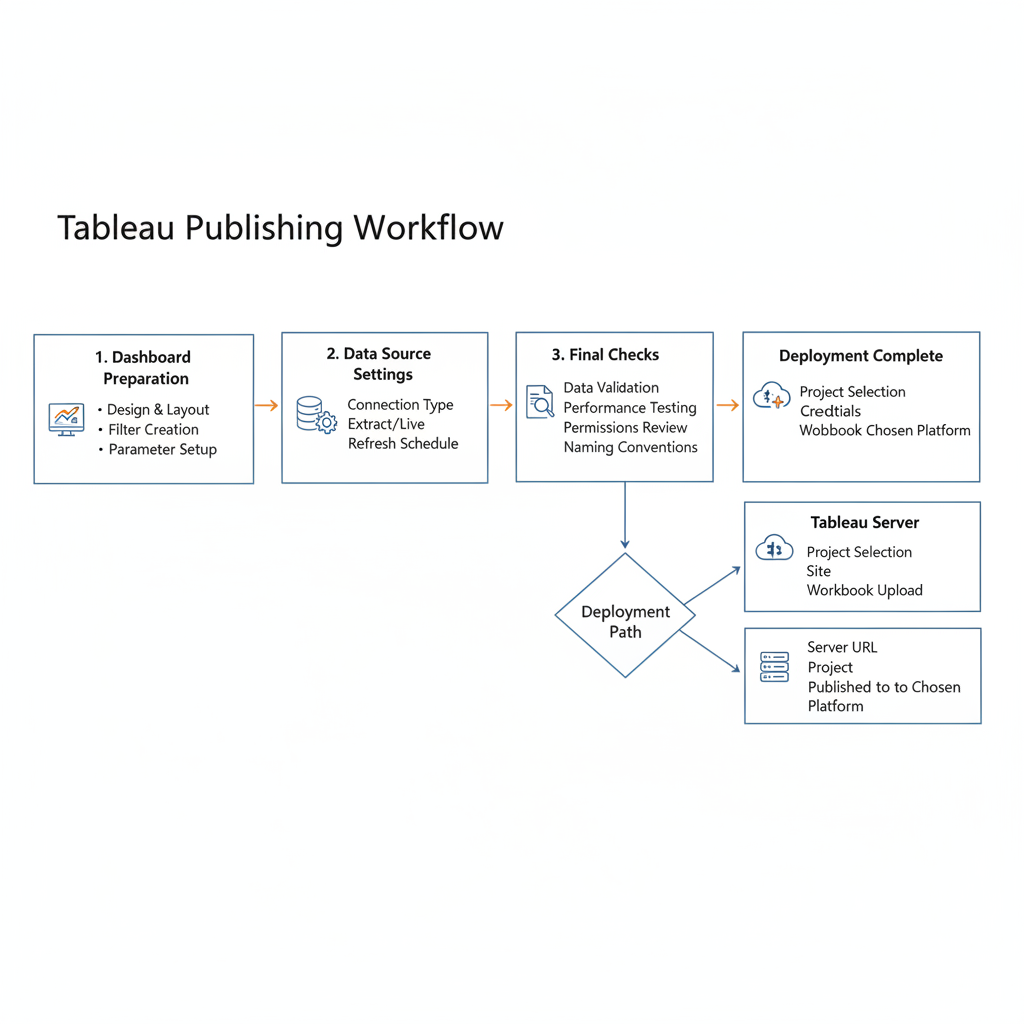
Prepare the Dashboard for Publishing
Before clicking the publish button, perform a thorough review to ensure your content is accurate, functional, and visually appealing.
Final Checks
- Review data accuracy to confirm that calculations yield correct results.
- Validate visual design consistency: formatting, color schemes, legends.
- Test filters and parameters for usability.
Data Source Settings
- Choose between live connection or extract:
- Live for real-time results (may affect speed).
- Extract for faster querying and offline access.
- Confirm data source permissions are aligned with the chosen publishing platform.
---
Optimize Dashboard Performance Before Publishing
Performance affects usability—slow dashboards can drive users away.
Reduce Load Time
- Minimize the number of sheets to what is strictly necessary.
- Avoid high-cardinality filters that slow queries.
- Compress or limit image sizes.
Efficient Calculations
- Replace redundant calculated fields with table calculations.
- Employ aggregated data extracts to reduce query complexity.
- Optimize SQL queries and joins before integrating with Tableau.
---
Set User Permissions and Access Levels
Permissions govern who can view, download, or edit dashboards once they are live.
Role-Based Access
- Viewer: Can see and interact but not edit.
- Editor: Can modify content within permitted areas.
- Admin: Full control over content and permissions.
Implementation Tips
- Assign permissions at the group level for easier management.
- Audit permissions regularly to maintain compliance with data security policies.
---
Publish to Tableau Server (Manual Upload Method)
Publishing to Tableau Server enables secure sharing within an organization.
Steps
- Open the dashboard in Tableau Desktop.
- Go to Server > Publish Workbook.
- Sign in to Tableau Server with valid credentials.
- Choose the project folder for hosting.
- Configure data source permissions appropriately.
- Click Publish to make the dashboard live.
---
Publish to Tableau Online (Cloud-Based Approach)
Tableau Online offers convenience and accessibility for distributed teams.
Procedure
- In Tableau Desktop, select Server > Tableau Online > Publish Workbook.
- Authenticate via your Tableau Online account.
- Select or create a project folder.
- Adjust extract schedules for timely updates.
- Press Publish and verify access from the cloud.
---
Publish to Tableau Public (Public Sharing and Privacy Considerations)
Tableau Public is an open platform for sharing visual insights broadly.
Points to Note
- No privacy—all uploaded data is visible publicly.
- Best for academic projects, portfolio pieces, or public data journalism.
- Always anonymize or remove sensitive information.
Publishing Steps
- Log in to your Tableau Public profile.
- Click File > Save to Tableau Public As… in Tableau Desktop.
- Provide a clear title and relevant tags for SEO purposes.
- Share the public URL generated.

---
Test Access from Different Devices and Browsers
Verifying accessibility ensures a consistent user experience.
- Test dashboard performance on desktop, tablet, and mobile devices.
- Use popular browsers such as Chrome, Firefox, Edge, and Safari.
- Confirm interactive features (filters, tooltips) function correctly on all platforms.
Tip: Tableau’s Device Designer allows custom layouts for different devices before publishing.
---
Update and Maintain Dashboards After Publishing
Dashboards require regular updates to stay relevant and accurate.
Updating Data
- Schedule refreshes for extract-based dashboards.
- Implement version control for workbook iterations.
Maintenance Tasks
- Monitor and improve performance periodically.
- Collect user feedback for iterative design enhancements.
- Reassess permissions to ensure continued compliance.
---
Common Publishing Errors and How to Fix Them
Understanding and resolving errors promptly ensures smooth operations.
| Error | Cause | Solution |
|---|---|---|
| Authentication Failure | Incorrect credentials or expired session | Log out/in, verify permissions |
| Data Source Not Found | Missing local connection or inaccessible database | Confirm database access; use extracts if necessary |
| Slow Performance | Complex calculations, large datasets | Optimize queries, simplify visuals |
| Permission Denied | Insufficient rights for publishing | Request role update from administrator |
---
Summary
Successfully publishing a Tableau dashboard blends technical precision with strategic planning. By choosing the right platform—Tableau Server, Tableau Online, or Tableau Public—optimizing performance, and controlling permissions, you can deliver secure and impactful analytics experiences.
Follow these steps, monitor performance, and continue refining your dashboards to keep them effective and engaging. Ready to share your insights? Start publishing your Tableau dashboards today for maximum impact and visibility.