How to Publish a Page on Facebook Step by Step
Learn step-by-step how to publish a Facebook Page, from setup and admin roles to visuals, contact info, guidelines, and going live.

How to Publish a Page on Facebook Step by Step
Publishing a Facebook Page is a crucial move for boosting your brand's online presence. Whether you're creating a profile for your business, a community, or a personal brand, learning how to publish page Facebook with precision will help maximize reach and engagement. This guide walks you through each step — from preparing essential details to optimizing content and monitoring performance after going live.
---
Understanding Published vs. Unpublished Facebook Pages
Before diving into your page settings, it’s important to know the difference between published and unpublished pages:
- Published Page: Visible to everyone on Facebook, searchable, and open to likes and follows from the public.
- Unpublished Page: Hidden from public view; only admins can access and edit until it’s ready for launch.
Unpublished pages allow you to build the structure, appearance, and key information with no public interference. Once you're satisfied, you can switch to a published state.
---
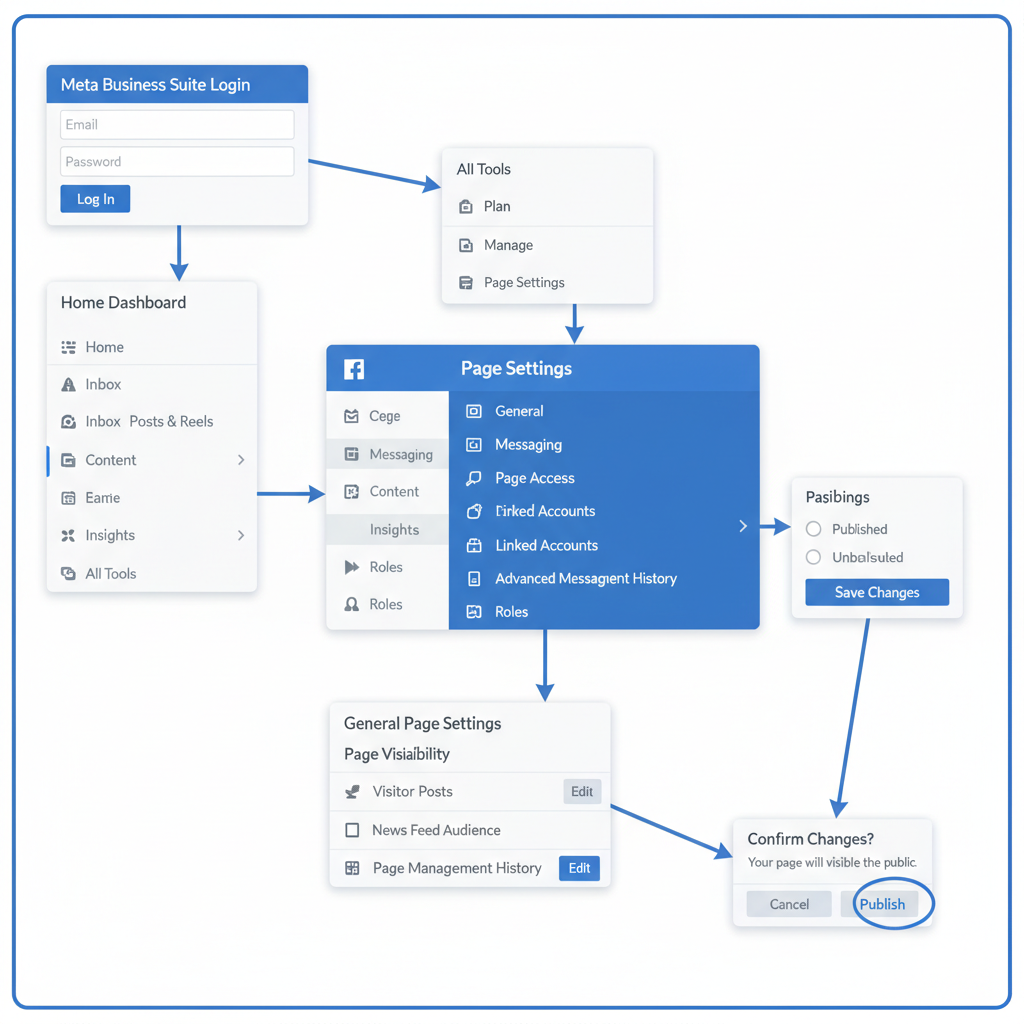
Step 1: Log Into Facebook and Navigate to Meta Business Suite or Page Settings
Follow these steps to access your draft page:
- Log into the Facebook account with administrative rights to your page.
- Click the Pages section in the left-hand navigation menu.
- Select your page draft.
- Choose Meta Business Suite or go directly to Settings.
Meta Business Suite offers enhanced publishing tools, analytics, and unified control.
---
Step 2: Verify Page Ownership and Admin Permissions
Publishing a page requires Admin or Editor access; without them, visibility adjustments aren’t possible.
- Navigate to Settings → Page Roles.
- Confirm your role type.
- If you don’t have admin rights, request them from the page owner.
---
Step 3: Complete Required Page Information
Ensure the basic details are added before publishing:
- Page Name: Utilize your brand’s name or a clear, descriptive title.
- Category: Select the most relevant category (e.g., Local Business, Community, Product/Service).
- Description: Write a concise, keyword-rich paragraph introducing the page’s purpose.
This foundational info enhances Facebook search discoverability and SEO visibility across platforms.
---
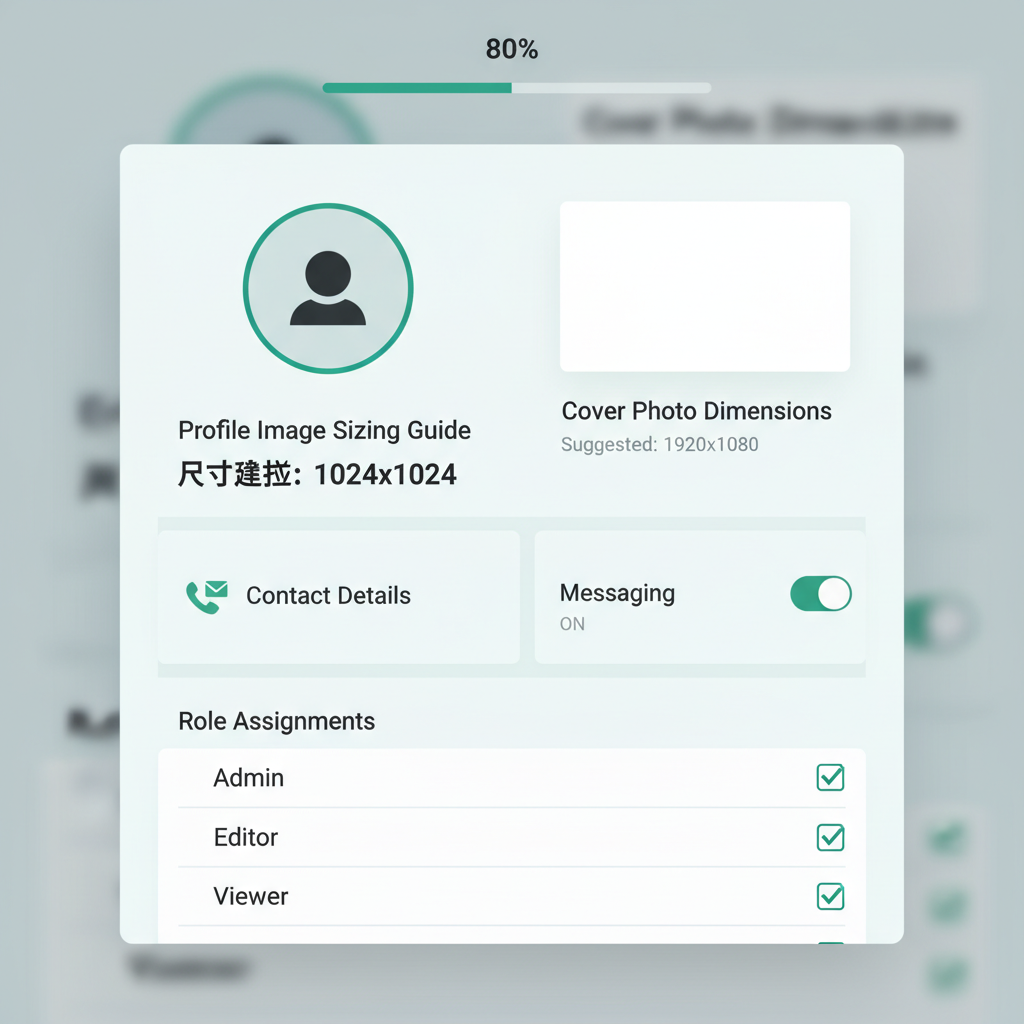
Step 4: Upload Profile and Cover Images with Correct Size and Format
Engaging visuals matter. Prepare high-quality images based on Facebook’s recommended dimensions:
| Image Type | Recommended Size | File Format |
|---|---|---|
| Profile Picture | 180 x 180 px | JPG / PNG |
| Cover Photo | 820 x 312 px | JPG / PNG |
Upload images through Settings → Page Info or directly from the main page view.
---
Step 5: Add Contact Details and Location (Optional)
Boost credibility by including:
- Phone number.
- Business email address.
- Physical location (advisable for local businesses).
This makes connecting with your audience more seamless.
---
Step 6: Enable Messaging and Assign Page Roles
For better customer service:
- Enable Messenger in Settings → Messaging.
- Set automated responses for FAQs.
For team management:
- Assign roles such as Moderator, Editor, or Advertiser under Page Roles.
---
Step 7: Review Facebook Community Standards and Page Guidelines
Before publishing:
- Avoid prohibited content like hate speech or illegal goods.
- Comply with advertiser policies if running ads.
- Adhere to copyright and intellectual property rules.
Noncompliance can cause publishing delays or restrictions.
---
Step 8: Publish Your Page via Settings → Page Visibility
Ready to go public?
- Go to Settings → Page Visibility.
- Switch from "Unpublished" to "Published."
- Save changes.
Your page is now live for the public.
---
Step 9: Troubleshoot Publishing Problems
Common issues include:
- Pending Verification: Public figures and certain brands may require ID or official documents.
- Content Restrictions: Remove any content that violates Facebook’s rules.
- Account Limitations: Resolve restrictions from prior policy violations.
---
Step 10: Optimize Page for Search
Enhance visibility with these strategies:
- Use relevant keywords (e.g., “how to publish page Facebook”) in your page description.
- Post regularly with engaging headlines, captions, and hashtags.
- Link your Facebook Page on your website and other social channels.
- Encourage reviews to boost credibility.
---
Step 11: Schedule Introductory Posts and Invite Followers
Increase engagement from day one:
- Schedule 3–5 introductory posts that define your brand and mission.
- Use Meta Business Suite’s scheduling tool.
- Invite friends, colleagues, and mailing list subscribers to like your page.

---
Step 12: Monitor Insights and Adjust Strategy Post-Publish
Once active:
- Check Facebook Insights for metrics on reach, engagement, and audience demographics.
- Determine top-performing content types.
- Adjust posting schedules and topics to better serve follower interests.
---
Summary & Next Steps
Publishing a Facebook Page is more than simply flipping a visibility switch — it requires preparation, accuracy, and an ongoing optimization plan. By following these steps, your page will be ready for a strong, successful launch.
Take the time to refine details, add compelling visuals, and monitor post-launch metrics to ensure growth. Start now and make your Facebook presence a powerful tool for connecting with your audience.


