How Do I Remove a Post from Facebook Page on Desktop and Mob
Learn how to delete, hide, or unpublish posts from your Facebook Page on desktop and mobile, plus tips on roles, recovery, and content control.

How to Remove a Post from a Facebook Page on Desktop and Mobile
If you manage a Facebook Page as an admin or editor, you may encounter a situation where you need to remove a post. Whether it’s due to outdated details, accidental duplication, or a mismatch with your brand voice, understanding how do I remove a post from Facebook Page is key to maintaining a professional and relevant presence. This guide will walk you through the process on desktop and mobile, explain Facebook’s visibility options, and share preventive measures so you can manage your content strategically.
---
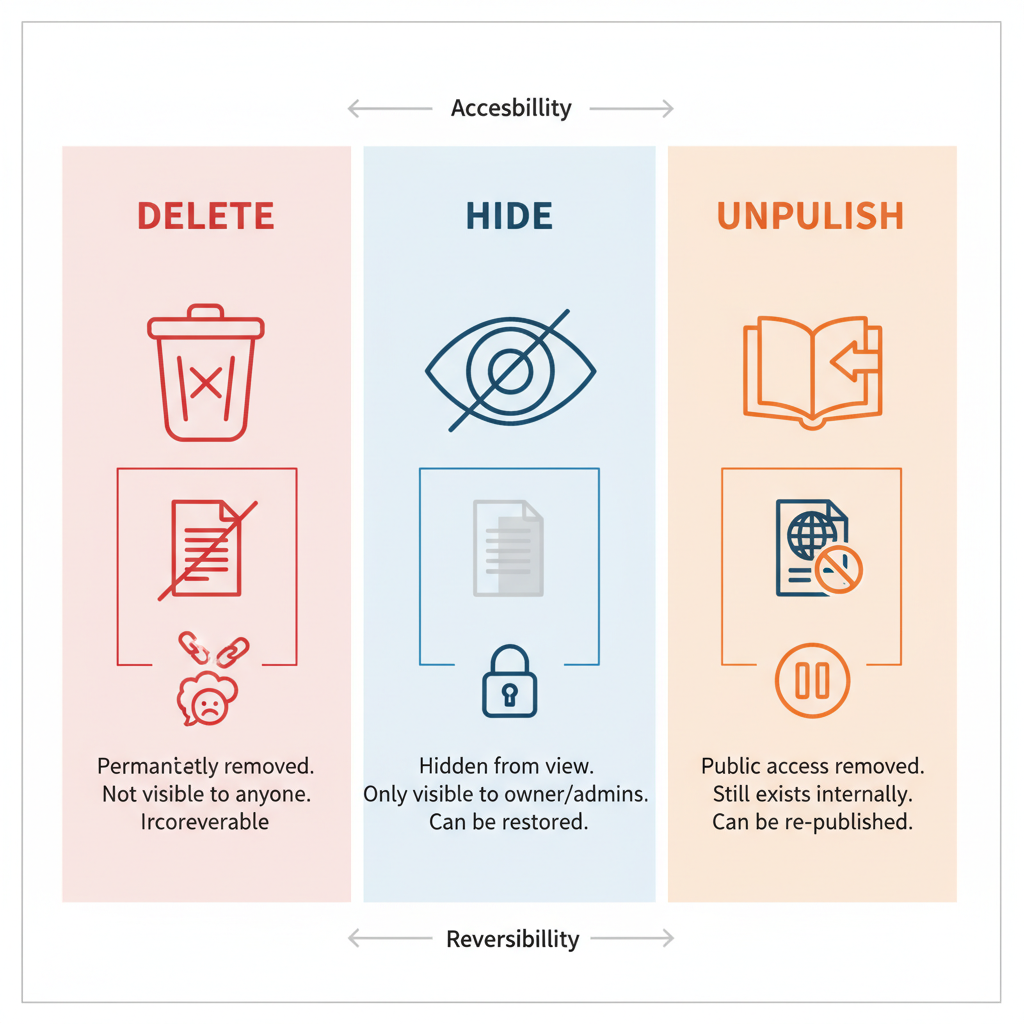
Understanding the Difference: Delete, Hide, and Unpublish
Before taking action, it’s important to know what each visibility change means for your Page:
- Delete: Permanently removes the post from your Page. This action cannot be undone after the recovery period.
- Hide from Timeline: Removes the post from public view on your Page timeline, but it remains accessible via direct link unless reactions and comments are removed.
- Unpublish (for Page posts): Removes the post from public view entirely—visible only to admins and editors—useful for revising or reposting later.
| Action | Visibility after action | Recoverable? |
|---|---|---|
| Delete | Completely removed | No |
| Hide | Hidden from Page timeline | Yes, can unhide |
| Unpublish | Not visible to public | Yes, can re-publish |
---
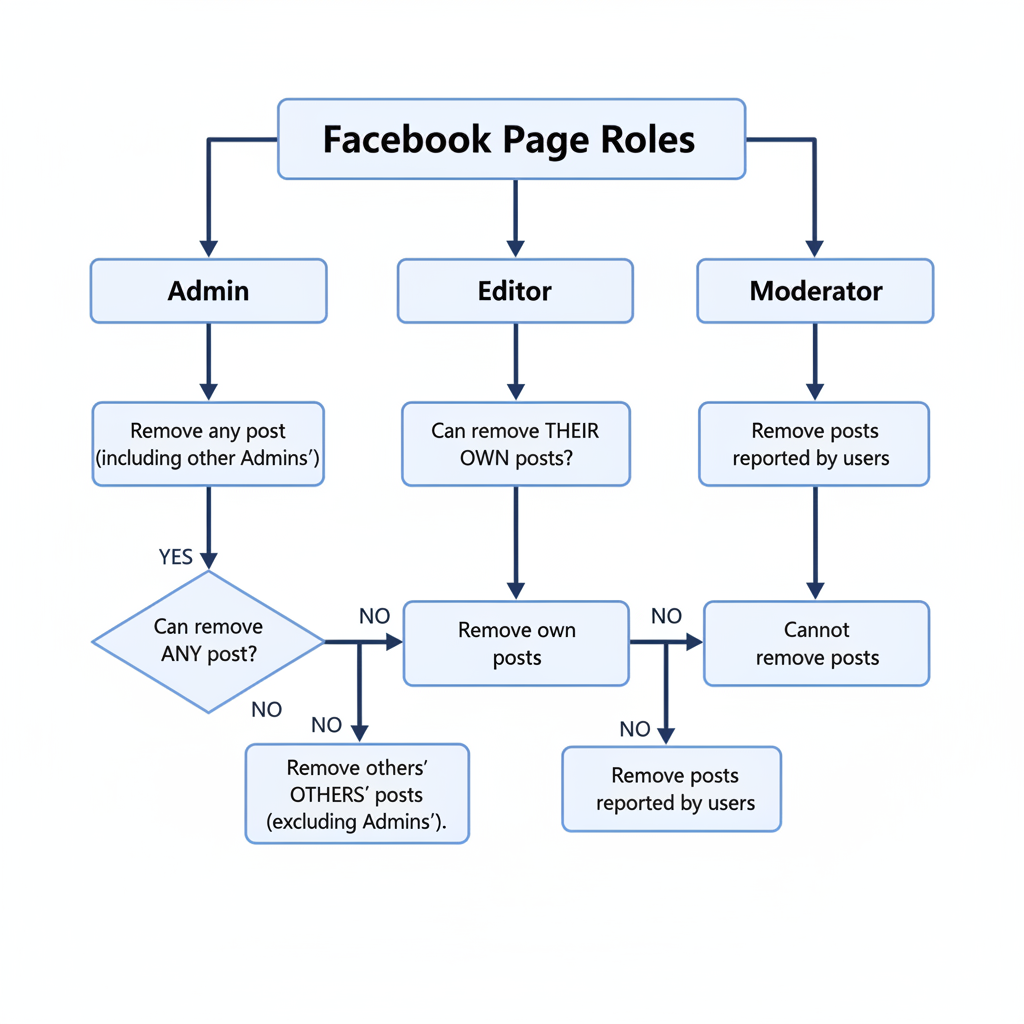
Check Your Page Role Permissions
Facebook Pages operate with role-based permissions, and not all roles can delete posts:
- Admin: Full control; can delete any post.
- Editor: Can delete own posts or those from others.
- Moderator: Cannot delete Page posts.
- Advertiser / Analyst: Cannot delete posts.
To verify your role:
Go to your Page → Settings → Page Roles. If your role lacks deletion access, request the correct level from an admin.
---
Locate the Post on Your Facebook Page
Finding the post is your first step, and the process differs slightly by platform.
On Desktop:
- Log in to Facebook in your browser.
- Navigate to your Page.
- Scroll through your timeline until you locate the post.
On Mobile App:
- Open the Facebook app.
- Tap the menu or Pages icon to select your Page.
- Scroll through your feed to find the post.
---
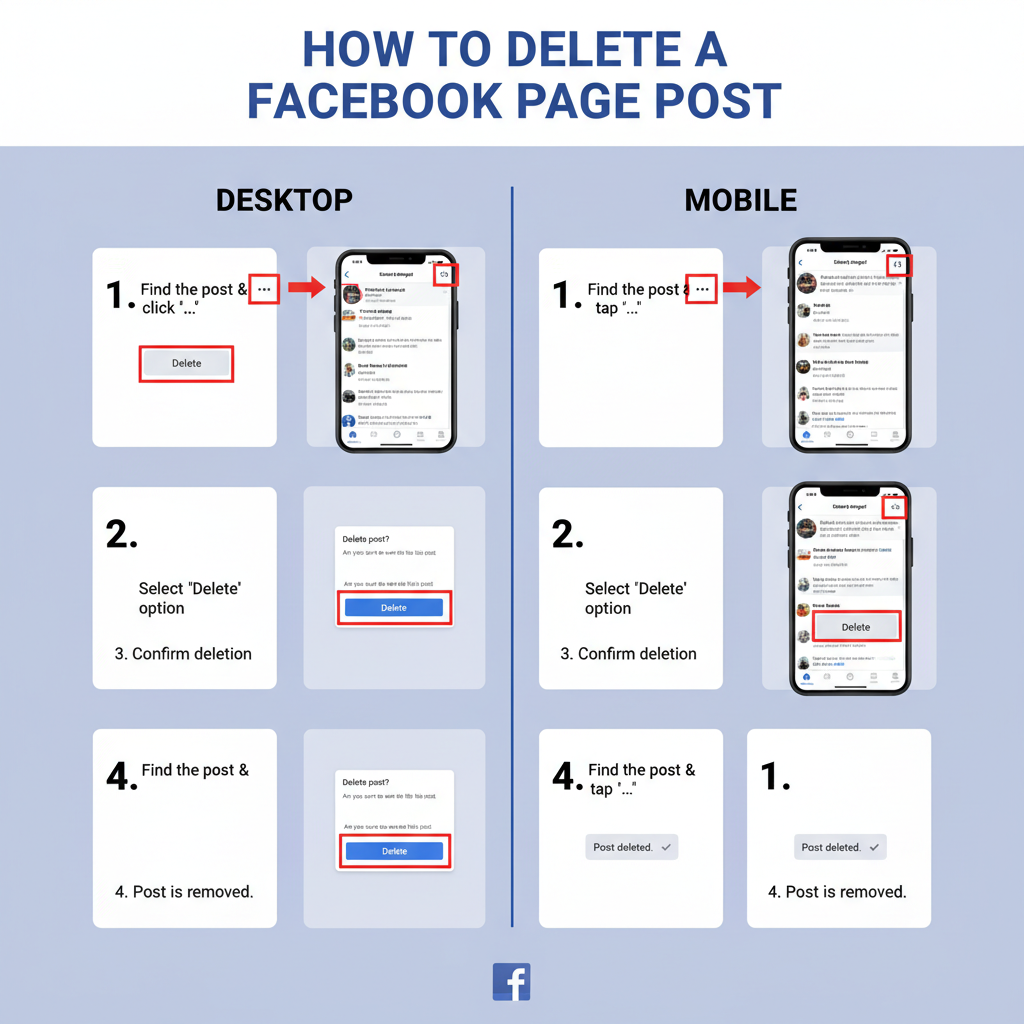
How to Delete a Post from Desktop
To fully remove a post using a desktop browser:
- Locate the post on your Page timeline.
- Click the three dots (`•••`) in the post’s upper-right corner.
- Choose Move to trash.
- Confirm your choice.
Note: Deleted posts remain in the Trash for 30 days before permanent removal. They can be restored during this time via Page Settings → Activity Log → Trash.
---
How to Delete a Post from the Facebook Mobile App
Removing a post in the mobile app is just as simple:
- On your Page timeline, find the post.
- Tap the three-dot menu.
- Select Move to trash.
- Confirm the action.
As with desktop, posts remain in Trash for 30 days, offering a recovery safeguard.
---
How to Hide a Post Instead of Deleting It
If you want to keep a post for reference but remove it from public view, hiding is ideal for:
- Expired promotions.
- Seasonal announcements.
- Posts pending edits.
To Hide on Desktop:
- Click the three-dot menu on the post.
- Select Hide from Timeline.
To Hide on Mobile:
- Open the three-dot menu.
- Choose Hide from Page.
You can use Activity Log to unhide later.
---
Removing Scheduled or Draft Posts
Some content is unpublished and scheduled for future release. To cancel:
From Desktop:
- Navigate to Publishing Tools or Meta Business Suite.
- Access Scheduled Posts or Drafts.
- Locate your post and choose delete from the dropdown.
From Mobile:
- Open the Facebook Business Suite app.
- Tap Posts & Stories.
- Select Scheduled or Drafts.
- Pick the post and delete.
---
What Happens After You Delete a Post
After the 30-day trash period:
- The post and all associated comments, reactions, and shares vanish permanently.
- All engagement metrics tied to that post are lost.
- The content will disappear from searches and timelines.
---
Managing Comments and Data Before Removal
Before deletion, you may want to preserve insights:
- Take screenshots of post performance.
- Export metrics via Facebook’s Insights.
- Save important comments or discussions.
---
Tips for Preventing Accidental Deletions
Best practices for content safety:
- Download an archive: Use Settings → Download Page Info to keep records.
- Limit editor access: Restrict deletion rights to trusted admins.
- Use scheduling reviews: Check posts before they publish using the Meta Business Suite preview.
---
Facebook’s Community Standards and Removal Policies
Remember that Facebook may remove posts without notice if they violate guidelines, such as:
- Hate speech or harassment.
- Misinformation (in specific contexts).
- Spam, scams, or deceptive promotions.
You will often receive a notification and may be able to appeal the removal.
---
Troubleshooting Post Deletion Issues
If you can’t delete a post:
- Verify that you’re an Admin or Editor.
- Refresh or update your app/browser.
- Clear your cache to fix menu glitches.
- Switch devices (mobile ↔ desktop) to test.
If issues remain, use Help & Support → Report a Problem to contact Facebook.
---
Summary
Maintaining control of your Page’s content means knowing how do I remove a post from Facebook Page quickly and correctly. Whether you choose to delete, hide, or unpublish, the steps are straightforward across desktop and mobile—provided you have the right role permissions. Always consider archiving content, limiting deletion access, and staying compliant with Facebook’s community standards.
Ready to take control of your Page? Follow these steps today to keep your feed relevant, clean, and aligned with your brand’s goals.


