Resize a Photo for Facebook Cover Without Quality Loss
Learn how to resize a photo for a Facebook cover using proper dimensions, tools, and tips to keep images sharp across desktop and mobile views.

Facebook Cover Photo Resizing Guide: Dimensions, Tools, and Best Practices
When you want to resize a photo for a Facebook cover, understanding precise dimensions and safe design zones is crucial. Facebook applies fixed sizes but different crops for desktop and mobile, so preparing your image properly ensures optimal visual impact across all devices. This guide walks you through recommended aspect ratios, editing tools, step-by-step resizing instructions, and quality tips to make your cover photo look sharp and professional.
---
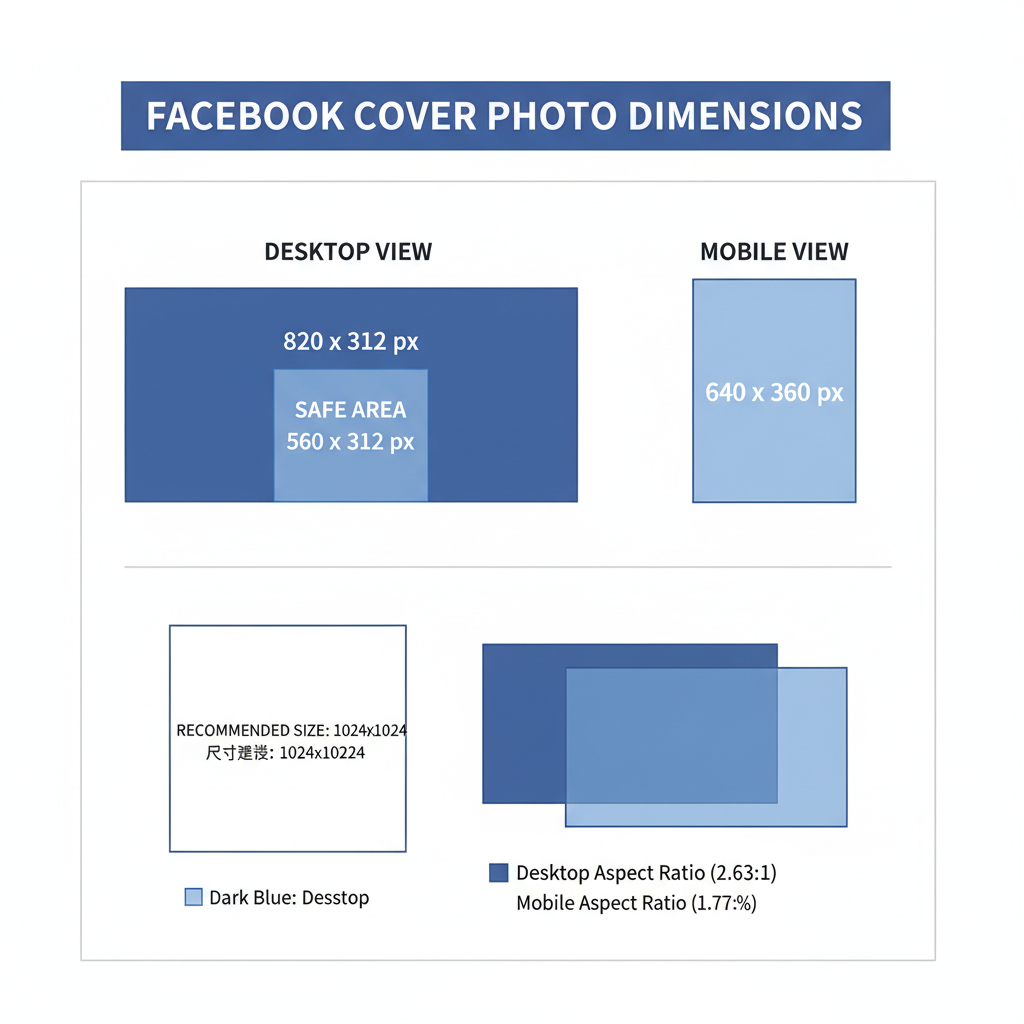
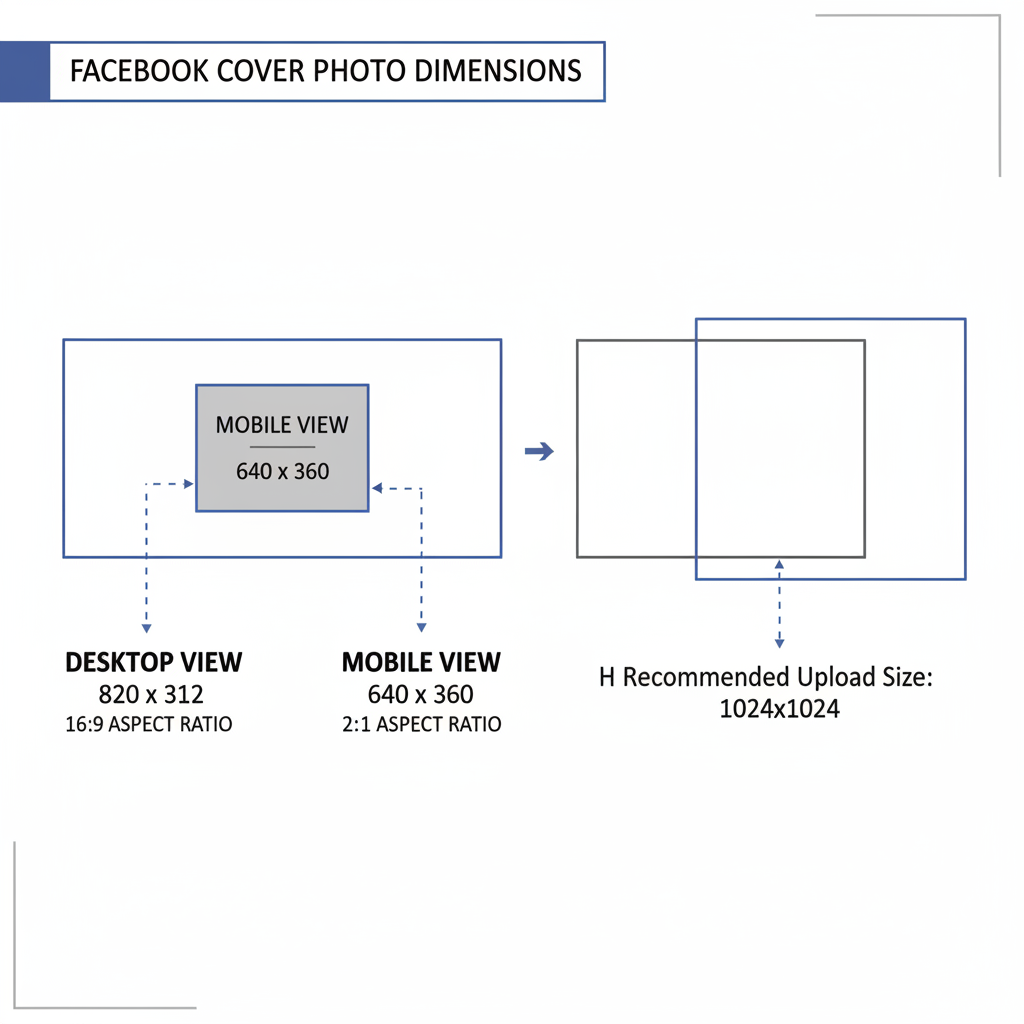
Understanding Facebook Cover Photo Dimensions
If you’re wondering _“how do I resize a photo for Facebook cover?”_, the first thing to know is the platform’s dimensions are fixed — but the display differs between desktop and mobile views.
On desktop, the Facebook cover photo displays at 820px wide by 312px tall.
On mobile, the cover photo appears slightly taller since it’s cropped differently (640px wide by 360px tall visible area).

This means your photo must accommodate both aspect ratios without cutting off key elements. Facebook automatically crops and scales your image to fit, so preparing it correctly prevents unpleasant surprises after publishing.
---
How Aspect Ratio Impacts Display
The recommended aspect ratio for Facebook cover photos is about 2.63:1 (width to height). Images outside this ratio will be resized automatically by Facebook, which can:
- Cause stretching or compression.
- Cut off important parts of the image.
- Blur fine details.
By sticking to the 820x312px dimension, you achieve both high-quality and consistent display across devices.
---
Choosing the Right Editing Tool
Before resizing, select a tool that matches your skill level and needs:
| Tool | Best For | Price | Ease of Use |
|---|---|---|---|
| Canva | Beginners, quick designs | Free / Pro | Very easy |
| Photoshop | Professionals, precise edits | Paid | Advanced |
| GIMP | Advanced editing, free option | Free | Moderate |
| Fotor | Simple photo adjustments | Free / Pro | Easy |
---
Step-by-Step Guide to Resizing in Canva (Free Option)
Canva is a popular web-based design tool for beginners. Here’s how to resize your photo for Facebook cover:
- Open Canva and log in (free account works).
- Click “Create a design” → Custom size.
- Enter Width: 820 px, Height: 312 px.
- Upload your photo.
- Drag and position the image within the canvas.
- Use the crop and zoom tools to adjust composition.
- Download the final design as JPG or PNG.
Canva’s drag-and-drop interface makes it simple to fit your image into the required ratio without complex settings.
---
Step-by-Step Guide to Resizing in Photoshop (Professional Option)
For photographers and advanced designers, Photoshop provides exact control:
- Open Photoshop and load your photo.
- Go to Image → Image Size.
- Select Pixels as unit, set width to 820 and height to 312.
- Keep Resample checked, choose Bicubic Sharper for downsizing to retain quality.
- Use the Crop Tool (C) with aspect ratio set to 820:312 to frame your subject.
- Save the image as JPEG (sRGB) at high quality (around 80-90%).
Image → Image Size → Width: 820px → Height: 312px → Resample: Bicubic SharperThis method ensures pixel-perfect adherence to Facebook’s specifications.
---
Tips for Maintaining Sharpness and Image Quality
When shrinking large images, you risk blurriness. Avoid that with these tips:
- Use high-resolution originals — avoid resizing tiny images upward.
- Downsize step-by-step — gradual resizing can retain more detail.
- Choose the right interpolation method:
- Bicubic Sharper for downsizing.
- Preserve Details for enlarging.
- Export at PNG if the image has text or logos.
---
How to Crop Strategically to Highlight Key Elements
Cropping isn’t just about fitting dimensions — it’s about directing viewer attention.
Focus on placing faces, logos, or text in the central “safe zone” that is visible on both desktop and mobile.
Example strategy:
- Center the main element horizontally.
- Avoid placing important content at extreme top or bottom edges.
- Leave breathing space around text for aesthetics.
---
Using Safe Zones to Prevent Text or Face Cutoffs
Due to mobile cropping, portions near the edges might be hidden. Design with “safe zones” in mind:
| Device | Visible Area | Safe Zone |
|---|---|---|
| Desktop | 820x312 px | Center 640px width |
| Mobile | 640x360 px | Center 640x270 area |
Keeping faces and text inside these areas helps avoid awkward cutoffs.
---
Testing Your Resized Image Across Devices Before Publishing
It’s wise to preview before uploading:
- Create a test cover image.
- Upload to a dummy or private Facebook page.
- View it on both desktop and mobile devices.
- Note any cropping issues.
- Adjust and re-upload if necessary.
Testing saves time and maintains a professional appearance.
---
Optimizing File Size for Faster Load Without Pixelation
Facebook compresses images during upload.
To maintain quality:
- Keep file size under 100 KB for JPGs when possible.
- For graphics or text, use PNG format and optimize via tools (TinyPNG, Squoosh).
- Balance quality with load speed — heavy files slow page loading.
---
Common Mistakes to Avoid
Beginners often encounter issues when resizing for Facebook covers:
- Stretching images instead of maintaining aspect ratio — causes distortion.
- Ignoring mobile view — your text or focal point can be cropped.
- Wrong DPI settings — 72 DPI suffices for web display; higher won’t improve online quality.
- Over-compressing files — makes images blurry.
---
Final Checklist Before Uploading Your Facebook Cover Photo
Make sure you:
- Resized to 820x312 px.
- Placed key elements in safe zones.
- Exported at optimal quality and file size.
- Tested preview on desktop and mobile.
- Avoided distortion or unintended cropping.
With these steps, resizing a photo for a Facebook cover becomes a straightforward, repeatable process — ensuring sharp, professional visuals wherever your audience views them.
---
Pro Tip: Save your final design as a template in Canva or Photoshop so future updates take minutes, not hours. This helps maintain brand consistency and simplifies future refreshes.
---
Summary: Mastering how to resize a photo for Facebook cover means knowing exact dimensions, properly cropping to safe zones, and optimizing quality. By following the right tools and methods, you safeguard your brand image and deliver a polished look across all devices.
CTA: Ready to upgrade your page visuals? Apply these resizing strategies today and make your Facebook cover stand out.


