How to Schedule a Post on X App Easily
Learn how to schedule posts on the X app using built-in features, edit or delete them, and optimize timing to boost engagement and reach.

Introduction to X App Scheduling Feature
X, formerly known as Twitter, remains one of the most influential microblogging and social networking platforms for businesses, influencers, and casual users. With its improved native post scheduling feature, users can now plan and publish content at optimal times without relying solely on external tools. This functionality makes it easier to maintain a consistent posting schedule, reach audiences in multiple time zones, and optimize engagement.
In this comprehensive guide, you’ll learn how to schedule post on X app using built-in features, explore the key benefits, and apply actionable tips to boost your social media performance.
---
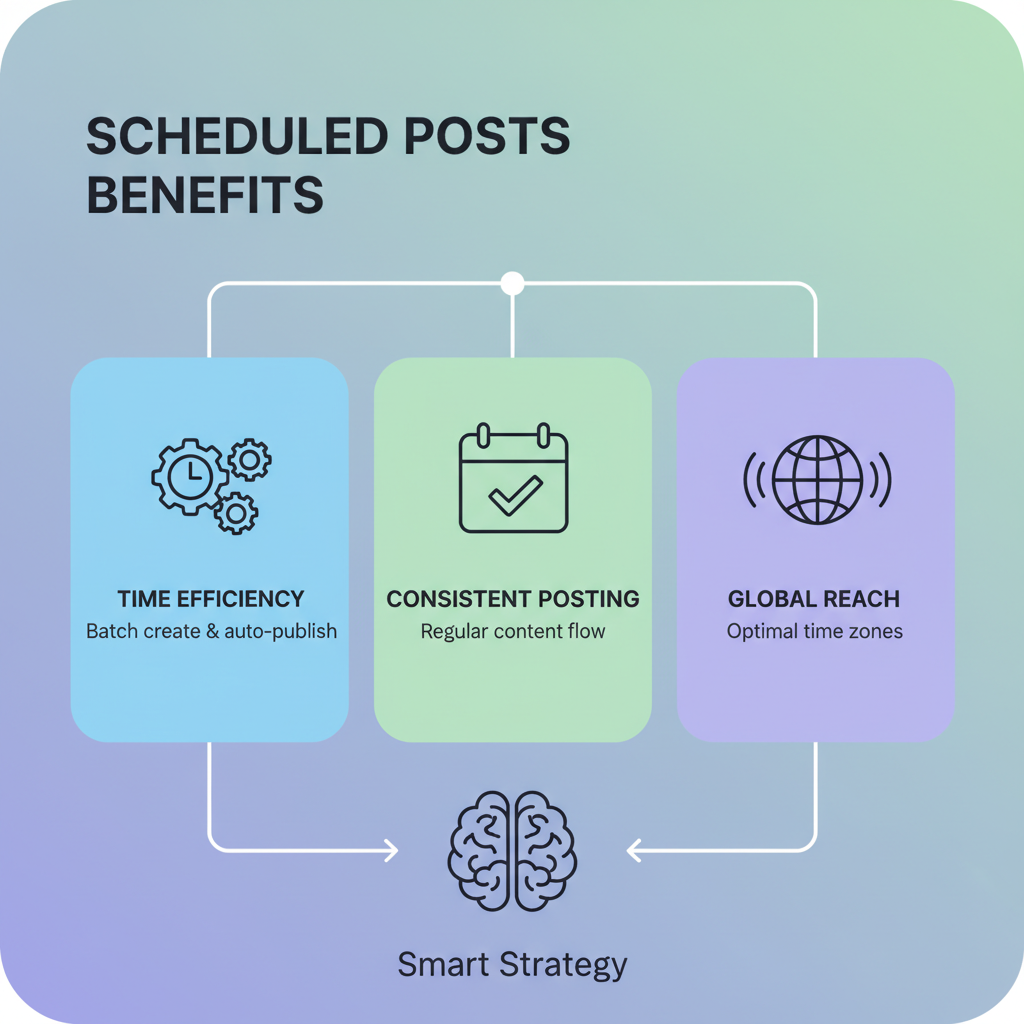
Benefits of Scheduling Posts on X App
Scheduling posts on X offers numerous advantages, especially for those managing multiple accounts or targeting different markets.
1. Time Management Efficiency
Batch-creating and scheduling posts allows you to streamline your workflow and avoid constant interruptions throughout the day.
2. Maintain Consistent Posting
Consistency helps your audience recognize and trust your voice, improving brand recall and engagement.
3. Reach Global Audiences
Using scheduled posts, you can publish content when international audiences are active—without disrupting your own schedule.
---
Requirements Before Scheduling
To use the scheduling feature effectively, ensure you meet these prerequisites:
- Account Setup: Maintain an active and authenticated X account.
- Verified Email Address: Verify your email to unlock advanced posting functionality.
- Stable Internet Connection: Enables successful scheduling and avoids errors.
- Updated X App: Keep the app updated to ensure compatibility and access to all features.
---
Step-by-Step Guide: How to Schedule Post on X App
Follow these steps to schedule a post directly from the official X app or desktop version.
Step 1: Log Into Your X Account
You can use the desktop web interface or the mobile app. Sign in using your credentials. For desktop, visit x.com; on mobile, tap the X app icon.
---
Step 2: Compose Your Post
Use the “Compose” button to write your message. Include text, hashtags, mentions, and attach:
- Images (JPEG, PNG formats)
- GIFs
- Videos
- Links with auto-generated previews
---
Step 3: Locate and Click the Calendar Icon
In the composer window, find the calendar icon near the “Post” button. Clicking it opens the scheduling interface.
---
Step 4: Select Date and Time
A scheduling dialog allows you to choose:
- Date: Select within the next 12 months.
- Time: Specify hour and minute in your local timezone.
> Tip: Adjust your account’s timezone settings beforehand to ensure accurate posting times.
---
Step 5: Review Your Scheduled Post
Confirm the date and time, then click Confirm. Your post enters the “Scheduled” queue and will publish automatically at the selected time.
---
How to Edit or Delete a Scheduled Post
You might need to adjust your scheduled content. Here's how:
- Go to Scheduled Posts within the compose screen or profile menu.
- Select the specific post.
- Click Edit to adjust text, media, or timing.
- Click Delete to remove it from your queue.
---
Tips for Optimal Posting Time Based on Analytics
Analytics provide valuable insights for timing your scheduled posts effectively.
- Peak Activity Hours: Publish when your followers are most engaged.
- Weekly Trends: Target days known for higher interaction.
- Content Performance: Tailor your schedule based on post format results.
| Metric | Recommended Action |
|---|---|
| High engagement at 9 AM UTC | Schedule content at 9 AM UTC three times weekly |
| Video posts perform 40% better than text | Integrate relevant videos into scheduled posts |
| Lower weekend engagement | Reduce weekend posts or share lighter, entertainment-focused content |
---
Using Third-Party Tools for Advanced Scheduling
Beyond the native scheduling feature, advanced users may opt for third-party tools to gain additional capabilities.
Hootsuite
Offers cross-platform scheduling, robust analytics, and team collaboration tools.
Buffer
Known for its clean, intuitive interface and actionable insights through its analytics dashboard.
TweetDeck
An X-owned tool ideal for power users managing multiple streams and accounts.
> Pro Tip:
> These tools enable bulk scheduling, auto-adjusting timezones, and in-depth analytics unavailable in the default X scheduling feature.

---
Common Issues and Troubleshooting
Even with powerful features, scheduling may occasionally encounter problems.
- Timezone Discrepancies: Check settings to avoid incorrect publishing times.
- Failed Post: Ensure stable network connectivity before confirming.
- Media Upload Limitations: Compress large files to meet X format and size requirements.
- Missing Feature: Update your app or browser to access the scheduling option.
---
Conclusion and Best Practices
Mastering how to schedule post on X app enables you to sustain a consistent online presence, capture optimal engagement periods, and better connect with your audience. This skill benefits businesses, creators, and casual users alike.
Best Practices Recap:
- Verify dates, times, and timezones before scheduling.
- Monitor and adjust scheduled posts regularly.
- Use analytics to refine your posting schedule.
- Mix various post formats for broader reach.
- Maintain consistency to build trust and brand recognition.
By integrating X’s scheduling with smart analytics and occasional third-party tools, you can streamline your social media strategy, save hours each week, and amplify your digital impact.
Ready to take control of your posting calendar? Start scheduling your first post today and watch your engagement grow!