How to View Scheduled Posts on LinkedIn Desktop and Mobile
Learn how to find, edit, and delete scheduled posts on LinkedIn using desktop or mobile, including steps for personal profiles and LinkedIn Pages.

Introduction to Scheduling Posts on LinkedIn
LinkedIn isn’t just a platform for job seekers — it’s one of the most powerful networks for professionals to share insights, build personal brands, and create business opportunities. One underused but highly effective feature is post scheduling. Leveraging it allows you to publish content at optimal times without being online 24/7.
For busy professionals, marketers, and recruiters, knowing exactly how to see my scheduled posts on LinkedIn is essential. This comprehensive guide explains how to view and manage scheduled posts on both desktop and mobile, highlights the differences for personal profiles versus LinkedIn Pages, and covers editing, deleting, and troubleshooting tips so you can maintain a consistent, strategic posting schedule.

---
Determine Where Your Scheduled Post Was Created
Before you can locate a scheduled post, first identify where you scheduled it:
- Natively on LinkedIn — Using LinkedIn’s built-in scheduling functionality.
- Through a third-party tool — Examples include Buffer, Hootsuite, Sprout Social, Later, or HubSpot.
Why this matters:
Native LinkedIn scheduled posts appear only in LinkedIn’s own interface. Posts scheduled through an external scheduler will not be visible in LinkedIn’s native scheduled post list. To find them, you’ll need to log into that specific scheduling platform.
---
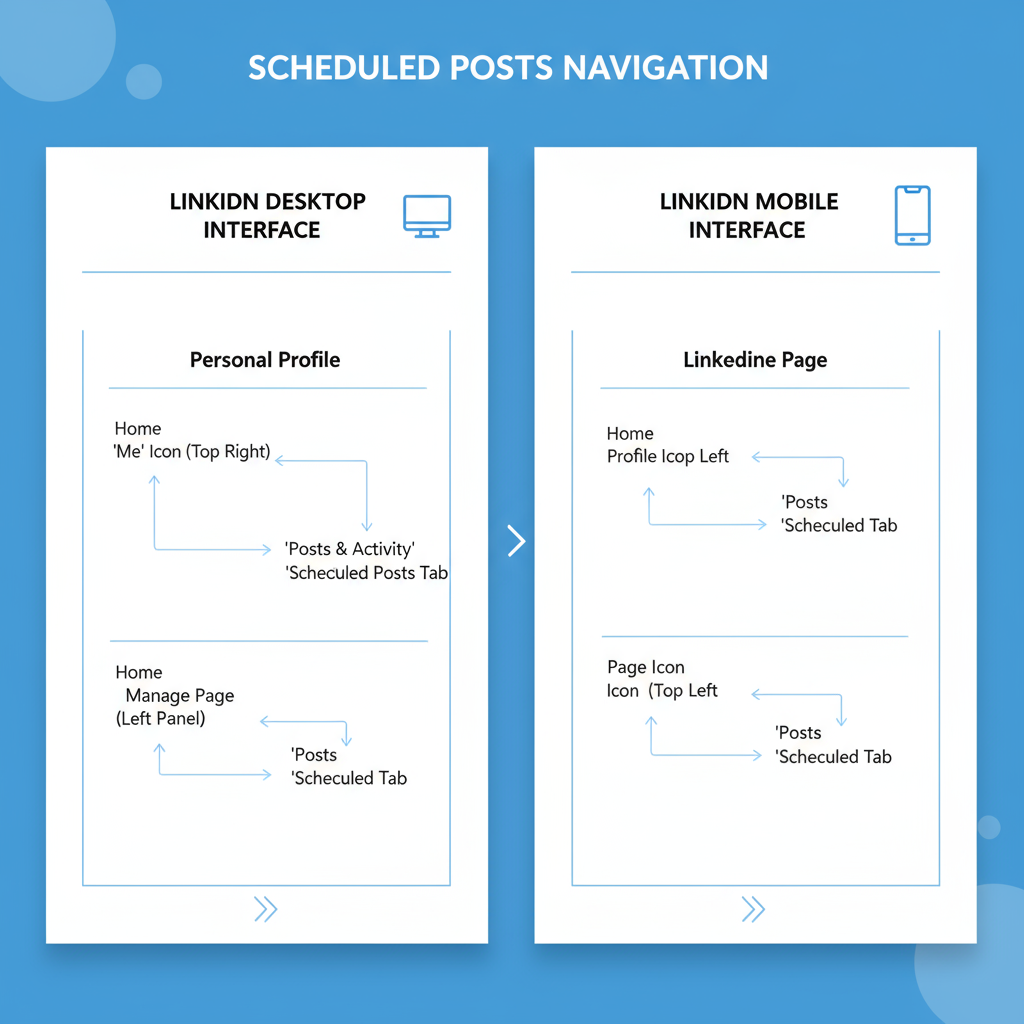
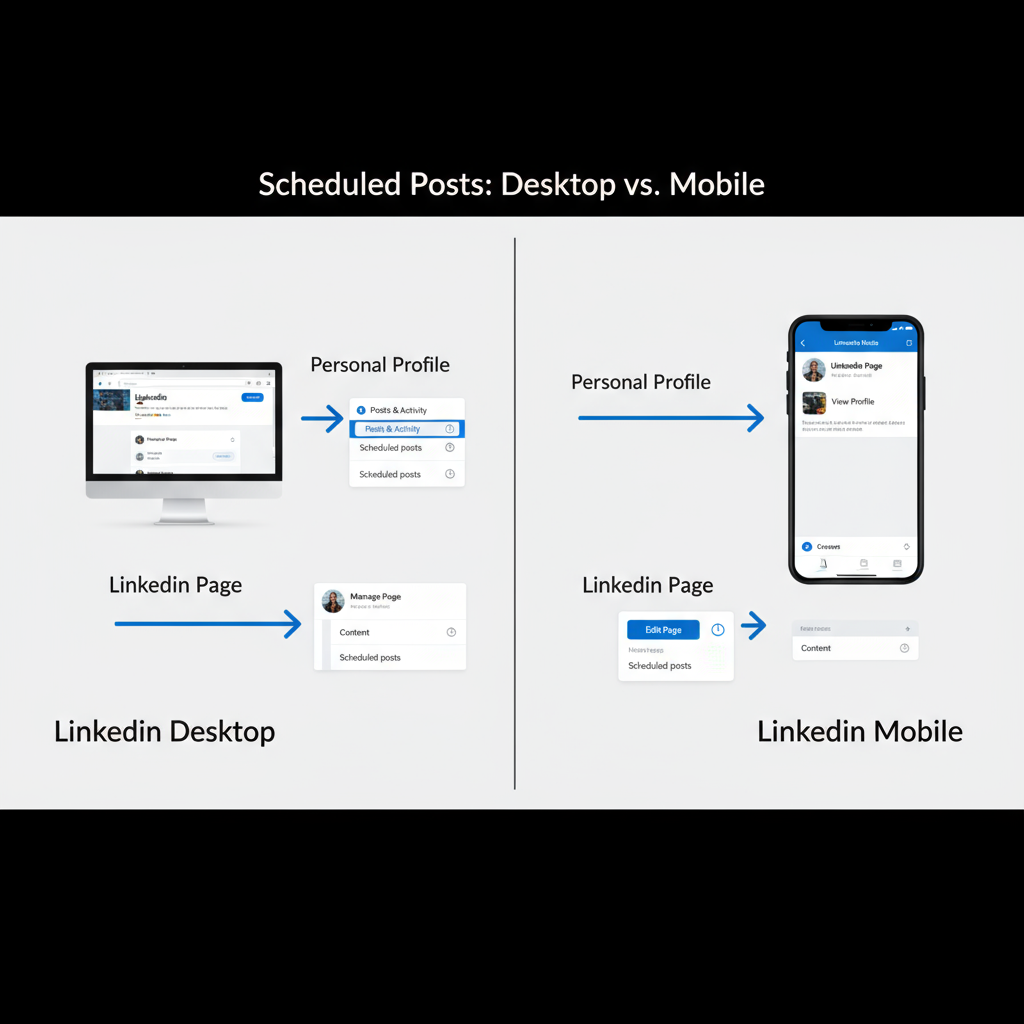
How to See Scheduled Posts in LinkedIn’s Desktop Version
If you’ve scheduled your post directly on LinkedIn’s desktop site, follow these steps:
- Log in to LinkedIn via your web browser.
- Access your Profile (for personal content) or LinkedIn Page (for business content).
- Click into the “Start a post” field from your feed or page.
- Click the clock icon (Schedule button) in the composer.
- Select View all scheduled posts or Manage scheduled posts to open your queue.
Pro Tip: If the scheduling icon isn’t visible, LinkedIn may be gradually rolling out the feature or it may not yet be enabled for your account.
---
Locating Scheduled Posts in the LinkedIn Mobile App
On LinkedIn’s mobile app for iOS or Android:
- Launch the LinkedIn app and sign in.
- Tap the Post (+) button.
- Tap the clock icon or choose Scheduled in the composer.
- Select Manage Scheduled Posts to display all planned posts with their scheduled dates/times.
- From here you can edit, reschedule, or delete any post before it’s published.
Note: In newer app versions, the “Manage scheduled posts” option may be under the three-dot (“…”) menu.
---
Differences Between Personal Profile and LinkedIn Page Scheduled Content
The way you access scheduled posts differs based on account type:
| Account Type | Where to Access Scheduled Posts | Extra Features |
|---|---|---|
| Personal Profile | Via the post composer’s clock/schedule icon on desktop or mobile. | View only your own scheduled posts; no shared admin access. |
| LinkedIn Page | Page admin view → “Content” section → “Scheduled” tab. | Multiple admins can view, edit, and manage all scheduled content. |
Teams managing brand content will find Page scheduling tools more collaborative than personal profile tools.
---
Editing or Rescheduling a LinkedIn Scheduled Post
Once you’ve found the scheduled post:
- Select the post from the scheduled list.
- Click Edit to update text, media, or links.
- Modify the scheduled publish date/time if needed.
- Save changes — LinkedIn will adjust the post’s schedule accordingly.
---
Deleting a Scheduled LinkedIn Post
To cancel a scheduled post:
- On Desktop: Find it in your scheduled list, open the three-dot menu, and choose Delete or Cancel Schedule.
- On Mobile: In the scheduled list, tap the menu icon or long-press the post, then select Delete.
Deleting ensures the post will not be published as planned.
---
Checking Scheduled Posts via Third-Party Scheduling Tools
If the post was scheduled with an external tool, go directly to that platform:
- Buffer — Access the “Queue” for the relevant LinkedIn profile or Page.
- Hootsuite — Use “Planner” view and filter for LinkedIn content.
- Sprout Social — Open the “Publishing” calendar and filter by profile.
- Later or HubSpot — Head to the scheduling dashboard and set filters for LinkedIn.
Third-party tools generally offer additional features like drag-and-drop calendar management, previews, and advanced analytics.
---
Troubleshooting Missing Scheduled Posts
If your scheduled posts aren’t showing up:
- Verify your account — Make sure you’re logged into the correct account or Page.
- Confirm scheduling method — Was it created natively or via a tool?
- Update the LinkedIn app to the latest version.
- Check feature availability — The scheduling function may not yet be rolled out to your region/account.
- Allow sync time — Newly scheduled posts may take a few minutes to appear across devices.
---
Best Practices for Scheduling LinkedIn Content
Maximize your scheduled post performance with these tips:
- Post at optimal times — For B2B, weekday mornings often perform best.
- Be consistent — Maintain a predictable posting frequency (e.g., three times a week).
- Diversify content — Alternate between articles, images, videos, and polls.
- Engage promptly — Respond to comments soon after each post is live.
- Analyze outcomes — Use LinkedIn Analytics to refine your strategy.
---
Summary & Next Steps
Mastering how to see and manage your scheduled posts on LinkedIn keeps your content pipeline smooth and your audience engaged. By knowing where your posts are scheduled, how to access them on each platform, and how to edit, reschedule, or delete them, you can stay in full control of your publishing calendar.
Quick Action Checklist:
- Identify if your post is native or from a third-party tool.
- Use the correct device-specific method to find it.
- Differentiate between personal profile and Page schedules.
- Adjust times or content before publishing.
- Prune your queue of outdated or irrelevant posts.
- Monitor analytics for ongoing improvement.
Stay organized, post consistently, and optimize your content strategy — start reviewing your scheduled posts on LinkedIn today to maintain a winning professional presence.


