How to Share Photos on Instagram for Beginners
Learn how beginners can share photos on Instagram, from choosing the right post type to editing, writing captions, and boosting engagement.
How to Share Photos on Instagram for Beginners
Instagram is one of the most engaging platforms for visual storytelling. If you’re wondering how to share photos in Instagram as a beginner, this guide will break down the entire process — from knowing which sharing option is best for your content, to crafting captions, optimizing engagement, and troubleshooting. By the end, you’ll be ready to share your images confidently and effectively.
---
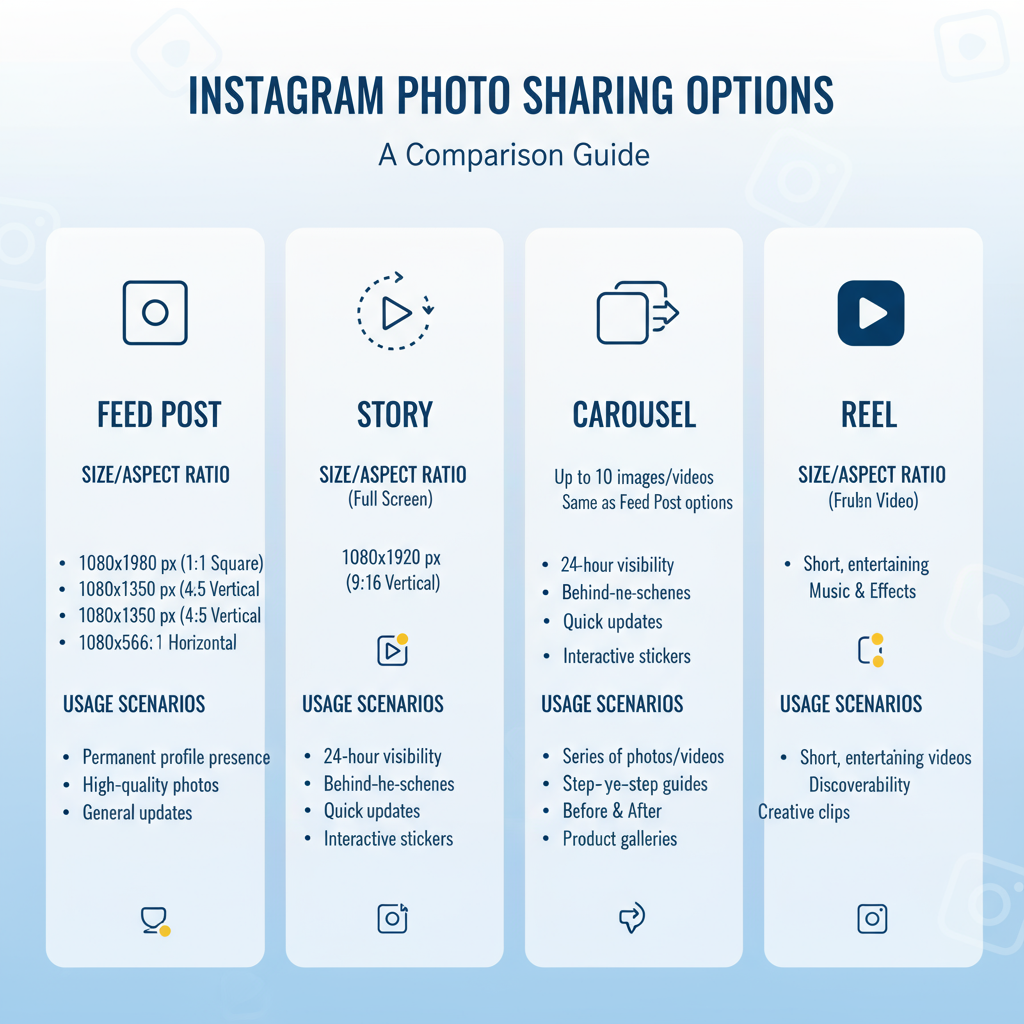
Understanding Instagram’s Photo Sharing Options
Instagram offers several methods to post photos, each catering to different types of interactions and visibility:
- Feed Posts – Appear on your profile grid and in followers’ feeds.
- Stories – Disappearing content available for 24 hours.
- Direct Messages (DM) – Private one-on-one or group sharing.
- Reels – Short videos that can incorporate still photos.

Selecting the right option depends on your goal. Major life updates fit well on your Feed, while spontaneous daily moments are ideal for Stories.
---
Prepare Your Photo
Good visuals are key to standing out on Instagram. Always check:
- Resolution: At least 1080 pixels on the shortest side.
- Aspect Ratio: Use 1:1 (square), 4:5 (portrait), or 1.91:1 (landscape).
- Editing: Adjust brightness, contrast, and color balance without over-processing.
A clear, striking image naturally encourages more likes, comments, and shares.
---
Open Instagram and Access the Upload Interface
Follow these steps to start uploading:
- Access the Instagram app on your mobile device.
- Tap the ‘+’ icon (bottom center or top right in newer layouts).
- Choose Post, Story, or Reel.
Your gallery will open, allowing you to pick your desired photo.
---
Select and Crop Your Photo
After choosing an image:
- Tap the resize icon to switch cropping modes.
- Pinch/zoom to perfect the composition.
- Keep focal points centered for balanced Feed previews.

Instagram’s auto-crop is convenient, but fine-tuning your frame often makes a big difference.
---
Apply Filters and Adjust Settings
Instagram filters can set a tone — warm, vintage, or modern. To keep things authentic, adjust manually when possible:
- Brightness – Control overall light.
- Contrast – Sharpen light/dark distinctions.
- Saturation – Intensify or soften colors.
- Warmth, Highlights, Shadows – Add subtle mood adjustments.
Try different combinations to find your visual style.
---
Write a Compelling Caption and Use Relevant Hashtags
A caption can transform a simple picture into a story. It might:
- Inform: Share location or backstory.
- Entertain: Use wit or interesting facts.
- Engage: Ask a question or request opinions.
Relevant hashtags increase visibility:
| Category | Example Hashtags |
|---|---|
| Travel | #Wanderlust #TravelGram #Adventure |
| Food | #Foodie #InstaFood #Yummy |
| Photography | #PhotoOfTheDay #InstaPic #PicOfTheDay |
---
Tag People, Add Location, and Configure Advanced Settings
Enhance your post’s reach and context by:
- Tagging users — Friends, collaborators, or brands in-frame.
- Adding location — Useful for travel, events, or local content.
- Advanced settings — Disable comments if needed; share to Facebook, Twitter, or Tumblr.
These features support discoverability and cross-platform presence.
---
Choose the Right Posting Method
Consider these strengths:
- Feed – Permanent and polished.
- Stories – Ephemeral and casual.
- DM – Intimate and direct.
Match your format to the content’s tone and desired engagement type.
---
Post Scheduling and Using Drafts
Consistency builds follower trust. Options include:
- Drafts – Save incomplete ideas for later.
- Third-Party Tools – Services like Later or Buffer for business scheduling.
- Meta Business Suite – Instagram’s official scheduling for creators/brands.
![post-scheduling]()
Scheduled posts keep your feed active even if you’re offline.
---
Privacy Controls and Visibility
Before publishing, confirm:
- Private account — Restricts posts to approved followers.
- Close Friends list — For more selective Story sharing.
- Blocked users — Ensure restricted accounts can’t see your posts.
Understanding privacy tools helps maintain control over your audience.
---
Tips for Increasing Engagement
If you want to grow reach and interactions:
- Post during peak follower activity.
- Warm up your audience — like and comment on other posts daily.
- Review Instagram Insights for performance data.
- Experiment with carousels and videos in addition to static images.
- Invite followers to share or tag friends.
Engagement is a two-way street — the more you connect, the more you’re seen.
---
Troubleshooting Common Upload Issues
If posting fails:
- Unsupported file type — Use JPEG or PNG formats.
- Slow internet — Try a stronger connection.
- App bugs — Clear cache or update the app.
- Quality loss — Stick to recommended sizes.
A reinstall can often fix persistent issues.
---
Conclusion
Mastering how to share photos in Instagram involves more than simply uploading — it’s about making smart format choices, preparing photos to look great, crafting captions and hashtags strategically, and engaging with your audience over time.
By following these steps and regularly experimenting, you can develop a consistent, appealing presence that resonates with your followers.
Ready to level up your Instagram game? Start applying these tips to your very next post and watch your engagement grow.


