How to Take a 3x4 Picture for Official Documents
Learn how to take a 3x4 photo for official IDs with tips on size, lighting, background, framing, and editing to meet strict agency requirements.
How to Take a 3x4 Picture for Official Documents
Taking a picture 3 4 for official documents may seem straightforward, but in reality, it involves precise attention to size, lighting, background, and framing. With each agency having strict guidelines, even small errors can result in rejection. This guide walks you step-by-step through understanding the dimensions, setting up the shot, editing, and printing — so your 3x4 photo meets formal requirements without costly resubmissions.
---
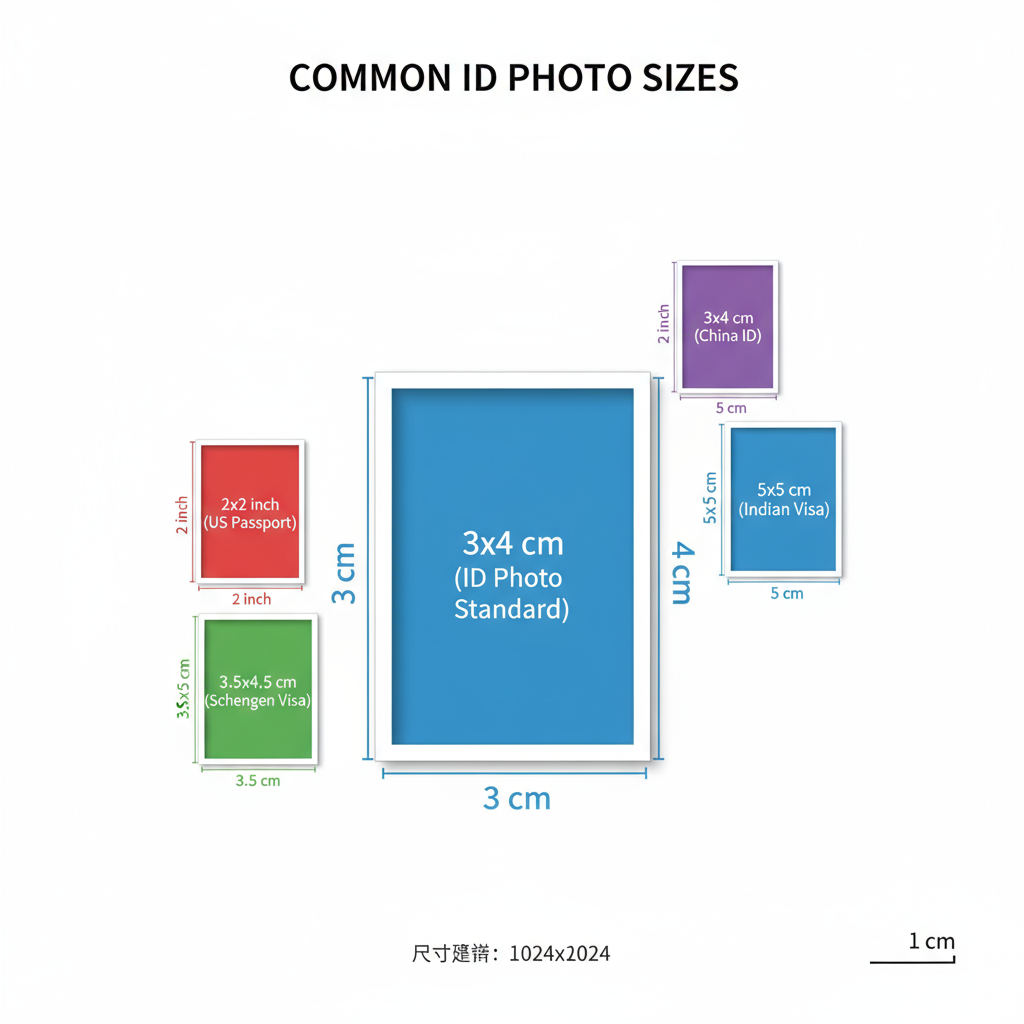
Understanding the 3x4 Photo Size and Aspect Ratio
A 3x4 photo measures 3 cm wide by 4 cm tall (aspect ratio 3:4). This format is widely required for identification photos worldwide. Agencies often specify dimensions in millimeters:
- Width: 30 mm
- Height: 40 mm
In digital form, pixel dimensions depend on resolution/DPI:
| Print Size | Resolution (72 DPI) | Resolution (300 DPI) |
|---|---|---|
| 3x4 cm | 85 x 113 pixels | 354 x 472 pixels |

---
Common Uses for 3x4 Photos
The picture 3 4 format is typically required for:
- Passports
- Visas
- National ID cards
- Driver’s licenses
- School ID cards
- Job applications
- Professional certifications
⚠ Always verify with the requesting institution, as requirements (e.g., background color) may vary despite using the same size.
---
Choosing the Right Background Color and Texture
Background requirements commonly include:
- Plain white — Most universal and accepted.
- Light blue — Often for certain visas.
- Light gray — Sometimes for corporate or employee IDs.
Texture rules:
- No patterns, shadows, or gradients.
- Evenly lit, smooth surface.
💡 Pro tip: At home, use a plain sheet, screen, or painted wall to create a uniform background.
---
Recommended Lighting Setup
Lighting is key to photo approval. Use a three-point lighting setup:
- Key light — Main light at 45° in front of you.
- Fill light — Opposite side to soften shadows.
- Back light — Behind to separate from the background.
Avoid:
- Harsh overhead lights.
- Single on-camera flash creating glare.
Natural daylight from a curtained window works well for an affordable solution.
---
Clothing and Grooming Tips
For a professional picture 3 4:
Clothing:
- Solid colors without patterns or logos.
- Collared shirts or formal tops.
- Avoid sleeveless or overly casual wear.
Grooming:
- Hair pulled back from face.
- Minimal, natural makeup.
- Trim facial hair neatly if allowed.
---
Camera Settings: Resolution and Framing
For a professional look:
- Resolution: Export at 300 DPI.
- Focal length: 50–85mm range to avoid face distortion.
- Framing: Your face should occupy 70–80% of the image height.
Example DSLR/mirrorless setup:
Mode: Aperture Priority (f/8)
ISO: 100–400
White Balance: Daylight or Auto
Focus Mode: Single-point AF on eyes
---
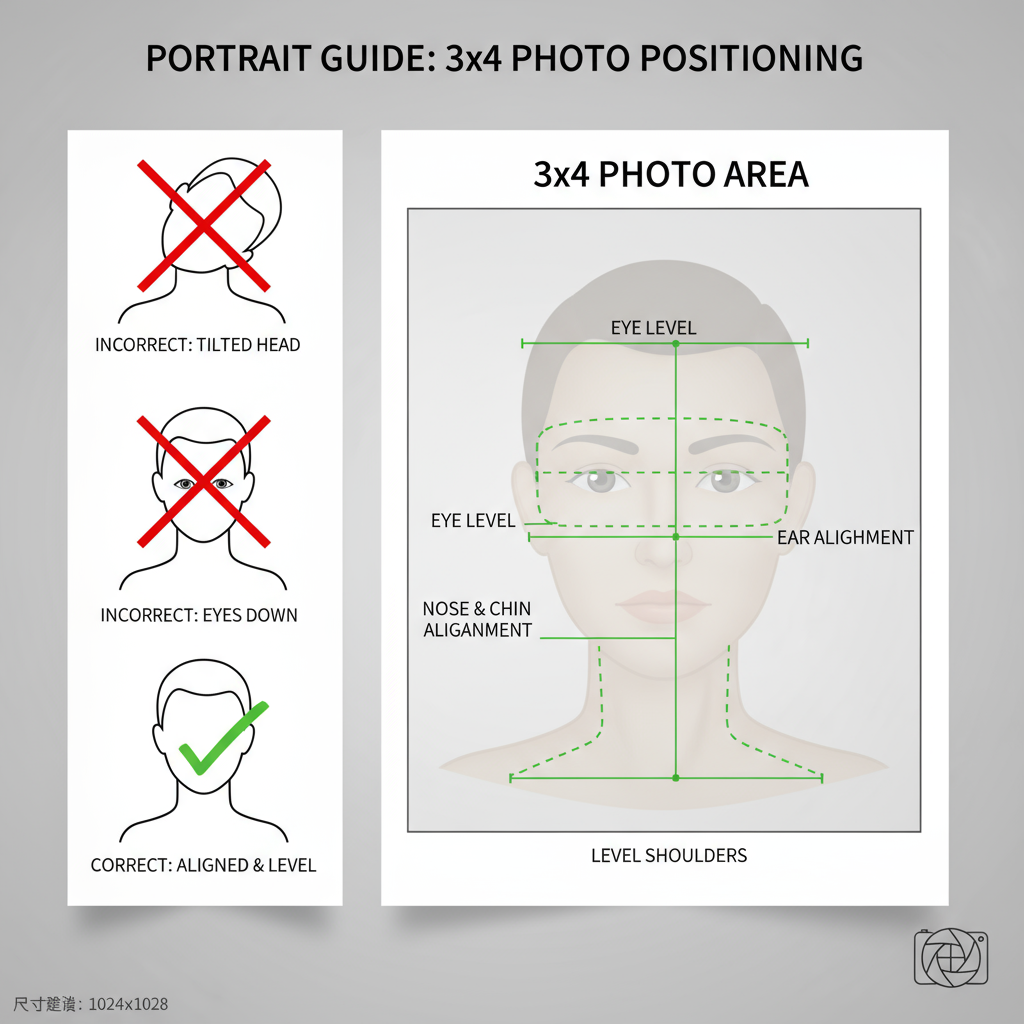
Correct Positioning and Posture
Position yourself about 1–1.5 m from the camera:
- Look straight into the lens.
- Keep shoulders level.
- Maintain neutral, relaxed expression.
- Smile only if permitted.
---
DIY vs. Professional Studio: Pros and Cons
| Option | Pros | Cons |
|---|---|---|
| DIY | Low cost, flexible timing, unlimited retakes | Needs skill/equipment; higher rejection risk |
| Studio | Pro equipment, editing, rule compliance | Higher cost, fixed schedule |
---
Editing and Cropping for a 3x4 Format
Free tools to crop your image exactly:
- GIMP — Set crop tool to 3:4 aspect ratio.
- Fotor / Canva — Lock aspect ratio in custom size.
- IrfanView — Batch crop multiple files.
Example in GIMP:
1. Open the photo.
2. Select Crop Tool.
3. Fix aspect ratio to 3:4.
4. Position selection to fit head/shoulders.
5. Export in high quality at correct DPI.
---
Printing Guidelines: Paper, Color, and Finish
When printing picture 3 4:
- Paper: Premium photo paper (≥200 gsm).
- Color: Calibrate monitor for accuracy; color consistency matters.
- Finish:
- Glossy — Rich colors, common for passports.
- Matte — Reduces glare/fingerprints.
Your printer should support high resolution and borderless printing for best results.
---
Frequent Mistakes to Avoid
Avoid rejections by steering clear of:
- Blurry or low resolution images.
- Wrong background color or shadows.
- Incorrect size/aspect ratio.
- Head tilt, improper posture.
- Glare from glasses or skin shine.
---
Pre‑Submission Checklist
Before submitting your picture 3 4, confirm:
- Correct 3x4 cm size in print or pixels at 300 DPI.
- Approved background color.
- Even lighting with no shadows.
- Face centered at correct proportions.
- Professional attire.
- Cropped to required frame.
- Clean, undamaged prints.
---
Conclusion
By carefully considering size, lighting, background, attire, and camera settings, you can produce a compliant picture 3 4 for passports, IDs, visas, and other official purposes. Following these steps helps ensure your photo meets regulations the first time — saving you both time and money.
Ready to take your own 3x4 photo? Start now with the checklist above to create a flawless image for your application.