How to Capture Perfect 16:9 Photos for Web and Social Media
Learn how to shoot, edit, and optimize 16:9 photos with camera settings, framing, and lighting tips for stunning web banners and social media visuals.

Introduction to Photo 16/9 Aspect Ratio
The photo 16/9 aspect ratio is a cornerstone of modern visual content creation, aligning perfectly with widescreen TVs, computer monitors, and mobile video playback. Understanding how to shoot, edit, and optimize images in this format helps photographers, designers, and marketers deliver professional, cinematic visuals that scale seamlessly across platforms. This guide explores practical uses, camera settings, composition techniques, post-processing, and optimization tips, ensuring your 16:9 images consistently make an impact.
---
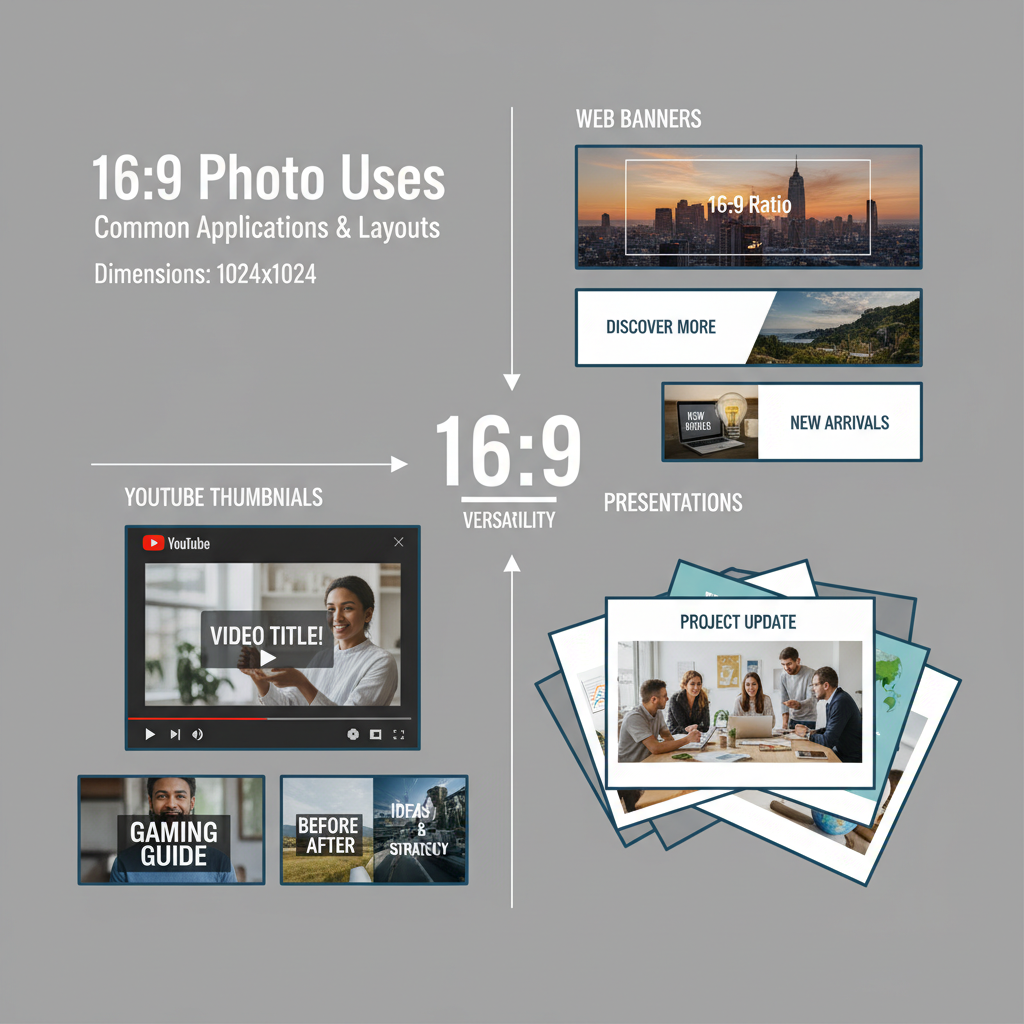
Understanding the 16:9 Aspect Ratio and Its Common Uses
The photo 16/9 aspect ratio refers to an image that is _16 units wide_ and _9 units tall_. This has become one of the most widely adopted formats in digital media because it matches the standard widescreen dimensions of modern displays, TVs, and most smartphone videos.
Typical uses of 16:9 photography include:
- Web banners where width is key for visual impact.
- YouTube thumbnails to match the platform’s native video format.
- Presentation slides since most templates default to widescreen.
- Social media story covers and headers.
By understanding this format, photographers and content creators can optimize their visuals for multiple platforms without unwanted cropping or stretching.
---
Why 16:9 Works Well for Web Banners, YouTube Thumbnails, and Presentations
The 16:9 aspect ratio is inherently engaging because it mimics the human field of view more closely than older 4:3 formats. This makes visuals feel natural and cinematic. Here’s why it’s the preferred choice:
- Web banners benefit from the horizontal expanse, ideal for showcasing landscapes, events, or promotional text alongside images.
- YouTube thumbnails look cleaner and avoid pillarboxing when viewed on widescreen monitors.
- Presentations appear more professional and utilize space efficiently, allowing for balanced text and imagery.
---
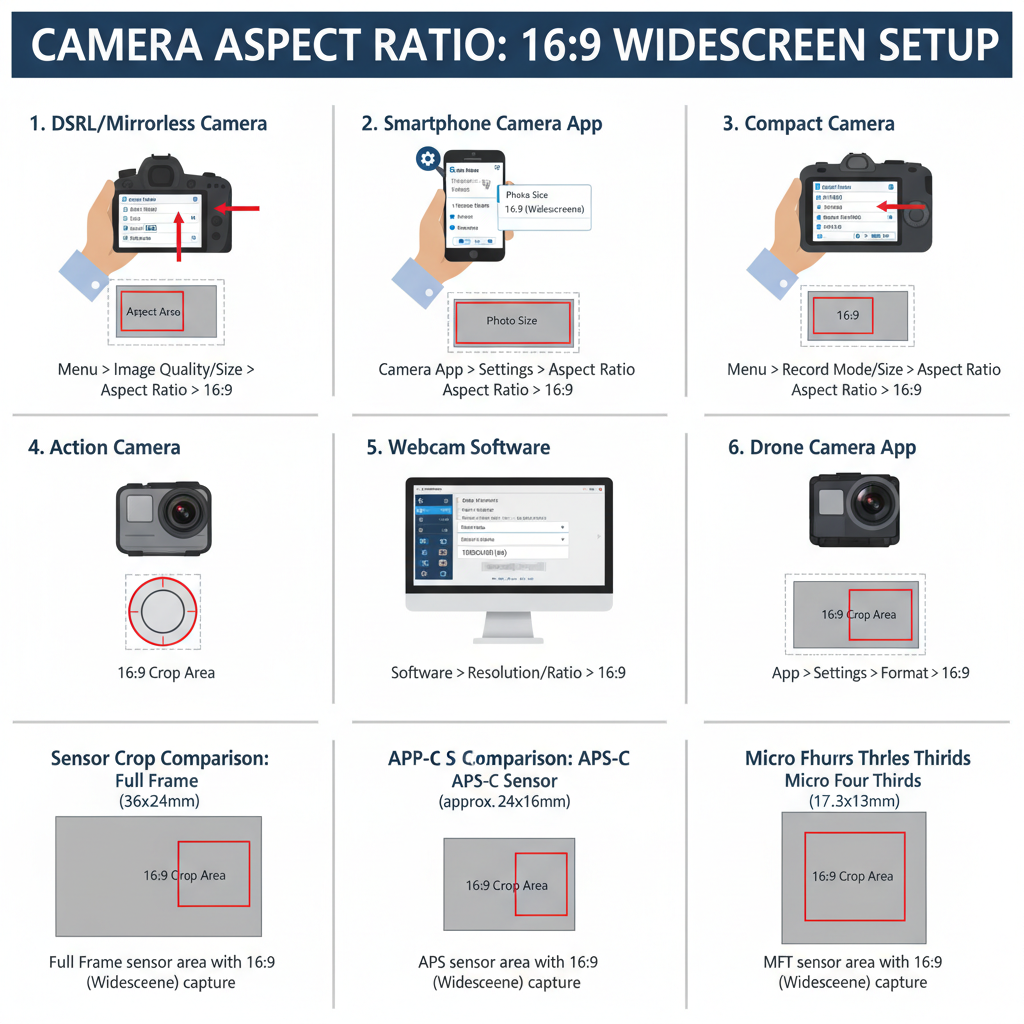
Choosing the Right Camera Settings for 16:9 Photography
Modern cameras and smartphones often allow you to set the aspect ratio before shooting. To capture perfect photo 16/9 shots:
- Set aspect ratio — choose 16:9 in camera settings.
- Resolution — aim for at least 1920x1080 pixels for standard HD quality.
- Frame guides — enable grid lines to help perform accurate compositions.
Some cameras crop the sensor image to achieve 16:9, so be mindful of losing vertical space. For DSLRs and mirrorless systems, shooting in the native sensor ratio and cropping later in post might be better for flexibility.
---
Framing and Composition Tips for Wide Aspect Shots
The extended width of 16:9 gives you more horizontal real estate, which changes how you compose shots:
- Rule of thirds: Place points of interest along vertical thirds for balance.
- Leading lines: Use roads, fences, or natural lines to draw viewers’ eyes horizontally.
- Foreground interest: Wide shots can feel empty; adding objects near the camera creates depth.
- Symmetry: A centered subject can be powerful if framed with symmetry.
---
Adjusting Lighting to Complement the Wide Frame Format
Lighting in wide frames can be tricky—illumination must balance across the elongated scene. Tips include:
- Even lighting: Use softbox or diffused light for consistent luminance across the frame.
- Directional light: To add drama, let light come from one side, enhancing textures across space.
- Golden hours: Early morning and late evening provide natural soft lighting that flatters a widescreen shot.
Lighting should guide the eye; in 16:9, side-to-side movement matters as much as top-to-bottom.
---
Creative Subject Placement for Cinematic Effect
The cinematic qualities of 16:9 photography increasingly appeal to content creators. To amplify this style:
- Position subjects slightly off-center to mimic movie framing.
- Keep dialogues or action along the horizontal axis.
- Use negative space on one side to create anticipation or tension.
- Incorporate environmental elements to support storytelling.
Wide frames are perfect for narrative shots—each composition can contain multiple action points without feeling cluttered.
---
Post-Processing Techniques to Crop and Enhance 16:9 Images
Post-processing can refine your 16:9 shots for print or digital use. Key techniques:
- Cropping accurately: Use software like Photoshop or Lightroom to maintain exact ratios.
- Color grading: Apply cinematic LUTs for cohesive tones.
- Lens correction: Fix distortions that are more noticeable in wide frames.
- Sharpening: Pay attention to edge details, which can stretch across large parts of the image.
Some editing tools allow custom overlays to ensure you keep critical subjects within the safe visible area.
---
Optimizing File Size and Resolution for Web Display Without Quality Loss
Large 16:9 images can slow down websites if not optimized. Use the following best practices:
| Use Case | Recommended Resolution | Compression Tips |
|---|---|---|
| Web Banner | 1920x1080 px | Use JPEG at 70% quality |
| YouTube Thumbnail | 1280x720 px | PNG for text clarity |
| Presentation Slide | 1920x1080 px | Light compression to avoid artifacts |
Modern tools like TinyPNG or ImageOptim can compress without visible loss.
---
Best Practices for 16:9 Photos on Social Media Platforms
Each social platform treats 16:9 differently:
- Facebook: Ideal for cover photos and event banners.
- Twitter/X: Works well for header images; crop previews should be checked.
- Instagram: Landscape posts show as 16:9 but preview in square—important subjects should be centered.
- LinkedIn: Header banners gain maximum visibility in widescreen.
Always test the uploaded image to ensure platform cropping doesn’t cut out essential elements.
---
Common Mistakes to Avoid with 16:9 Photography
Avoid these pitfalls:
- Placing subjects at extreme edges — crop risk on different screens.
- Ignoring vertical balance — a wide frame still needs visual weighting from top to bottom.
- Overstuffing — too many subjects make the frame chaotic.
- Poor resolution — stretching a low-res image degrades quality significantly.
Thinking ahead about where and how an image will be displayed is key to avoiding disappointments.
---
Tools and Apps for Shooting and Editing in 16:9
Some great tools include:
- Professional cameras: Canon EOS R, Sony A7 series with aspect ratio settings.
- Smartphone apps: ProCamera, Moment, Halide.
- Editing software: Adobe Lightroom, Capture One, Affinity Photo.
- Mobile editing apps: Snapseed, VSCO for quick crops and grading.
These tools often allow you to set or lock the aspect ratio while shooting, ensuring precision.
---
How to Repurpose 16:9 Images for Vertical or Square Formats
Sometimes you need a 16:9 image to fit Instagram stories (vertical 9:16) or feed posts (square 1:1). Strategies for repurposing:
- Re-crop: Maintain key subjects by cropping down carefully.
- Background blur: Fill empty vertical space when flipping to portrait.
- Add text overlays: Use blank sides for messaging in new formats.
- Collages: Combine excerpts of the wide frame into multiple square tiles.
Repurposing requires respecting the original composition while adapting to new constraints.
---
Conclusion
Mastering the photo 16/9 aspect ratio is more than just adjusting camera settings—it’s about composition, lighting, and platform optimization. By taking a deliberate approach from shooting to editing to posting, you can ensure that your widescreen visuals stand out across web and social media.
Whether you’re a beginner or seasoned photographer, following these guidelines will give your wide-aspect imagery a cinematic, professional quality that resonates with viewers and boosts engagement.
Start experimenting with your next 16:9 shot today—apply these tips for framing, lighting, and file optimization to elevate your photo projects and capture audience attention everywhere you share.