How to Take the Best Pic of Highlights
Learn how to capture stunning highlights in hair or photography with expert tips on lighting, backgrounds, exposure, and camera settings.

Understanding “Highlights” in Photography and Hair Styling
Capturing the perfect pic of highlights is both an art and a technical skill. In photography, the term refers to the brightest areas of an image that draw the viewer's attention, while in hair styling it describes lighter strands that add depth and dimension to hair color. Whether your subject is shimmering locks or reflective surfaces, knowing how to manage highlights is essential for producing striking, professional images.
- Photography Context: Highlights are the most illuminated parts of a photo, such as reflections, rays of sun, or bright backgrounds. Controlling them prevents overexposure and maintains visual balance.
- Hair Styling Context: Highlights in hair involve lightening certain sections to add vibrancy. Properly photographing these requires keen attention to light, angle, and color accuracy.
Before shooting, decide which type of highlight you intend to showcase. Your methods—lighting, composition, editing—will vary based on this choice.

---
Choosing the Right Lighting Setup
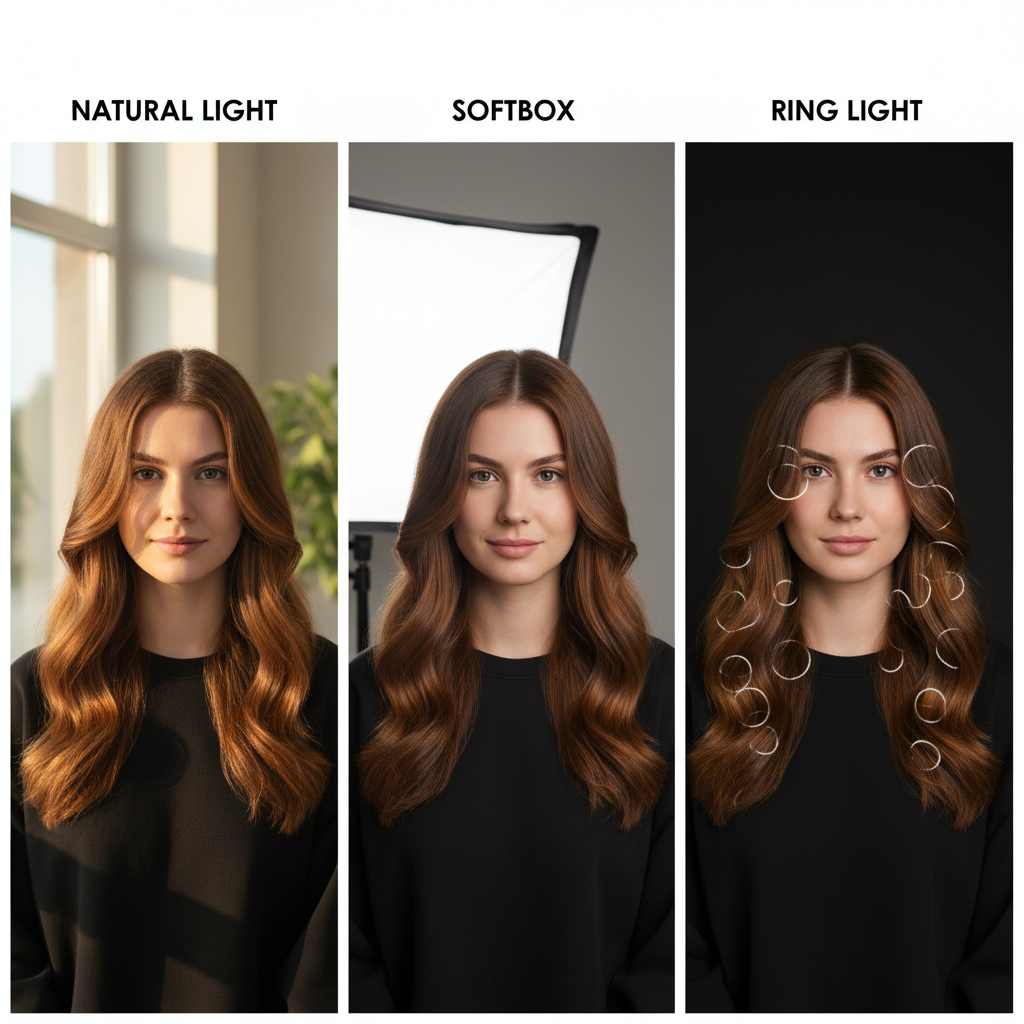
Lighting is the single most important factor when taking a pic of highlights. Whether you’re working with glossy hair or shiny materials, light determines how effectively those bright tones appear.
Natural Light
- Pros: Soft, even exposure; flattering for skin tones; minimal gear needed.
- Cons: Weather and time limitations.
- Tip: Shoot near a window during golden hour (shortly after sunrise or before sunset) for warm, golden highlights.
Softbox Lighting
- Pros: Diffused, controlled light; minimizes harsh shadows.
- Cons: Requires extra setup.
- Tip: Position slightly above and angled toward the subject to define highlights with minimal glare.
Ring Light
- Pros: Even illumination; creates appealing “catchlight” in eyes; excellent for close-ups.
- Cons: Can look flat if misused.
- Tip: Use in makeup or hairstyle photography where consistent highlight coverage is preferred.
---
Picking the Best Background to Make Highlights Stand Out
An effective backdrop ensures your highlights are the visual focus of the image:
- Solid Colors: Black or white backdrops emphasize contrast.
- Neutral Tones: Beige, gray, and pastels soften and balance tones.
- Textures: Blurred bokeh backgrounds add interest without distraction.
Background Selection Table
| Background Type | Best Use | Effect on Highlights |
|---|---|---|
| Solid Black | Jewelry, shiny hair | Maximum contrast, depth enhancement |
| Solid White | Light-colored highlights | Crisp, airy look |
| Bokeh | Outdoor photography | Artistic, keeps focus on subject |
| Neutral Gray | Professional portraits | Balanced tone without overpowering |
---
Using a High-Quality Camera or Smartphone with Manual Settings
Modern smartphones and professional cameras both serve well for highlights—provided you have manual control.
Recommended Settings:
- Aperture: Wide (e.g., f/2.8) for shallow depth and subject isolation.
- ISO: Low (100–400) to limit noise.
- Shutter Speed: Adjust to lighting; avoid excessive speed in dim conditions.
Manual control via apps like Lightroom Mobile or ProCamera lets you fine-tune exposures for perfect highlight capture.
---
Adjusting Exposure and White Balance
Overexposure can destroy highlight detail. Lower exposure slightly to protect them and ensure color accuracy through proper white balance.
For Hair Photography:
- Match white balance to lighting—daylight or tungsten settings.
- Avoid oversaturation to keep highlights natural.
For Product Photography:
- Use a white balance card before shooting.
- Balance exposure to preserve reflective textures.
---
Framing the Shot for Maximum Visual Appeal
Composition determines how a pic of highlights is perceived visually.
- Rule of Thirds: Create harmony by placing the subject along gridlines.
- Close-Ups: Emphasize intricate highlight details.
- Leading Lines: Guide the eye toward the highlight area.
Framing strategically makes highlights the focal point.
---
Capturing Multiple Angles to Show Depth and Variation
Highlights shift with angle. Multiple perspectives enhance dimensionality:
- Overhead Shots: Ideal for crown hair highlights.
- Side Profiles: Show tonal gradients.
- 45-Degree Angles: Balance depth and dimension.

Professional stylists or photographers often rotate subjects to reveal every nuance of the highlights.
---
Editing Photos to Enhance Contrast and Brightness
Post-processing can subtly improve highlights:
Editing Checklist:
- Contrast: Slight increases boost brightness areas.
- Brightness: Lift shadows but protect highlights.
- Color Correction: Maintain accurate hues.
- Sharpening: Enhance detail carefully.
- Highlight Recovery: Retrieve overexposed details.
Recommended Tools:
- Adobe Lightroom
- Snapseed
- Photoshop for advanced work
---
Saving Images in High Resolution
Always store edited highlight shots in high resolution:
- Online Sharing: Use PNG or high-quality JPEG.
- Printing: Opt for TIFF for lossless fidelity.
Avoid heavy compression to keep fine highlight details intact.
---
Best Practices for Posting Highlight Pics on Social Media
Make your pic of highlights stand out online:
- Aspect Ratios:
- Instagram: 4:5 portrait
- Facebook: 1.91:1 cover image
- Captions & Hashtags:
- Add descriptive copy with hashtags like #highlightshot, #hairhighlights.
- Style Consistency:
- Keep a uniform look across profiles.
- Timing:
- Post in peak engagement hours.
- Interaction:
- Reply to comments to build audience trust and reach.
---
Conclusion
Mastering how to take a pic of highlights involves understanding your subject, selecting flattering light, perfecting camera settings, and composing the shot strategically. From hair styling to product photography, capturing the brightest tones demands attention to technical factors and artistic vision.
The difference between flat, forgettable images and dazzling, professional shots lies in mastery of highlights. Apply these tips to elevate your portfolio, impress clients, and create content that shines both online and in print—start experimenting today to see your highlights in their best light.