3/4 Photo Tips for Portrait and Fashion Photography
Learn how to master the 3/4 photo angle in portrait and fashion photography with tips on posing, lens choice, lighting, and directing models.

Understanding the 3/4 Photo in Portrait and Fashion Photography
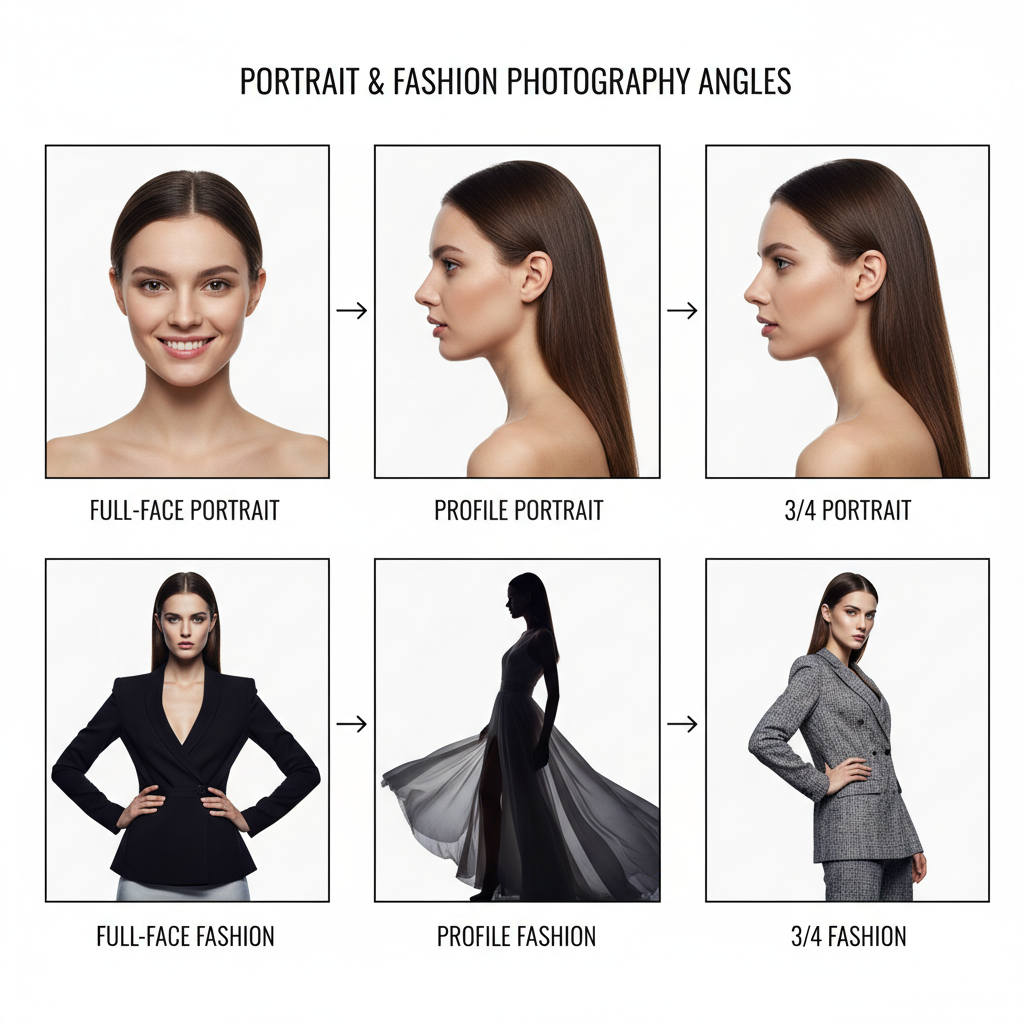
The 3/4 photo angle is a widely used composition style in portrait and fashion photography, where the subject is turned slightly—about 45 degrees—from the camera lens. This positioning reveals roughly three-quarters of the face or body, creating visual depth while maintaining a compelling connection with the viewer.
Favoured in portraiture, editorial photography, lifestyle shoots, and actor headshots, the 3/4 pose offers flattering proportions and storytelling potential, making it a go-to choice for professionals aiming for polished yet dynamic imagery.
By mastering the 3/4 shot, you can diversify your portfolio, enhance subject appeal, and achieve consistent, flattering results across a wide range of projects.
---
Why Use the 3/4 Photo Angle
Photographers embrace the 3/4 angle for several impactful reasons:
- Dimension and depth: Adds contour to facial and body features, avoiding flatness.
- Flattering proportions: Helps conceal asymmetry and provides a slimming effect.
- Dynamic storytelling: Suggests movement or introspection for a more engaging image.
This composition is particularly effective for presenting grace, elegance, and natural poise.
---
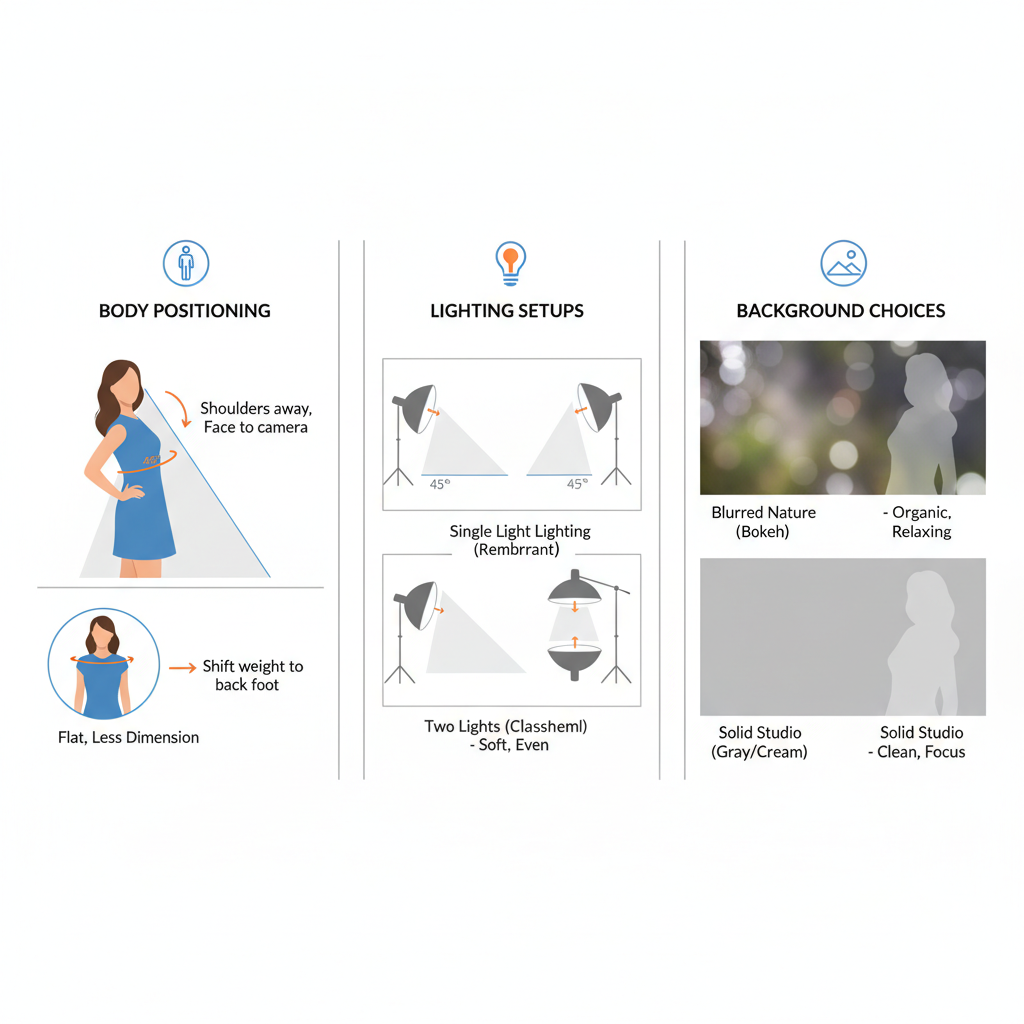
Body Positioning for the Perfect 3/4 Angle
Small positioning adjustments can significantly elevate a 3/4 photo.
Feet:
- Point the front foot slightly toward the camera.
- Keep the rear foot angled away for a relaxed stance.
Shoulders:
- Rotate 30–45 degrees from the lens.
- Position one shoulder closer to create depth layers.
Head Tilt:
- Tilt toward the leading shoulder for softness and connection.
- Adjust chin height to prevent harsh shadows.
Quick Practice Drill
Have your subject walk in place slowly, then freeze them mid-step into the 3/4 stance for a natural, fluid body line.
---
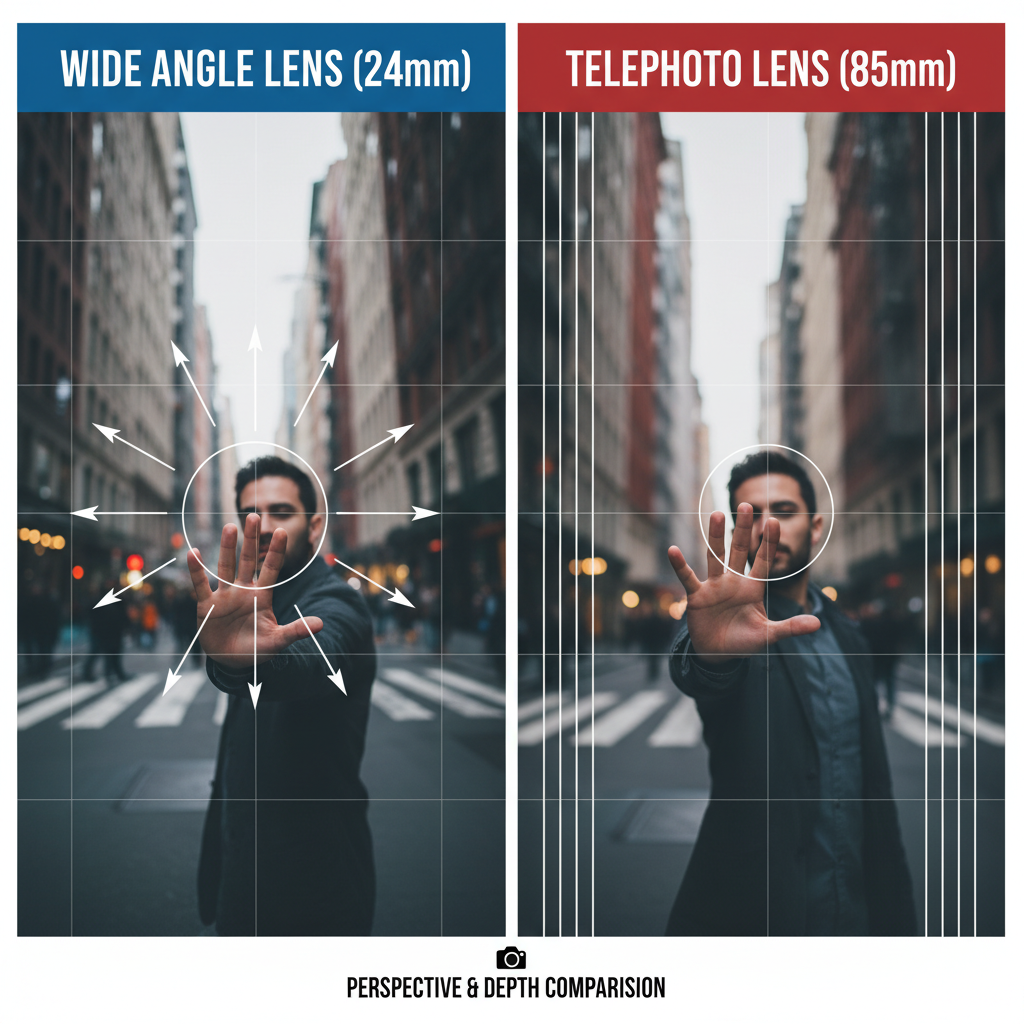
Choosing the Right Lens and Focal Length
Selecting an appropriate lens is crucial for capturing flattering proportions in a 3/4 portrait.
| Lens Type | Focal Length | Effect on 3/4 Portrait |
|---|---|---|
| Prime | 85mm | Classic flattering compression, ideal for portraits |
| Zoom | 70-200mm | Versatile at longer focal lengths, excellent for lifestyle and editorial |
| Wide-angle | 35mm | Dynamic with environmental context; watch for distortion up close |
Aim for lenses in the 50–135mm range to balance perspective without distortion.
---
Lighting to Enhance Depth and Contours
Lighting shapes the mood and dimension of a 3/4 portrait.
Natural Light:
- Use sidelight to define contours.
- Employ reflectors to soften harsh shadows without losing depth.
Studio Lighting:
- Apply Rembrandt lighting for cheekbone shadows and drama.
- Introduce fill light to preserve facial detail in shaded areas.
Mood control through lighting can shift from soft romance to bold editorial with a few adjustments.
---
Background Selection and Composition Rules
In a 3/4 photo, backgrounds must enhance—not distract from—the subject.
Key guidelines:
- Prevent lines from intersecting the subject’s head or joints.
- Position the leading eye near a rule-of-thirds intersection.
- Layer backgrounds for depth with blurred foregrounds and texture behind.
Pro Tip: Keep headshot backgrounds clean, but allow subtle textures in fashion shoots.
---
Directing Models for Dynamic Poses and Expressions
Strong direction brings emotion and authenticity to the 3/4 composition.
Cues to give:
- “Shift your weight to the back foot and soften your shoulders.”
- “Look just past the camera for a reflective mood.”
- “Move between shots—adjust clothing or hair for a natural flow.”
Encouraging subtle movements retains freshness in facial expressions and posture.
---
Editing Techniques for 3/4 Images
Post-processing enhances the visual strengths of a 3/4 image.
Color Grading:
- Subtle split toning enriches atmosphere.
- Guard skin tone integrity during HSL adjustments.
Retouching:
- Dodge and burn along facial planes to emphasize contours.
- Retain natural texture by avoiding excessive softening.
Cropping:
- Keep ample space toward the subject’s gaze direction.
- Avoid cropping that disrupts proportion cues.
---
Common Mistakes and How to Avoid Them
Common pitfalls include:
- Over-rotation: Loses intimacy of eye contact.
- Flat lighting: Removes depth cues.
- Ultra-wide distortion: Overemphasizes facial features.
- Busy backgrounds: Distract from the focal point.
Fixes:
Maintain subtle angles, control lighting, use suitable focal lengths, and simplify your scene.
---
Examples Across Industries
| Industry | Application | Benefits of 3/4 Angle |
|---|---|---|
| Fashion | Lookbooks, catalogue shoots | Highlights garment flow and silhouette |
| Film/Theater | Actor headshots | Reveals character depth and confidence |
| Weddings | Bride and groom portraits | Romantic, elegant framing |
| Corporate | Executive portraits | Balances professionalism with warmth |
---
Practice Drills for Mastering the 3/4 Perspective
1. Rotational Series:
Photograph a subject turning from straight-on to profile; identify the optimal 3/4 angle.
2. Light Variation:
Keep the same pose but alter light positions to study changes in depth and mood.
3. Background Scenarios:
Shoot in diverse environments—studio, outdoor, urban—to adapt composition rules.
---
Final Thoughts and Next Steps
The 3/4 photo angle remains a timeless technique that seamlessly blends technical precision and artistic vision. With careful positioning, lens choice, lighting mastery, and mindful editing, you can consistently produce striking portraits that convey depth and personality.
Whether your goal is a high-end fashion campaign or a heartfelt personal portrait, incorporating the 3/4 angle will elevate your photography. Start experimenting today—you may capture your portfolio’s standout image at that perfect 45-degree turn.
Ready to refine your photography skills? Practice these techniques in your next shoot and watch your portraits transform.