How to View Scheduled Posts on X and X Pro
Learn how to view, edit, and manage scheduled posts on X and X Pro, including desktop, mobile app, and advanced TweetDeck scheduling features.
Introduction to Viewing Scheduled Posts on X
Scheduled posts on X (formerly Twitter) let you plan and automate your content so it publishes exactly when you want. This is a core tool for social media managers, small business owners, marketers, and personal users aiming for consistent posting without being online 24/7. Understanding how to view scheduled posts on X ensures your content strategy remains on track and adaptable to last-minute changes.
By scheduling your posts, you can:
- Coordinate campaigns with specific dates, events, or promotions.
- Reach audiences in multiple time zones without staying up late.
- Maintain regular posting cadence to boost engagement.

In this guide, you’ll learn step-by-step how to view, edit, and manage scheduled posts across X’s web platform, mobile app, and X Pro (formerly TweetDeck).
---
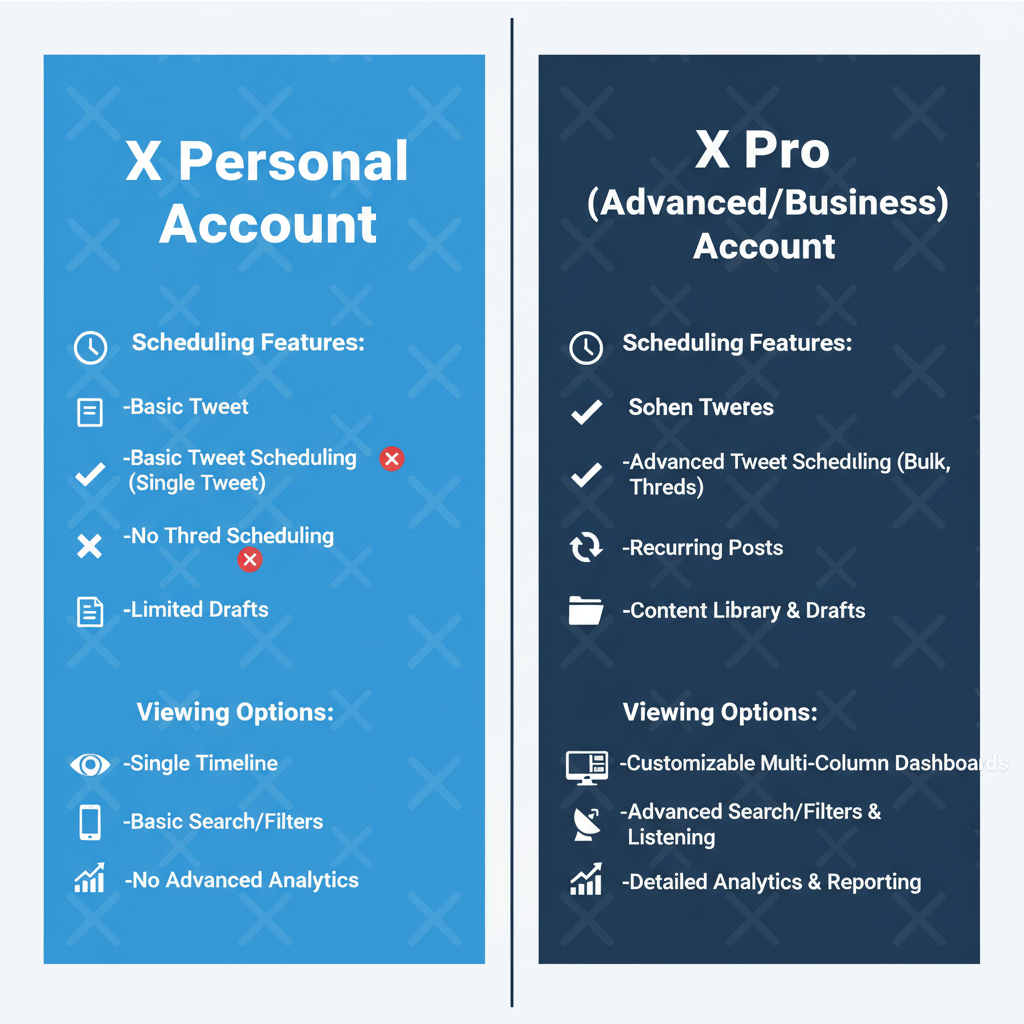
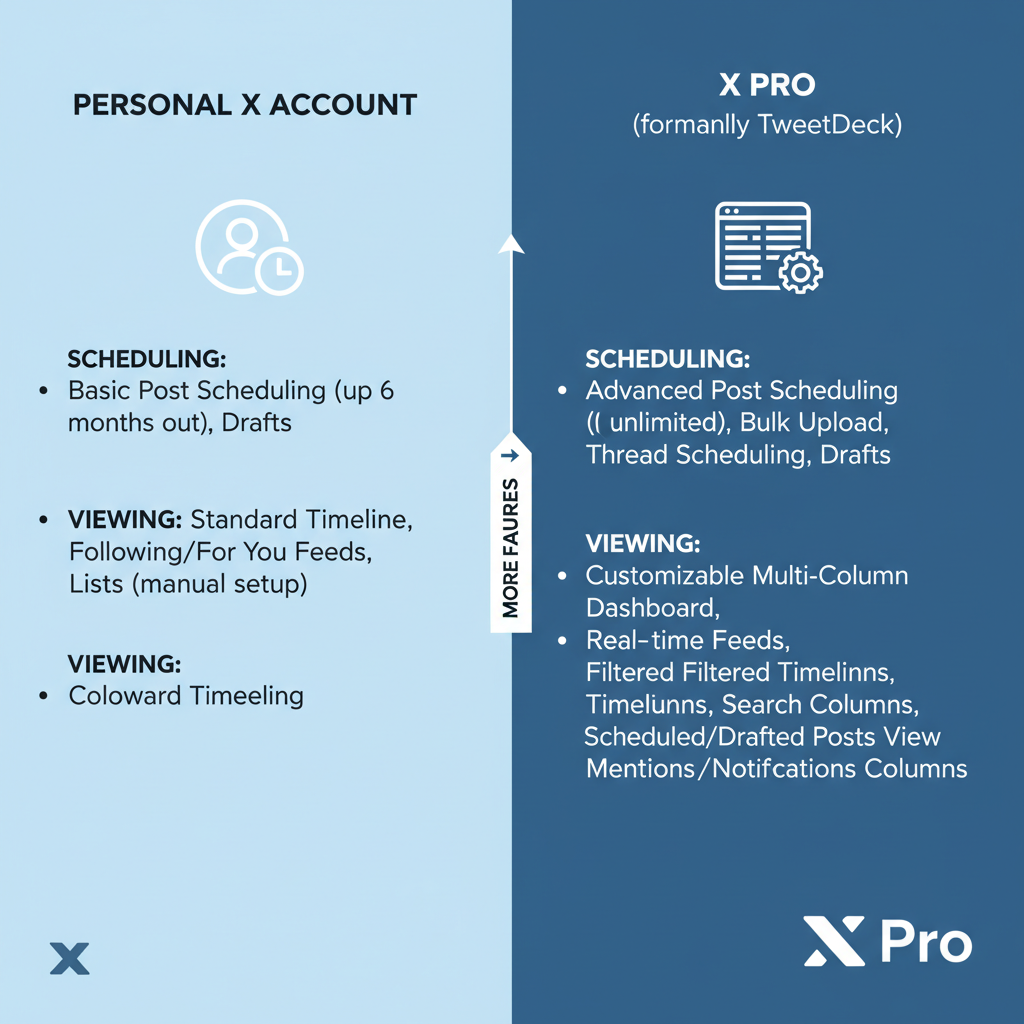
Differences Between Personal Accounts and X Pro Scheduling
There are two main ways to schedule posts on X:
- Regular X Accounts — Accessed via the standard web or mobile app, suitable for basic scheduling.
- X Pro (formerly TweetDeck) — Ideal for advanced users and teams, providing rich scheduling tools, multi-account support, and collaborative capabilities.
Key differences include:
| Feature | Regular X | X Pro (TweetDeck) |
|---|---|---|
| Post Scheduling | Yes | Yes |
| Bulk Schedule View | Limited | Full calendar/timeline |
| Multi-Account Support | No | Yes |
| Team Collaboration | No | Yes |
---
How to Schedule a Post on X Web
Before viewing scheduled posts, you’ll need to know how to create one.
Steps:
- Log in to your X account via a desktop browser.
- Click the Post button.
- Compose your message, adding images, GIFs, or videos as needed.
- Click the calendar and clock icon for scheduling options.
- Select your desired date and time.
- Save to schedule.
Once set, your post appears in the "Scheduled" section.
---
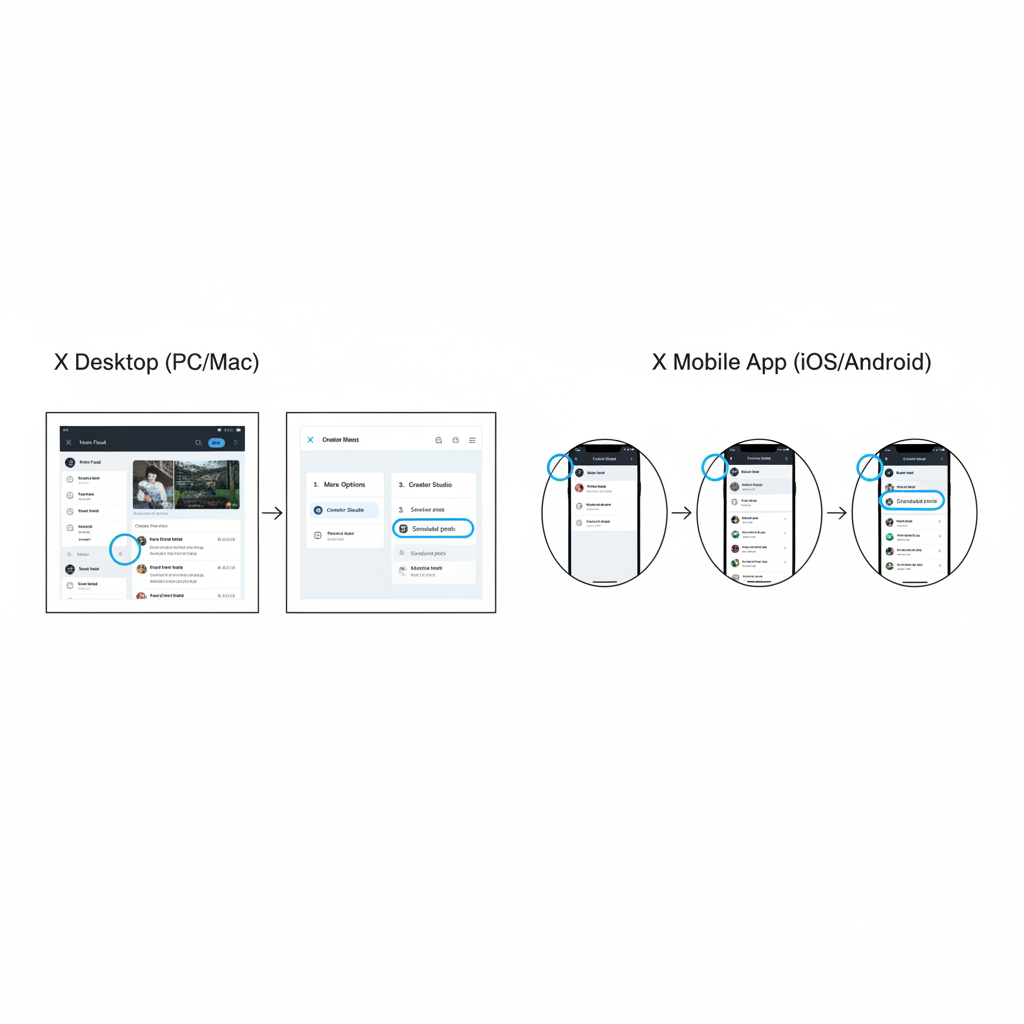
Viewing Scheduled Posts on X via Desktop
Here’s how to view scheduled posts from your desktop:
- Log in to X in your web browser.
- Click the Post icon to open the composer.
- In the composer, look for the Unsent Posts button (top right or bottom corner).
- Select the Scheduled tab in the popup.
- Review all scheduled posts with their publishing times.
Tip: Click on any scheduled post to preview, edit, or delete it before it goes live.
---
Viewing Scheduled Posts on the X Mobile App
The mobile workflow differs slightly:
- Open the X app on your device.
- Tap the Compose icon (feather with a plus).
- In the compose screen, tap the drafts/unsent posts icon.
- Go to the Scheduled tab to see posting times.
- Tap to edit or reschedule if needed.
This is perfect for quick checks or last-minute revisions when you’re away from your computer.
---
Accessing and Managing Scheduled Posts in X Pro
X Pro offers a more comprehensive scheduling interface.
Steps:
- Visit tweetdeck.x.com or access via your X account.
- Sign in with your credentials.
- Locate the Scheduled column or add it if missing.
- View all scheduled posts in chronological order.
Advantages:
- See all scheduled content across accounts in one view.
- Drag-and-drop posts to change times.
- Apply account or keyword filters.
---
Editing or Deleting Scheduled Posts
You can manage scheduled posts on any platform:
Edit a Scheduled Post:
- Find the post.
- Select Edit.
- Change text, media, or time.
- Save.
Delete a Scheduled Post:
- Locate post.
- Choose Delete or Discard.
- Confirm deletion.
Keeping this process handy ensures you can adapt content rapidly.
---
Common Issues & Troubleshooting
Frequent Problems:
- Scheduled Tab Missing — Ensure your post was properly saved; refresh.
- Posts Not Showing — Verify you’re in the correct account.
- Edits Not Saving — Could be due to poor internet or server issues.
Quick Fixes:
- Clear browser cache/cookies.
- Update to the latest app version.
- Try another device for cross-checking.
---
Best Practices for Scheduling
- Post at Peak Times — Know when your audience is most active.
- Keep a Consistent Brand Voice — Improves brand recognition.
- Avoid Overscheduling — Maintain audience interest.
- Proofread Before Scheduling — Avoid embarrassing errors.
- Use Visual Media — Higher engagement rates from images, videos, and GIFs.
---
Frequently Asked Questions
Q: Can I schedule threads?
A: Yes, both standard X and X Pro allow thread scheduling.
Q: Is scheduling free?
A: Yes, but X Pro has additional free and premium features.
Q: How far ahead can I schedule?
A: Typically up to 18 months.
Q: Can I schedule polls?
A: Poll scheduling isn’t supported on some versions.
---
Conclusion: Master How to View Scheduled Posts on X
Mastering how to view scheduled posts on X—and using tools like X Pro—lets you manage content proactively, save time, and stay consistent. Whether you’re a solo creator or part of a marketing team, effective scheduling keeps your feed active and relevant without the stress of real-time posting.
Take advantage of the platform’s scheduling tools today to streamline your workflow and boost audience engagement. Start experimenting with viewing, editing, and optimizing your scheduled posts, and watch your social media efficiency soar.