IG Reels Size Guide (2025): Dimensions, Safe Zones, Covers, and Export Settings
Master IG Reels in 2025 with exact sizes: 9:16, 1080x1920, safe zones, feed/grid crops, cover tips, and export settings (codec, fps, audio) for crisp uploads.

IG Reels Size Guide (2025): Dimensions, Safe Zones, Covers, and Export Settings

Getting IG Reels size right is the difference between a crisp, readable, and clickable video and one that gets cropped, covered by UI, or crushed by compression. This 2025 guide distills practical, creator-tested specs and workflows so your Reels look great in the Reels viewer, feed previews, and your profile grid.
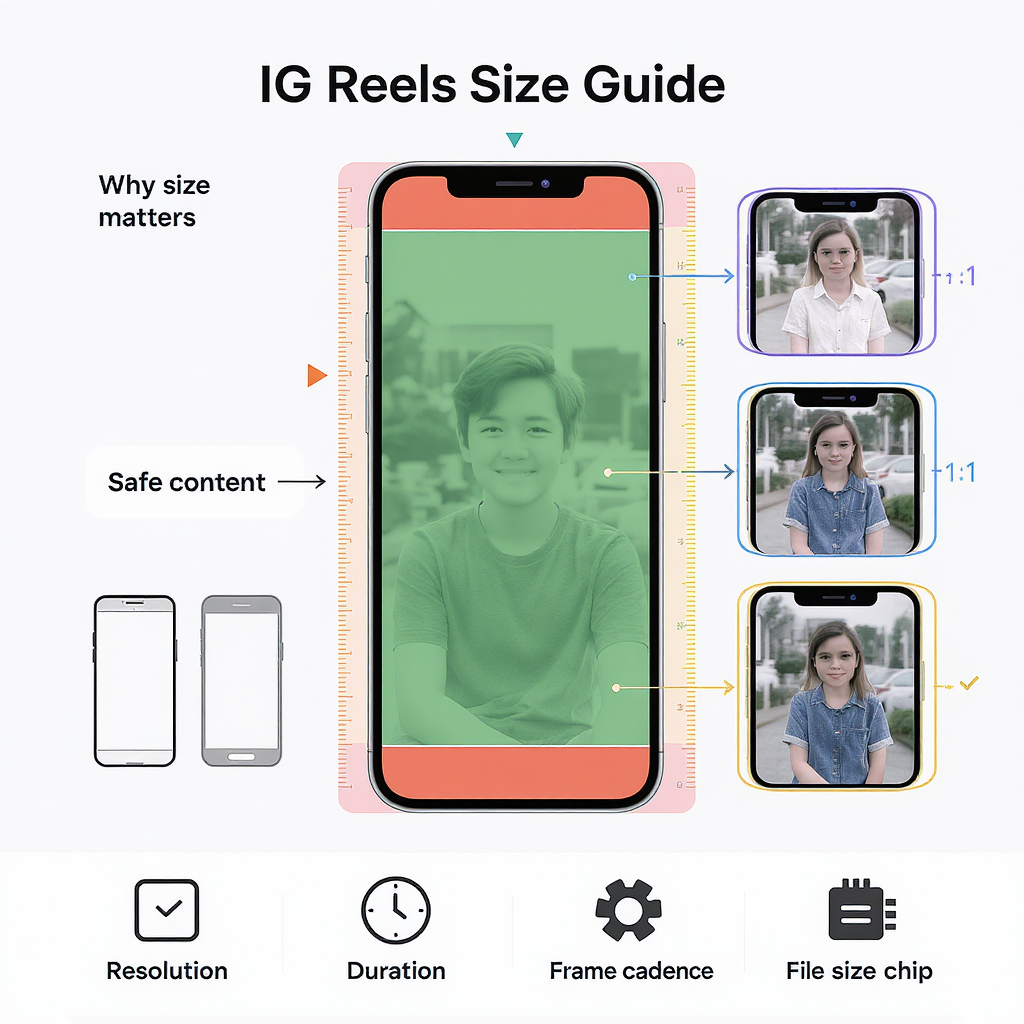
Why IG Reels size matters
Aspect ratio isn’t just a preference—it dictates how much of your story is actually visible across Instagram surfaces.
- Visibility across surfaces:
- Reels viewer: full 9:16 vertical shows the whole frame.
- Feed preview: cropped to 4:5, cutting off top and bottom.
- Profile grid: cropped to 1:1 square from the center.
- Avoid auto-crops: If you place titles or faces near edges, they’ll be cut off in feed/grid previews.
- Prevent UI overlap: Usernames, captions, and buttons cover the top and bottom, hiding anything placed there.
- Reduce compression artifacts: Clean, properly sized 1080×1920 masters compress better than upscaled or letterboxed exports.
---
Current IG Reels dimensions and specs
| Spec | Recommendation (2025) | Notes |
|---|---|---|
| Canvas / Aspect | 9:16 vertical | Core Reels aspect ratio |
| Resolution | 1080 × 1920 px | Minimum 720p (720 × 1280); stick to 1080p for quality |
| Container | MP4 or MOV | MP4 is the safest for upload |
| Video codec | H.264 (AVC), High Profile | 8-bit 4:2:0; use High profile to preserve detail |
| Audio codec | AAC, 44.1 kHz, 128–320 kbps | Stereo is fine; 48 kHz also acceptable |
| Frame rate | 30 fps recommended; 60 fps acceptable | Use constant frame rate; avoid variable unless necessary |
| Orientation | Native vertical (record in portrait) | No letterboxing or pillarboxing |
| Color | Rec.709/sRGB | Avoid HDR/HLG unless you know the pipeline |
---
Safe zones explained (avoid UI overlays)
Instagram overlays UI on the top and bottom of Reels:
- Top: username, follow, audio.
- Bottom: captions, like/comment/share buttons, and sometimes CTA elements.
To keep key visuals and text visible:
- Design inside the central 1080 × 1420 px safe area.
- That’s a 250 px margin at the top and 250 px at the bottom of a 1080 × 1920 frame.
- Keep logos, titles, and faces within this central band.
- Place burned-in subtitles at least 250 px above the bottom edge.
Quick safe-zone checklist:
- Leave 250 px empty at the top and bottom for UI.
- Keep essential elements within the central 1420 px height.
- Align text left/right with 60–80 px horizontal padding for readability.
---
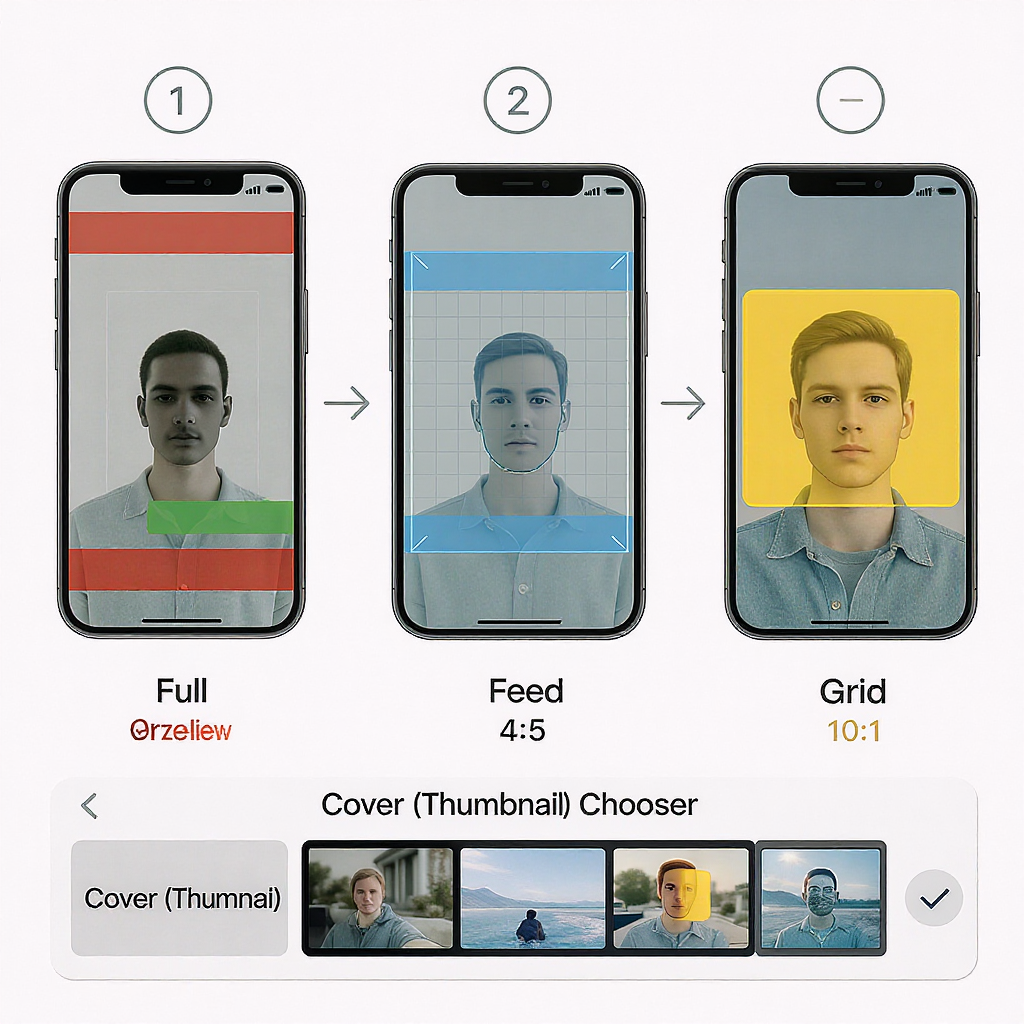
Feed and grid previews: plan for three crops
Your Reel will appear in three different crops:
| Surface | Aspect | Displayed Area (from 1080×1920 master) | What gets cut |
|---|---|---|---|
| Reels viewer | 9:16 | 1080 × 1920 | Nothing (but UI covers top/bottom) |
| Main feed preview | 4:5 | 1080 × 1350 center-cropped | Top and bottom 285 px each |
| Profile grid | 1:1 | 1080 × 1080 center-cropped | Top and bottom 420 px each |
Composition strategy:
- Place the “must-see” subject within the center square (1080 × 1080) so it survives the grid crop.
- Place secondary elements inside the 4:5 area (1080 × 1350) to look good in feed previews.
- Use headroom: if the subject’s head is near the top, it may be cut off in 4:5 and 1:1.
---
Reel cover images (thumbnails)
- Best upload size: 1080 × 1920 px (9:16).
- Keep title text and faces:
- Inside the 4:5 area (1080 × 1350) for feed previews.
- Inside the central 1:1 square (1080 × 1080) for the profile grid.
- Create reusable templates with guides:
- Top and bottom guides at 285 px for 4:5 safe.
- Additional guides at 420 px for 1:1 safety.
- Avoid busy backgrounds; use high-contrast titles and a single focal subject.
Template tip:
- Build a Photoshop/Canva file with three overlays:
- 9:16 base (1080 × 1920).
- 4:5 center overlay (1080 × 1350).
- 1:1 center overlay (1080 × 1080).
- Design within the 1:1 for the headline; use 4:5 for supporting text.
---
Pro export settings for crisp uploads
Recommended encoding for IG Reels size 1080 × 1920:
- Codec: H.264, High Profile, Level 4.2.
- Bitrate: 8–16 Mbps for 1080p vertical.
- For detailed textures/motion, aim closer to 12–16 Mbps.
- Use VBR 2-pass if available for better quality at a given size.
- Frame rate: 30 or 60 fps; set as constant frame rate.
- Keyframe interval (GOP): 2× frame rate (e.g., 60 for 30 fps).
- Audio: AAC, 44.1 kHz, 192–320 kbps stereo.
- Color: Rec.709, full swing video levels correctly tagged; avoid HLG/HDR unless your pipeline is managed end-to-end.
- Scaling: Pre-scale to exactly 1080 × 1920. Do not add black bars.
Example ffmpeg 2-pass export (1080 × 1920, 30 fps, ~12 Mbps):
## Pass 1

ffmpeg -y -i input.mov -vf "scale=1080:1920:flags=lanczos:force_original_aspect_ratio=increase,crop=1080:1920" \
 -r 30 -pix_fmt yuv420p -colorspace bt709 -color_primaries bt709 -color_trc bt709 \
 -c:v libx264 -profile:v high -level 4.2 -b:v 12M -maxrate 16M -bufsize 24M \
 -g 60 -keyint_min 60 -sc_threshold 0 -pass 1 -an -f mp4 /dev/null

## Pass 2

ffmpeg -i input.mov -vf "scale=1080:1920:flags=lanczos:force_original_aspect_ratio=increase,crop=1080:1920" \
 -r 30 -pix_fmt yuv420p -colorspace bt709 -color_primaries bt709 -color_trc bt709 \
 -c:v libx264 -profile:v high -level 4.2 -b:v 12M -maxrate 16M -bufsize 24M \
 -g 60 -keyint_min 60 -sc_threshold 0 -c:a aac -ar 44100 -b:a 192k \
 -movflags +faststart -pass 2 output.mp4
NLE quick presets:
- Premiere Pro: H.264 Match Source – High Bitrate; set 1080×1920; Profile: High; Level 4.2; VBR 2-pass; Target 12 Mbps, Max 16 Mbps; Rec.709.
- Final Cut Pro: Export H.264 Faster Encode, then transcode with HandBrake/ffmpeg for 2-pass control if needed.
- DaVinci Resolve: Deliver H.264, 1080×1920, Profile High, Key Frames every 60 frames, Quality Restrict to 12000–16000 Kb/s, Color Space Rec.709 (Scene or Gamma 2.4 to taste).
---
Shooting and editing tips for better compression
- Record native vertical (portrait). Don’t rotate in post if you can avoid it.
- Light well and avoid high ISO noise—noise gets over-compressed.
- Stabilize: in-camera or post (warp/gyro). Stable footage compresses cleaner.
- Shutter guideline: ~1/60 for 30 fps, ~1/120 for 60 fps for natural motion blur.
- Leave headroom for captions; don’t frame foreheads at the very top.
- Use safe-zone guides in your editor: 250 px top/bottom, plus 4:5 and 1:1 overlays.
- Avoid tiny high-frequency patterns (thin stripes, moiré) that trigger artifacts.
- Keep logos and text away from extreme edges to survive all crops.
---
Text, captions, and subtitles that read on mobile
- Font size:
- Titles: roughly 6–10% of video height (115–190 px at 1920 px tall).
- Subtitles: 40–64 px depending on typeface weight and device density.
- Color and contrast:
- Use high-contrast text with a semi-opaque background box (60–80% black/white) or an outline.
- Drop shadows help on busy footage; outlines are clearer on flat backgrounds.
- Placement:
- Keep burned-in captions inside the central 1080 × 1420 safe area.
- For multi-line subs, max 2 lines, 35–42 characters per line.
- Line spacing: 120–140% of font size for readability.
- Consistency: Use a limited style set (title, subtitle, CTA) to build brand recognition.
---
Troubleshooting IG Reels quality issues
| Issue | Likely Cause | Fix |
|---|---|---|
| Blurry/soft after upload | Upscaled or low-bitrate source; app recompression | Export 1080×1920 at 8–16 Mbps, VBR 2-pass; enable “Upload at highest quality” |
| Unexpected crop in feed/grid | Essential content placed near top/bottom | Reframe within 4:5 and 1:1 safe boxes; move titles inward |
| Black bars (letterbox/pillarbox) | Wrong canvas or aspect mismatch | Pre-scale and crop to exactly 1080×1920; no bars in the file |
| Banding in gradients | Low bitrate; 8-bit footage; heavy compression | Add subtle film grain/dither; raise bitrate; avoid crushed gradients |
| Stutter/judder | VFR uploads; mixed frame rates | Export CFR (constant frame rate) at 30 or 60 fps; correct timeline FPS |
| Muted or desaturated colors | Color space mismatch (HLG/HDR to SDR) | Convert/grade to Rec.709; tag export correctly; avoid HDR if unmanaged |
Additional app-side steps:
- In the Instagram app: Settings and privacy → Data usage and media quality → toggle “Upload at highest quality.”
- Upload over strong Wi‑Fi to reduce server-side aggressive compression.
- Avoid heavy re-edits of downloaded Instagram files; always export from the original timeline.
---
Quick workflow checklist for perfect IG Reels size
- Edit on a 1080 × 1920 (9:16) timeline, Rec.709.
- Use overlays for:
- UI safe area: central 1080 × 1420.
- Feed crop: 1080 × 1350.
- Grid crop: 1080 × 1080.
- Keep titles/faces inside the 1:1 center when possible.
- Export H.264 High, 8–16 Mbps, VBR 2-pass, CFR, AAC 44.1 kHz.
- Upload with “highest quality” enabled. Verify on a second device.
Nail these fundamentals and your IG Reels will look sharp, read clearly, and hold up across the Reels viewer, feed, and profile grid—no surprises, no crops, and no mystery blur.
---
Summary
For best results on Instagram in 2025, build and export your Reels at a true 1080 × 1920 (9:16) resolution, keep all critical visuals within the central safe area, and plan compositions to survive 4:5 feed and 1:1 grid crops. Use H.264 High Profile with a constant frame rate, solid bitrates, and correctly tagged Rec.709 color to minimize recompression artifacts. With these specs and a disciplined workflow, your Reels will display cleanly across all surfaces and maintain crisp quality after upload.