IG Story Green Screen: The Complete How-To, Pro Tips, and Creative Ideas
Learn how to use Instagram Story’s Green Screen effect: step-by-step setup, lighting and framing tips, on-screen text best practices, and creative ideas.

IG Story Green Screen: The Complete How-To, Pro Tips, and Creative Ideas


The IG Story Green Screen effect is a lightweight, built-in tool that lets you place yourself over any photo or video without a studio. Done right, it boosts storytelling, viewer retention, and brand polish—no expensive gear required. Whether you’re a creator reacting to trends, a marketer demoing a product, or a traveler narrating highlights, the IG Story Green Screen setup is both fast and flexible.
What the Green Screen Effect Is and Why It Matters
- Puts you and your reactions front and center while showing relevant context (news clips, screenshots, slides).
- Elevates production value with minimal effort—looks “edited” without post-production.
- Encourages engagement: viewers see your face and content simultaneously, which often improves watch-through rates.
- Keeps your workflow inside Instagram—no export/import loops unless you want advanced edits.
Step-by-Step: Set Up the IG Story Green Screen
- Open Instagram and swipe right to Story.
- Tap the effects carousel (sparkle icon). Scroll or tap the magnifying glass to search “Green Screen” (the official Instagram effect is easy to spot).
- Tap Add Media on-screen to import your background:
- Use a photo for static explainers or a video for dynamic reactions.
- Adjust yourself:
- Pinch to resize your subject.
- Drag to position yourself where you won’t cover key visuals.
- Record:
- Press and hold to record a clip.
- Release and press again to stack multiple shots in one Story sequence.
- Switch backgrounds between clips to progress your narrative.
- Finishing:
- Add stickers, captions, and links.
- Save to your Camera Roll (download icon) for reuse or cross-posting.
- Post to Your Story or Close Friends for testing.
Pro tip: If you need to reframe after recording, save the clip and trim/reframe in a third-party editor, then re-import.
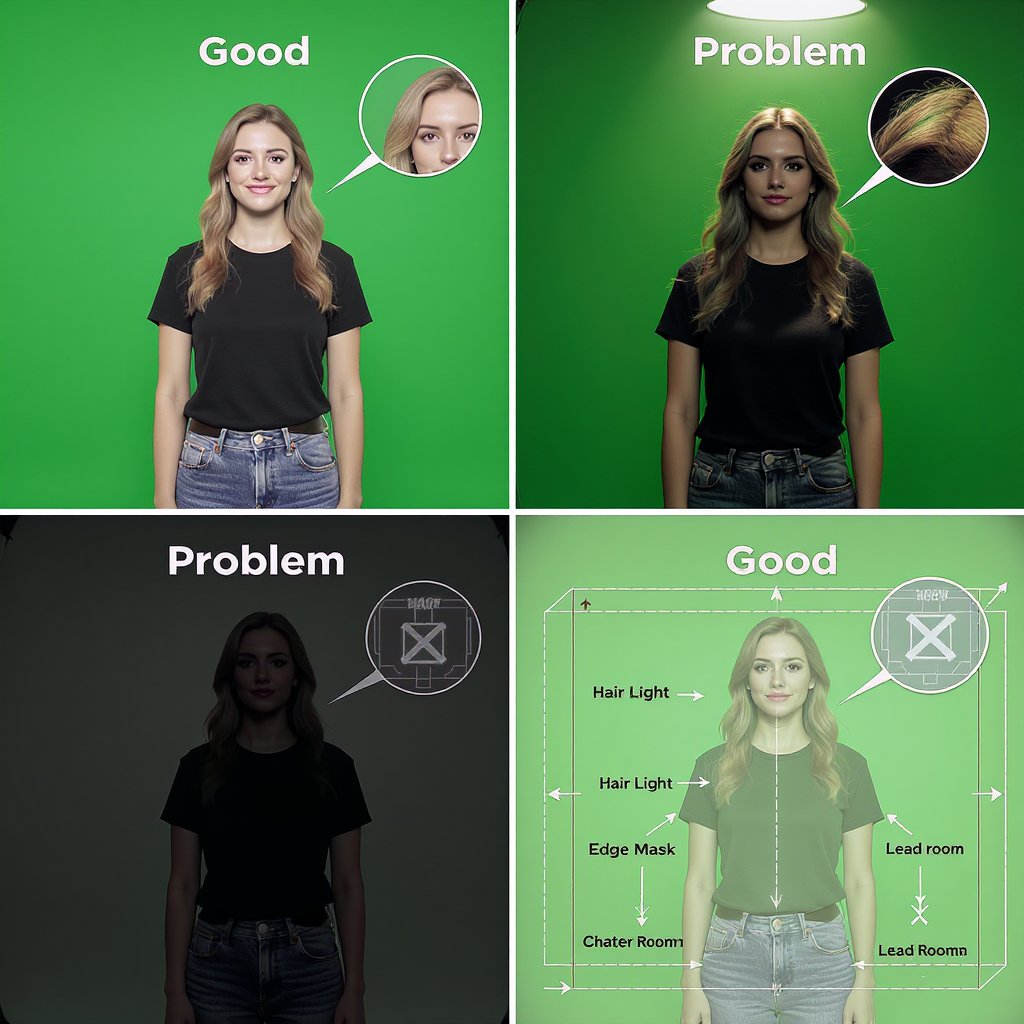
Lighting and Framing for Clean Cutouts
The green screen effect relies on AI segmentation, not a literal green backdrop, so lighting and contrast are everything.
- Even front lighting: A soft, diffuse light (window light or a softbox) gives the algorithm clean edges.
- Avoid backlight: Strong light behind you creates halos and noise around hair and shoulders.
- Distance from the wall: Step 3–5 feet away to reduce shadows that confuse edge detection.
- Camera height: Eye-level or slightly above is flattering and reduces chin and neck shadows.
- Clothing and background contrast:
- Wear colors that contrast with your background media.
- Avoid busy patterns that blend with the background.
Creative Formats That Win
- Reactions to news or memes: Offer commentary while the clip or screenshot plays behind you.
- Travel recap narrations: Stand “in” your photos and guide viewers through highlights.
- Before/after reveals: Use the first clip to set context, then swap to the “after” background.
- Mini tutorials: Diagram or screen-grab steps and point at them on-screen.
- Product explainers: Slot in feature slides or demo footage while you speak.
- Collage-style storytelling: Cycle backgrounds quickly to build momentum and show variety.
Tip: Keep each clip focused on a single point; use multiple short clips rather than one long monologue.
Design and On-Screen Text That Works
- Safe zones: Keep text away from UI overlays (profile bar, reply box, and stickers).
- Captions for accessibility: Always include on-screen captions for sound-off viewers.
- Brand fonts/colors: Use consistent colors and a readable font weight for small screens.
- Subtle motion graphics: Minimal animated arrows, highlights, or underlines help focus attention.
- Calls-to-action: Use the Link sticker with short, action-first copy: “Get the guide,” “Book a demo.”
Recommended working safe zones for 1080x1920 canvases (approximate):
| Area | Pixels (1080x1920) | Percent of Frame | Use |
|---|---|---|---|
| Top margin | ~180 px | ~9% | Keep titles below this line to avoid profile/UI overlap. |
| Bottom margin | ~280 px | ~15% | Avoid placing CTAs here; reply bar may cover them. |
| Side margins | ~90 px each | ~8% total | Prevents edge cropping on various displays. |
| Safe title area | ~900x1460 | Center ~70–75% height | Place key text and stickers here. |
Audio That Elevates
- Use IG’s music library: Choose licensed tracks inside the app for hassle-free rights.
- Voiceover clarity: Record in a quiet room; face a soft surface (curtains/clothes) to reduce echo.
- Duck background music: Lower music under speech so your voice sits clearly on top.
- Beat-matched cuts: Switch backgrounds on beats for energy.
- Mic tips:
- Wired earbuds often beat built-in mics.
- If using a lavalier, hide the cable and avoid clothing rustle.
Troubleshooting Common Issues
Fuzzy edges around hair
- Increase front light and reduce backlight.
- Avoid similar color/clutter directly behind you in the real environment.
- Slightly enlarge your subject so the algorithm prioritizes your face.
Frame drops or stutter
- Close background apps; keep 1–3 Story clips per segment.
- Reduce motion in the background video or trim to shorter loops.
Low-light noise
- Raise ambient light; set your phone brightness up to help the camera preview.
- Prefer static photo backgrounds when lighting is limited.
App glitches (crashes, missing stickers)
- Update Instagram to the latest version.
- Clear app cache or reinstall if persistent.
- Ensure 2–5 GB free storage; low storage causes export hiccups.
Shaky footage
- Lean your phone against a stable surface or use a small tripod.
- Use hands-free recording.
Mismatched backgrounds (looks “fake”)
- Match angle and height: Frame yourself to align with horizon lines in the background.
- Add a slight blur to the background (pre-edit) to mimic phone depth-of-field.
- Adjust color temperature: Warm up/cool down your foreground to match the background tone.
Quality Upgrades and Efficient Workflows
- Color matching:
- If the background is warm, warm your face by 200–400K using a ring light or in pre-edit.
- Add a subtle vignette or shadow on the “ground” area to anchor you in the scene.
- Resolution and format:
- Export at 1080x1920, 30 fps for Stories; keep bitrates moderate to avoid compression artifacts.
- Third-party apps:
- CapCut or VN for pre-editing backgrounds (blur, text, cut to beat).
- Export the prebuilt background reel, then use IG Story Green Screen to present.
- Batch your backgrounds:
- Prepare a folder of 10–20 background slides or loops per series.
- Create templated intros/outros for consistent branding.
Reusable Story shot list (template):
## IG Story Green Screen Shot Plan

- Clip 1 (2–4s): Hook + headline over branded background
- Clip 2 (4–6s): Context screen (screenshot/video) + you pointing
- Clip 3 (4–6s): Key tip/demo step + minimal annotation
- Clip 4 (3–5s): Proof/after example
- Clip 5 (2–3s): CTA + Link sticker placement
Metrics and Strategy: Iterate to Win
Track what actually moves the needle:
- Watch-through rate (WTR): Percent of viewers who view every frame in your Story sequence.
- Taps forward/back: Forward taps can signal boredom; back taps indicate rewatching interest.
- Replies and link clicks: Strong signals of intent—optimize for at least one clear CTA.
- Completion funnel: If you stack multiple segments, monitor drop-off per card.
A/B testing ideas
- First-frame cover: Test bold headline vs. emotive selfie with background blurred.
- Clip pacing: 3 short clips vs. 1 long clip.
- CTA style: Text-only vs. Link sticker plus arrow.
Timing and distribution
- Post when your audience is most active (check Insights).
- Use Story Highlights to extend lifespan; group by topic (“Tips,” “Reactions,” “Case Studies”).
Encourage UGC remixes
- Prompt viewers to green-screen your asset with “Use Yours” or explicit instructions.
- Feature the best remixes to build community.
Quick Checklist Before You Post
- Lighting: Even on your face, no strong backlight.
- Framing: Eye-level, subject sized to avoid covering key background details.
- Text: Inside safe zones, high contrast, readable in 1 glance.
- Audio: Voice clear, music ducked, no clipping.
- CTA: One clear action with Link sticker.
- Save: Download a copy for repurposing.
Summary
Mastering the IG Story Green Screen effect is mostly about preparation and small, consistent tweaks. With clean light, simple framing, and a focused message, you’ll publish Stories that look edited, sound professional, and keep people watching to the very last frame. Iterate on pacing and design, track key metrics, and your Stories will steadily improve.