Instagram Reels Size Guide for 2025: Dimensions, Safe Zones, and Pro Export Settings
Master Instagram Reels in 2025 with the right size: 9:16 at 1080x1920. Learn safe zones, cover crops, bitrate/fps targets, codecs, and pro export settings.
Instagram Reels Size Guide for 2025: Dimensions, Safe Zones, and Pro Export Settings

If you only remember one phrase this year, make it “instagram reels size = 9:16 at 1080×1920.” That single spec underpins how your video fills the screen, how it’s cropped in the feed, and how sharp it looks after Instagram recompresses it. This guide distills the practical specs, safe-zone rules, and export settings you can apply today—plus a few pro tips for cross‑posting and troubleshooting.
---
Quick specs at a glance
| Item | Recommended / Notes |
|---|---|
| Aspect ratio | 9:16 vertical (full-screen on phones) |
| Resolution | 1080×1920 px (standard); optional 2160×3840 px for 4K masters |
| Frame rate | 24–60 fps; stick to 30 or 60 for the cleanest platform handling |
| Codec / Container | H.264 video in MP4 (preferred) or MOV; AAC audio |
| Audio | AAC 128–320 kbps, 44.1 or 48 kHz |
| Length | Up to 90 seconds per Reel |
| Bitrate | VBR target 8–12 Mbps (30 fps); 15–20 Mbps (60 fps) |
| Color | sRGB/Rec.709 look, avoid letterbox/pillarbox bars |
| “Size” means | Dimensions (px), aspect ratio (shape), file weight (bitrate/MB), and duration |
What “size” covers:
- Dimensions and aspect ratio: the canvas your video occupies.
- File weight: bitrate and compression level that control visual clarity.
- Duration: how long before the platform truncates or rejects.
- Frame cadence: consistent fps to prevent stutter and re-encoding artifacts.
---
Why 9:16 matters—and when to use it
A true 9:16 frame fills the vertical screen without letterboxing in the Reels tab. It:
- Maximizes immersion: no black bars, no distractions.
- Prevents auto-crops: Instagram won’t need to guess your framing.
- Translates well across TikTok and YouTube Shorts.
How it differs from other ratios:
- 4:5 (1080×1350) is the “tall portrait” used in feed posts. If you upload 4:5 as a Reel, Instagram will pillarbox or crop unpredictably in Reels surfaces.
- 1:1 (1080×1080) center-crops heavily inside a 9:16 presentation; you’ll lose top/bottom content in the Reels tab.
Bottom line: shoot and export at 9:16 for Reels. Use 4:5 and 1:1 only for static feed posts or when you specifically design for those surfaces.
---
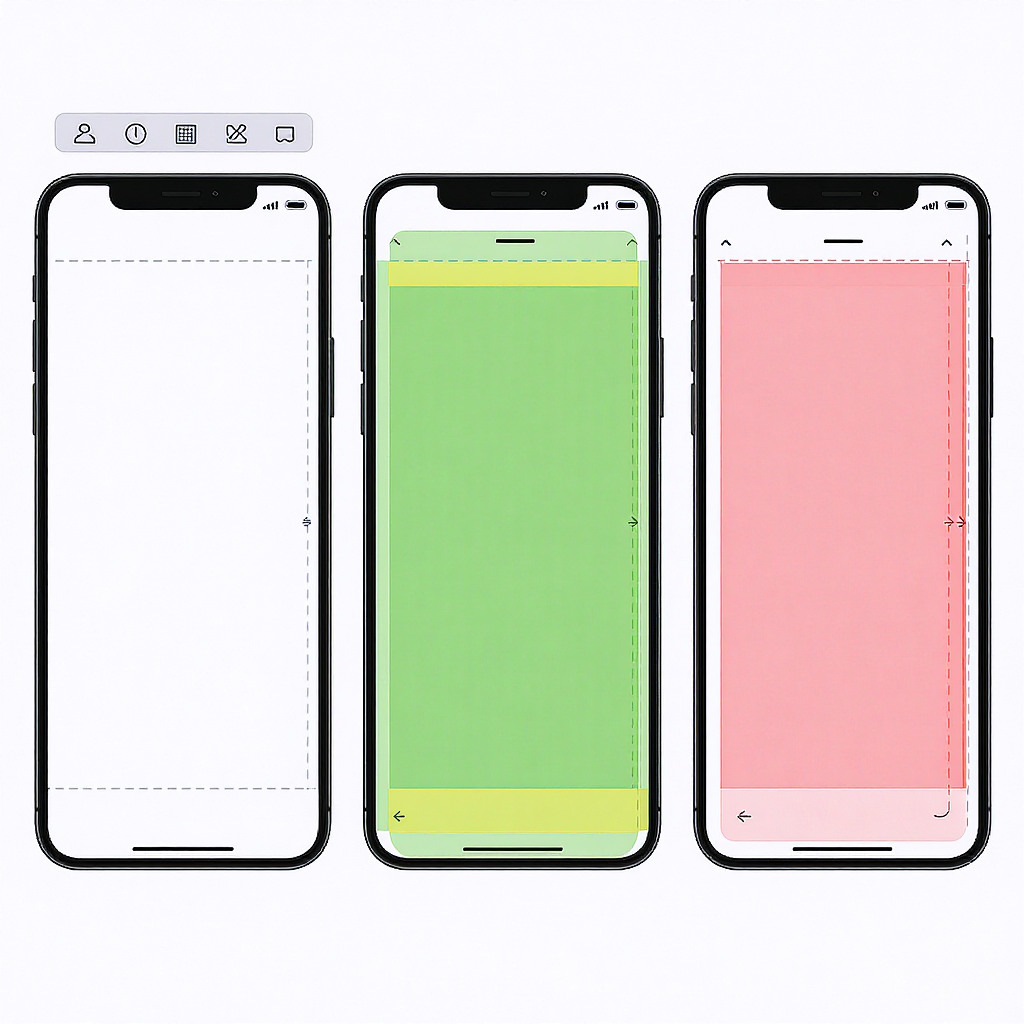
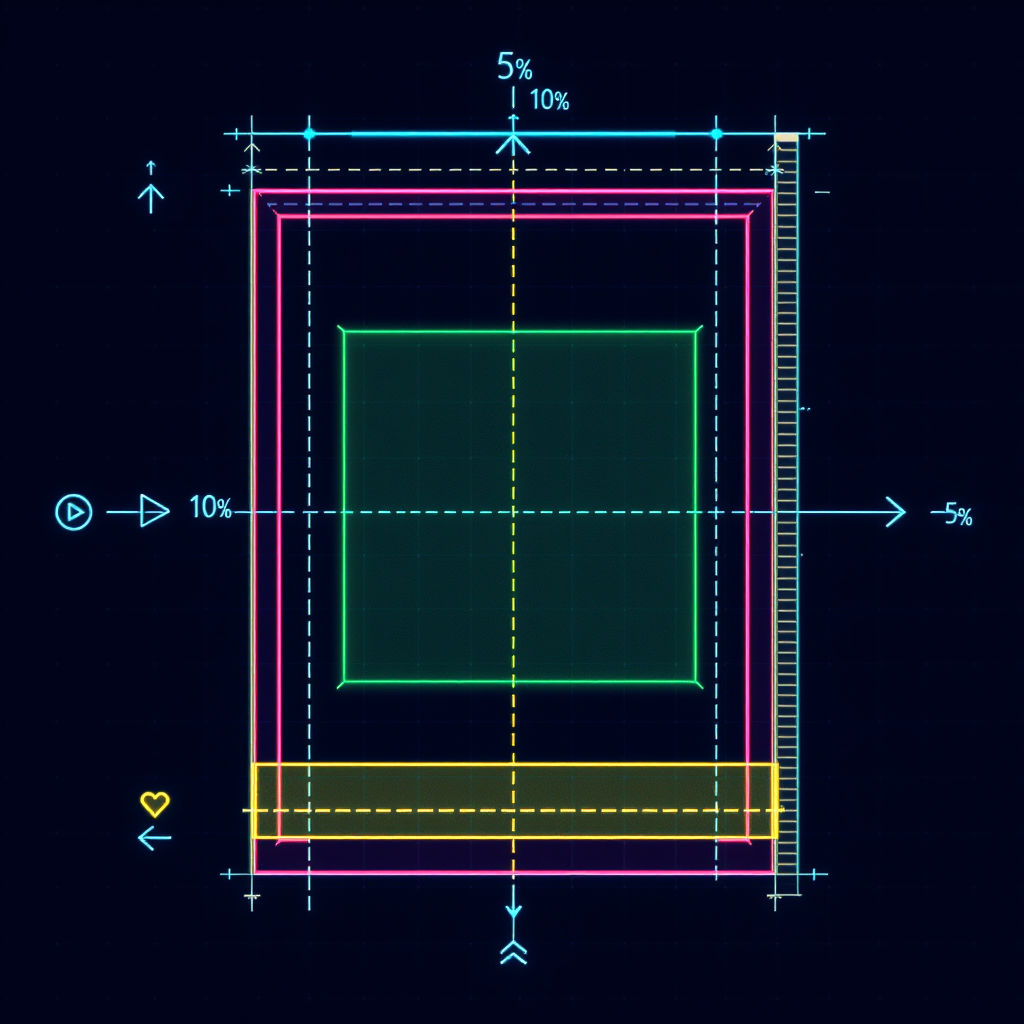
Safe zones and UI overlays
Where the UI sits
Instagram overlays UI elements over your video. Typical placements:
- Top: username and audio line.
- Bottom: caption, like/comment/share buttons, and seek bar.
Practical rule of thumb
- Compose for 9:16, but keep critical text and faces inside a centered 4:5 box (≈1080×1350 within the 1080×1920 frame).
- Leave roughly 15% headroom and footroom. At 1080×1920, that’s about 288 px clear at the top and bottom.
Why it matters
This ensures:
- Your titles survive the feed preview (which often behaves like a 4:5 crop of the 9:16).
- Faces and lower-thirds aren’t obscured by captions or buttons.
- Everything essential is readable on small screens.
Pro move
- Use guides. In your NLE, add safe-area overlays: one for the full 9:16 frame and one for the inner 4:5 box. Place subtitles above the bottom UI—more on that below.
---
Cover image (thumbnail) sizing and crops
Design your cover at 1080×1920 (9:16). Instagram shows it in multiple surfaces, each with different crops:
| Surface | Display ratio | Crop behavior | Design tip |
|---|---|---|---|
| Reels tab | 9:16 | Displays full 1080×1920 | Great for full artwork |
| Main feed preview | 4:5 | Center-crops your 9:16 to 1080×1350 | Keep titles within center 4:5 area |
| Profile grid | 1:1 | Center-crops to 1080×1080 square | Center your subject; avoid edge text |
Tips that survive all crops:
- Center the focal subject vertically and horizontally.
- Keep titles/logos inside the center square (1080×1080) with a bit of padding.
- Avoid thin borders; they’ll get chopped on at least one surface.
---
Pro export settings cheat sheet
Consistent frame cadence and sensible bitrate reduce platform recompression and preserve detail.
| Setting | 30 fps | 60 fps | Notes |
|---|---|---|---|
| Resolution | 1080×1920 (optional 2160×3840 for a 4K master) | 9:16 vertical | |
| Codec | H.264, High Profile, Level 4.2+ | MP4 container preferred | |
| Frame rate | Match source (29.97/30) | Match source (59.94/60) | Avoid converting 24 ↔ 30/60 unless necessary |
| Bitrate (VBR) | Target 8–12 Mbps | Target 15–20 Mbps | 2-pass if available for consistency |
| Audio | AAC, 128–320 kbps, 44.1 or 48 kHz, stereo | Keep peaks under -1 dBFS | |
| Color | sRGB/Rec.709 look; avoid LUTs that crush/clip | No letterbox bars | |
Example FFmpeg commands
For 30 fps:
ffmpeg -i input.mov -vf "scale=1080:1920:flags=lanczos,format=yuv420p" \
  -r 30 -c:v libx264 -profile:v high -pix_fmt yuv420p -preset slow \
  -b:v 10M -maxrate 12M -bufsize 20M -x264-params keyint=60:min-keyint=60:scenecut=0 \
  -colorspace bt709 -color_trc bt709 -color_primaries bt709 \
  -c:a aac -b:a 192k -ar 48000 -movflags +faststart reel_1080x1920_30.mp4
For 60 fps:
ffmpeg -i input.mov -vf "scale=1080:1920:flags=lanczos,format=yuv420p" \
  -r 60 -c:v libx264 -profile:v high -pix_fmt yuv420p -preset slow \
  -b:v 18M -maxrate 20M -bufsize 30M -x264-params keyint=120:min-keyint=120:scenecut=0 \
  -colorspace bt709 -color_trc bt709 -color_primaries bt709 \
  -c:a aac -b:a 192k -ar 48000 -movflags +faststart reel_1080x1920_60.mp4
Export notes
- Match your timeline fps. Don’t let the encoder auto-convert; it can induce judder.
- Maintain a steady GOP (keyint at 2× fps) to help IG transcode cleanly.
- If your camera is 24 fps, consider staying 24 fps end-to-end rather than converting to 30.
---
Resizing and reframing existing footage
Turning horizontal clips vertical without looking amateurish:
- Smart Reframe: Use AI reframing tools (Premiere Auto Reframe, Final Cut Smart Conform, DaVinci Smart Reframe) to track the subject inside 9:16.
- Punch-ins and crops: Cut to tighter crops on key beats to hide the conversion and add energy.
- Masks and splits: Use masked duplicates to keep a face large while preserving context in the background.
- Backgrounds sparingly: If you must fill space, blur or stylize a duplicate of the clip at low opacity; avoid bright or moving backgrounds that compete with the subject.
- Mix vertical b‑roll: Insert native 9:16 shots between reframed wides to maintain pacing and disguise transitions.
Workflow tip
Start a 9:16 sequence. Drop your 16:9 source in, scale to fit or fill, then keyframe position to keep the subject centered through cuts.
---
Designing on-screen text and captions
Mobile-first readability guidelines:
- Font size: Design at 1080×1920; main titles typically 72–120 px; subtitles 42–60 px depending on weight.
- Contrast: White or bright text over a semi-opaque dark backplate (60–80% opacity) or use a 2–3 px stroke.
- Avoid edge-hugging: Keep lower-thirds a good 120–160 px above the bottom to clear UI and thumbs.
- Subtitle placement: Put captions inside the centered 4:5 box and above the bottom UI. Two lines max when possible.
- Safe padding: Maintain ~48 px inset from left/right edges to avoid touch targets and cropping variances.
Accessibility
- Use sentence case and clear fonts.
- Ensure minimum 4.5:1 contrast ratio when possible.
- Don’t bake subtitles if you might localize later; consider captions added in-app for discoverability.
---
Cross-posting to TikTok and YouTube Shorts
One 9:16 master can serve all three platforms if you design conservatively:
- Neutral safe-zone placement: Keep titles and captions inside the centered 4:5 area; this clears most platform UI overlays.
- Avoid watermarks: Export a clean master and upload natively to each platform. If you edit in-app, download a clean copy before adding platform effects.
- Frame rates: 30 or 60 fps travel well. Shorts often looks best at 60; TikTok and Reels handle both.
- When to export a 4K master: If you shoot high-res or plan repurposing later, keep a 2160×3840 ProRes or high-bitrate H.264/HEVC archive. For uploads, still deliver 1080×1920 H.264 unless you know the platform is honoring 4K that week.
---
Quality troubleshooting
Why uploads can look soft or stuttery—and how to avoid it:
- Over-compression: If your master bitrate is too low, IG’s transcode has less to work with. Stay in the 8–12 Mbps (30 fps) or 15–20 Mbps (60 fps) range.
- Mismatched fps: Uploading 24 fps into a 30 fps transcode path can cause cadence issues. Match fps from camera to timeline to export.
- Multiple re-encodes: Export once from your NLE. Avoid exporting, re-importing, and exporting again. Each pass compounds artifacts.
- Crushed or clipped tones: Heavy LUTs and excessive sharpening exaggerate compression. Keep contrast manageable; add subtle sharpening pre-export if needed.
- Audio issues: Very low bitrates or loudness clipping can trigger reprocessing. Use AAC 128–320 kbps and keep integrated loudness around −14 to −16 LUFS with peaks under −1 dBFS.
Upload best practices
- Enable “High-quality uploads” in the Instagram app settings.
- Use stable Wi‑Fi. Cellular uploads sometimes downscale or stall; poor connections can cause the app to retry with heavier compression.
- Test a 5–10 second sample first to validate look/motion before batch publishing.
- Leave headroom: Avoid hard letterboxes or pillarboxes; they waste bitrate on black areas and can trigger unnecessary scaling.
---
TL;DR: The dependable setup
- Edit and export at 9:16, 1080×1920.
- 30 or 60 fps; match camera and timeline.
- H.264 High Profile MP4, VBR 8–12 Mbps (30) or 15–20 Mbps (60); AAC 192 kbps stereo.
- Keep text/faces inside the 4:5 center box; add ~15% top/bottom padding.
- Design covers at 1080×1920 but center titles to survive 4:5 and 1:1 crops.
- Upload over solid Wi‑Fi with high-quality uploads enabled.
Stick to these and your Reels will look clean, legible, and platform-friendly—today and throughout 2025.
---
Summary
This guide organizes the essential Instagram Reels specs into clear sections with safe-zone guidance, practical export presets, and platform-aware cover design tips. Follow the recommended 9:16, 1080×1920 workflow, keep text within the 4:5 center, and match frame rates end-to-end to minimize recompression. With consistent settings and mindful uploads, your videos will render crisply across Reels, TikTok, and Shorts.