Instagram Reels Size Guide: Dimensions, Safe Zones, Thumbnails, and Best Export Settings
Clear Instagram Reels size guide: dimensions, 9:16 safe zones, thumbnail tips, and best export settings to keep uploads sharp, readable, and free of crops.

Use this guide to format, export, and present Instagram Reels so they look sharp, readable, and clickable across every placement. You’ll find clear specifications, practical safe-zone measurements, and export presets that minimize compression artifacts. Follow the structure below to reduce crop mishaps, speed up processing, and keep your visuals and text crisp on Instagram, TikTok, and YouTube Shorts.
Instagram Reels Size Guide: Dimensions, Safe Zones, Thumbnails, and Best Export Settings
Want your Reels to look clean, sharp, and clickable everywhere they appear? This guide breaks down the reels size spec in plain English—what the numbers mean, how to lay out text and covers that won’t get cropped, and the export settings that keep uploads crisp without getting crushed by compression.
What “Reels size” actually means
When creators talk about reels size, they often mean more than one thing. Each parameter influences how your video looks, how Instagram processes it, and even how viewers react.
- Aspect ratio: The shape of the frame. Instagram Reels is a vertical 9:16 canvas (e.g., 1080×1920 pixels).
- Pixel dimensions (resolution): The actual width and height in pixels, commonly 1080×1920 for Reels. Higher resolution gives more detail—but only if Instagram can preserve it.
- File size (weight): The megabytes you upload. Larger files can trigger heavier recompression server-side; excessively small files look blocky.
- Frame rate: Frames per second (fps). Reels supports common rates like 24, 25, 30, and 60 fps. Smoother motion needs more bitrate to look clean.
- Codec and container: How your video is encoded. H.264 in an MP4 container is the safest bet; HEVC/H.265 can work but is less predictable across devices.
- Duration: Up to 90 seconds for Reels. Longer videos may process more slowly and are not eligible as “Reels” if they exceed limits.
- Color space and range: Use Rec.709/sRGB color and full-range 0–255 video levels for predictable results. HDR uploads often look washed out after conversion.
How this affects quality and reach
- Clean, correctly sized files upload faster, process more consistently, and avoid aggressive recompression that causes blur and banding.
- Proper aspect and safe zones improve watch-through (no text hidden behind UI) and tap-through (clean covers in feed and grid).
Core specs to use every time
Below are baseline settings that are consistently safe and good-looking.
| Parameter | Recommendation | Notes |
|---|---|---|
| Aspect Ratio | 9:16 (vertical) | Designed for full-screen mobile viewing |
| Resolution | 1080×1920 | 1080p offers more clarity than 720p; IG commonly displays at this scale |
| Frame Rate | 24–60 fps | 30 fps is a safe default; 60 fps for sports/gaming; keep consistent |
| Codec / Container | H.264 (High Profile) in MP4 | Most reliable across devices and editors |
| Audio | AAC, 44.1 or 48 kHz, 256–320 kbps | Clear voice/music without bloating file size |
| Color Space | Rec.709 / sRGB | Avoid HDR; upload standard dynamic range for consistency |
Why 1080p beats 720p
- Text and UI overlays look sharper.
- Fine textures (hair, fabric, gradients) hold up better after IG compression.
- Gives you headroom to stabilize, crop, and reframe without immediate pixelation.
Pro tip
You can export 1440×2560 or 4K 9:16 masters, but Instagram will downscale. If your upload workflow or device struggles, 1080×1920 at strong bitrate is the most predictable sweet spot.
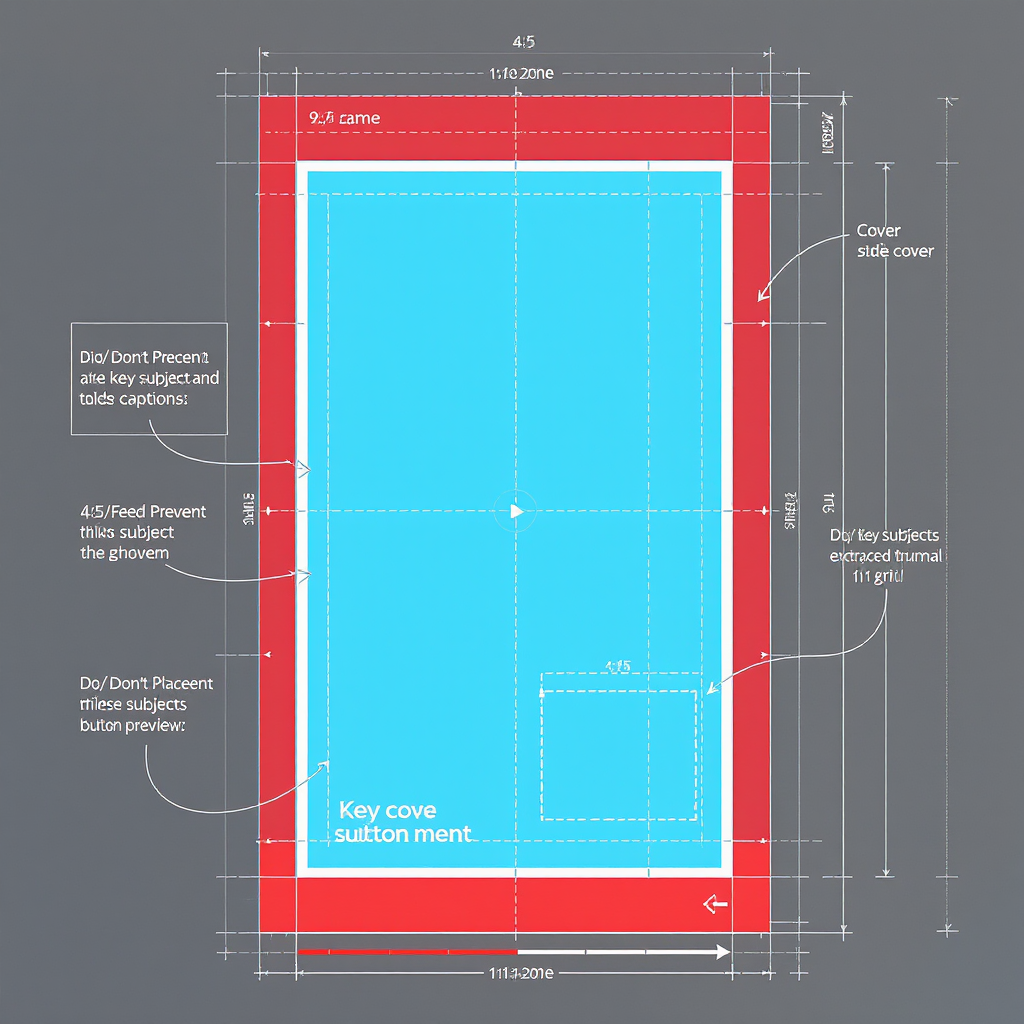
Safe zones and overlays
Instagram places usernames, captions, and buttons at the edges of the screen. Keep essential text and logos inside a central zone to avoid collisions.
- Core safe zone for text/logos: 1080×1420 centered area
- That’s roughly 250 px margin at the top and bottom.
- Side safety: Keep at least 5% margins on left/right
- About 54 px on each side at 1080 width.
What can overlap the edges
- Bottom: caption, audio info, and action buttons
- Right side: like/comment/share buttons
- Top: username/status and sometimes indicators
Practical layout rules
- Place titles and subtitles no lower than y=250 and no higher than y=1670 (on a 1080×1920 canvas).
- Keep brand bugs/watermarks in the upper-left within the safe zone.
- Center align subtitles and keep them above bottom overlays.
![diagram]()
Covers and crops explained
You design one vertical cover, but it shows up in different crops:
- Story/Explore/Reels view: 9:16 (1080×1920)
- Feed preview: 4:5 (1080×1350)
- Profile grid: 1:1 (1080×1080)
Use this cheat sheet to keep titles dead center across placements.
| Placement | Crop | Pixels at 1080 width | What to avoid |
|---|---|---|---|
| Reels cover (full) | 9:16 | 1080×1920 | Top/bottom 250 px areas for UI; don’t put critical text there |
| Feed preview | 4:5 | 1080×1350 | Edges; keep title centered vertically to survive 4:5 cut |
| Profile grid | 1:1 | 1080×1080 | Anything outside the middle square—center your title/logo |
Layout tip
Design your cover at 1080×1920, draw guides for a centered 1080×1350 rectangle and a centered 1080×1080 square. Keep the main title fully inside the 1080×1080 square and secondary info inside the 4:5 area. This guarantees legibility in grid and feed.
Best export settings for crisp uploads (Premiere, Final Cut, CapCut)
Overall targets
- Codec: H.264, High Profile, Level 4.1
- Bitrate: VBR 2-pass, 8–16 Mbps for 1080p (10–12 Mbps is a strong default)
- Keyframe interval: every 2 seconds (e.g., 60 at 30 fps)
- Audio: AAC 256–320 kbps, 44.1/48 kHz
- Color: Rec.709, full range, yuv420p
- Metadata: faststart (moov atom at front) for quicker start on mobile
Premiere Pro
- Sequence: 1080×1920, 9:16, 30 or 60 fps, Rec.709
- Export: H.264, Match Source, Profile High, Level 4.1, VBR 2-pass
- Target bitrate: 10 Mbps (raise to 12–16 for complex motion)
- Max bitrate: 16–24 Mbps
- Key frames: 60 for 30 fps (2 s)
- Color: Render at Maximum Depth; Use Maximum Render Quality (if scaling)
Final Cut Pro
- Project: Vertical (1080×1920), 30 or 60 fps, Standard (Rec.709)
- Export via Compressor or built-in H.264:
- Profile: High, Key frame distance: 2 s
- Data rate: 10–14 Mbps for 1080p
- Audio: AAC 256–320 kbps
CapCut (desktop or mobile)
- Resolution: 1080p
- FPS: 30 or 60
- Codec: H.264
- Bitrate: Set to high quality or manual 10–12 Mbps
- Audio: 256–320 kbps AAC
FFmpeg example (advanced)
ffmpeg -i input.mov -vf "scale=1080:1920:flags=lanczos,format=yuv420p" \
-c:v libx264 -profile:v high -level 4.1 -preset slow \
-b:v 10M -maxrate 16M -bufsize 16M -r 30 -g 60 -keyint_min 60 -bf 2 \
-c:a aac -b:a 256k -ar 48000 -ac 2 \
-color_primaries bt709 -color_trc bt709 -colorspace bt709 \
-movflags +faststart output_reel_1080x1920.mp4
Avoid common pitfalls
- Heavy denoise or stylized filters that flatten detail—Instagram’s encoder can over-sharpen/quantize these and create banding.
- Uploading in HDR (HLG/PQ) without converting to Rec.709; IG will tone-map unpredictably.
Length and file weight
- Duration: Aim under 90 seconds for broad Reels compatibility.
- File size: Keep exports under 100–150 MB when possible.
- At 10 Mbps, a 60 s clip is ~75 MB; 90 s is ~112 MB.
- Very large files invite stronger server-side compression and longer processing times.
Tips to stay lean without losing quality
- Use VBR 2-pass so simple scenes get fewer bits and action gets more.
- Trim dead space and silence.
- Avoid stacked effects that force higher bitrates to look clean.
Cross-posting to TikTok and YouTube Shorts
Create one 9:16 master that respects universal safe zones:
- Bottom 250 px: avoid critical text (Reels and Shorts overlay controls).
- Right edge: avoid critical text (TikTok’s vertical tool stack).
- Sides: keep 5% padding.
Positioning that works everywhere
- Title: centered within the 1080×1080 square.
- Subtitles: 1080×1420 central safe area, typically 300–400 px above bottom edge.
- CTA: place near middle-bottom of safe zone, not at the absolute bottom.
Export once, post everywhere
- The same 1080×1920 H.264 master at 10–12 Mbps plays well on IG, TikTok, and Shorts.
- For Shorts, 60 seconds is the hard limit for eligibility; consider a 59.5 s cut when targeting Shorts specifically.
Design workflow and templates
Figma or Canva template setup:
- Base frame: 1080×1920, 9:16
- Safe-zone rulers:
- Top and bottom guides at 250 px
- Left/right guides at 54 px (5% of 1080)
- Cover overlays:
- 4:5 rectangle centered: 1080×1350
- 1:1 square centered: 1080×1080
- Text styles:
- Titles: high-contrast, 60–96 px, semi-bold/bold
- Subtitles: 42–56 px with drop shadow or solid background strip for legibility
- Minimum body text: ~34–38 px at 1080 width
- Color choices:
- Stick to sRGB/Rec.709 palette; test for sufficient contrast (WCAG AA if possible)
- Avoid neon gradients with tight banding; add subtle noise (1–2%) to smooth
Reusable layers
- Subtitle bar in the central safe zone
- Logo bug placed within upper-left safe boundary
- CTA sticker area pre-defined above bottom overlays
Troubleshooting quality loss
If your Reel looks blurry, blocky, or washed out after upload, try this checklist:
- Enable “Upload at highest quality” in Instagram
- Instagram app > Settings > Data usage > toggle “Upload at highest quality”
- Stabilize shaky footage
- Even slight shake increases compression artifacts; use in-app stabilize or NLE stabilization.
- Avoid double-compression
- Don’t export at 720p or low bitrate and then re-export again. Keep an original timeline and export once at final settings.
- Match frame rates
- If you shot 60 fps, export 60 or cleanly convert to 30 using frame blending or motion estimation. Don’t mix variable fps sources without conforming.
- Fix blurry captions
- Render subtitles in-editor as vector/text with high contrast and a background box; avoid thin, low-contrast fonts.
- Tame banding in gradients
- Use slightly higher bitrate (12–16 Mbps) and add 1–2% dither/noise to gradient backgrounds. Avoid crushing shadows.
- Color looks washed out
- Convert HDR/Log to Rec.709 before export; ensure yuv420p and correct tag metadata (bt709 primaries/transfer).
- Audio is thin or distorted
- Export AAC 256–320 kbps at 44.1/48 kHz; avoid clipping; leave ~-1 dB ceiling.
- Check device and network
- Preview on multiple phones; IG sometimes shows a lower preview while processing—give it a few minutes and recheck on Wi‑Fi.
Quick creator checklist
- Aspect/resolution: 9:16 at 1080×1920
- Frame rate: 24–60 fps (30 fps default), consistent throughout
- Safe zones respected: 250 px top/bottom; 5% sides; central 1080×1420 for text
- Cover tested: legible in 9:16, 4:5 (feed), and 1:1 (grid)
- Subtitles: inside safe zone, high contrast, readable size
- Export preset: H.264 High, VBR 2-pass, 10–12 Mbps, keyframe every 2 s, AAC 256–320 kbps, Rec.709
- File size: under 100–150 MB; duration under 90 s
- Cross-post ready: no critical elements on right edge or bottom overlays
- App settings: “Upload at highest quality” enabled
- Final test: upload on strong Wi‑Fi; watch full playback on-device and in-feed
With the right reels size, safe zones, and export settings, your Reels will look pro-grade across Instagram, TikTok, and YouTube Shorts—no mystery artifacts, no cropped titles, and no muddy text. Save a master template, stick to the presets above, and you’ll ship consistently crisp vertical videos every time.
Summary
- Design for 9:16 at 1080×1920, keep text inside a 1080×1420 central safe zone, and align covers to survive 9:16, 4:5, and 1:1 crops.
- Export H.264 High, VBR 2-pass at 10–12 Mbps with AAC audio and Rec.709 color; avoid HDR unless properly converted.
- Maintain clean layout, consistent frame rate, and reasonable file sizes to reduce recompression and preserve sharpness across platforms.