Post a Landscape Photo on Instagram Story Without Cropping
Learn how to post full landscape photos on Instagram Stories without cropping, using built-in tools, apps, and design tips to preserve quality.
Post a Landscape Photo on Instagram Story Without Cropping
Instagram’s Stories feature is built for vertical content — but that doesn’t mean your breathtaking panoramic view or cinematic wide shot has to be lost to awkward cropping. If you’ve captured a stunning landscape photo and want it to shine in Stories without compromising its composition, there are simple, effective techniques you can use.
In this guide, we’ll explain why Instagram crops landscape images by default, outline practical methods to post them in their entirety, and share creative ways to make your landscape photo Instagram Story visually striking and engaging while optimizing both quality and reach.

---
Understanding Instagram Story Dimensions
Instagram Stories display at 1080 x 1920 pixels with a 9:16 aspect ratio, filling the vertical space of most phone screens.
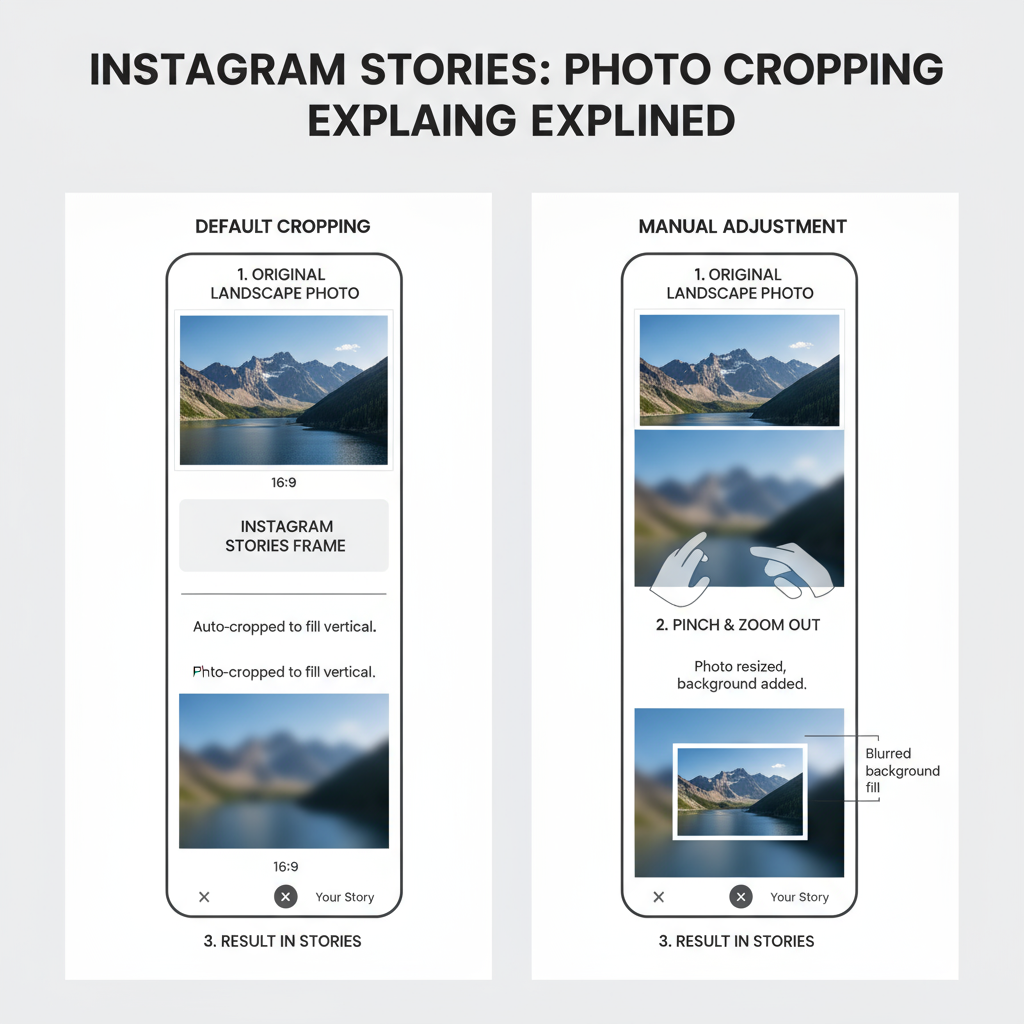
When you upload a landscape-oriented image, typically at 16:9 or 3:2, Instagram automatically scales and crops it to fit, resulting in lost edges.
Quick facts:
| Story Spec | Value |
|---|---|
| Resolution | 1080 x 1920 pixels |
| Aspect Ratio | 9:16 |
| Supported Formats | JPEG, PNG, MP4, MOV |
| Max File Size | 30MB (images) |
---
Why Landscape Photos Get Cropped by Default
The vertical-first design of Stories means images are enlarged until their height matches the full screen. This forces:
- Cropping of the sides of wide shots
- Cropped-out details (like a complete horizon or architectural expanse)
- Loss of the original composition and storytelling impact
For anyone who cares about image framing — from professional photographers to casual travelers — this can be frustrating.
---
Method 1: Use Instagram’s Built-In Zoom-Out and Background Fill
The simplest solution is to pinch and zoom out during upload:
- Tap “+” → select “Story.”
- Choose your landscape photo.
- Pinch to zoom out until white or blurred border areas appear.
- Pick a background color manually or let Instagram auto-blur to match tones.
This ensures your full photo displays while still fitting into the Story frame.
---
Method 2: Edit with Third-Party Apps for Borders or Blurred Background
If you want greater creative control, prepare your image in an editing app before posting. Useful apps include:
- Canva
- PicsArt
- InShot
- Adobe Express
Example using InShot:
- Import your photo.
- Set canvas size to 1080x1920.
- Center the landscape within the frame.
- Add a blurred or plain color background matching your theme.
- Export in high quality, then upload to Stories.
---
Method 3: Build a Collage Layout
A collage lets you center your landscape photo, surround it with complementary visuals, and maintain the 9:16 format.
Possible additions:
- Smaller supporting images (e.g., detailed shots, portraits, or maps)
- Frames, icons, or patterns
- Brief captions and tags in unused zones
This method works especially well for travel content or thematic series.
---
Tips for Maintaining Image Quality
To prevent degradation:
- Start with the highest resolution available.
- Avoid multiple exports; edit and export once at 1080x1920.
- Save as high-quality JPEG (90%+) or PNG for minimal compression artifacts.
---
Adding Text and Stickers Smartly
Preserve your landscape’s impact by positioning elements thoughtfully:
- Stay clear of focal points and detailed areas
- Use contrasting colors for readability
- Lower opacity for stickers if you want a subtle overlay
---
Matching Background Colors to Landscape Tones
Coordinated backgrounds give a professional, cohesive look:
- Pair blue skies with pastel blues or light gradients
- Match sunsets with warm orange-pink gradients
Pro tip: Use the eyedropper color picker in Instagram for exact hue matching.

---
How to Customize Templates in Canva or Similar Tools
Canva and related platforms have pre-sized Story templates:
- Start a new design in “Instagram Story” format.
- Place your landscape photo where desired.
- Adjust the background and design elements.
- Export as PNG or JPEG before posting.
This lets you fine-tune proportions, colors, and positioning before sharing.
---
Optimizing Story Engagement
Great content deserves views. Boost engagement by:
- Posting at high-traffic times (7–9 am or 7–9 pm)
- Adding niche hashtags (#landscapephotography, #travelgram)
- Using location tags to attract local and interested audiences
---
Saving Landscape Stories in Highlights
Stories vanish after 24 hours, but Highlights keep them viewable:
- Create themed Highlights (“Landscapes,” “Travel”)
- Add your Stories to them
- Use consistent Highlight cover icons for a uniform profile aesthetic
---
Creative Examples from Influencers
Landscape-centric influencers often use:
- Clean borders that emphasize image width
- Subtle motion effects like slow zoom or panning
- Minimal, date-and-location text overlays for context
These approaches maintain focus on the scenery while enhancing storytelling.
---
Mistakes to Avoid
- Uploading low-resolution files that pixelate
- Poorly placed text/stickers over focal areas
- Overcrowding visuals so the landscape is lost in clutter
---
Recap and Best Practices
Key takeaways:
- Know the Story format (1080x1920, 9:16)
- Avoid cropping with zoom-out gestures or pre-editing
- Preserve quality with a single, high-res export
- Match backgrounds to photo tones for aesthetics
- Leverage hashtags, tags, and Highlights for discovery and longevity
By applying these methods, you can post any landscape photo Instagram Story in its full glory, keeping composition intact and visual impact high. Experiment with borders, collages, and creative backgrounds to make your wide shots fit seamlessly into Instagram’s vertical world — and stand out in your followers’ feeds.
Ready to share your landscapes without compromise? Try one of these methods on your next Story and watch your engagement climb.


