Maximum Image Quality Tips for Web and Print
Learn how to capture, edit, and export images with maximum quality for both web and print, covering resolution, formats, compression, and shooting tips.

Mastering Maximum Image Quality for Web and Print
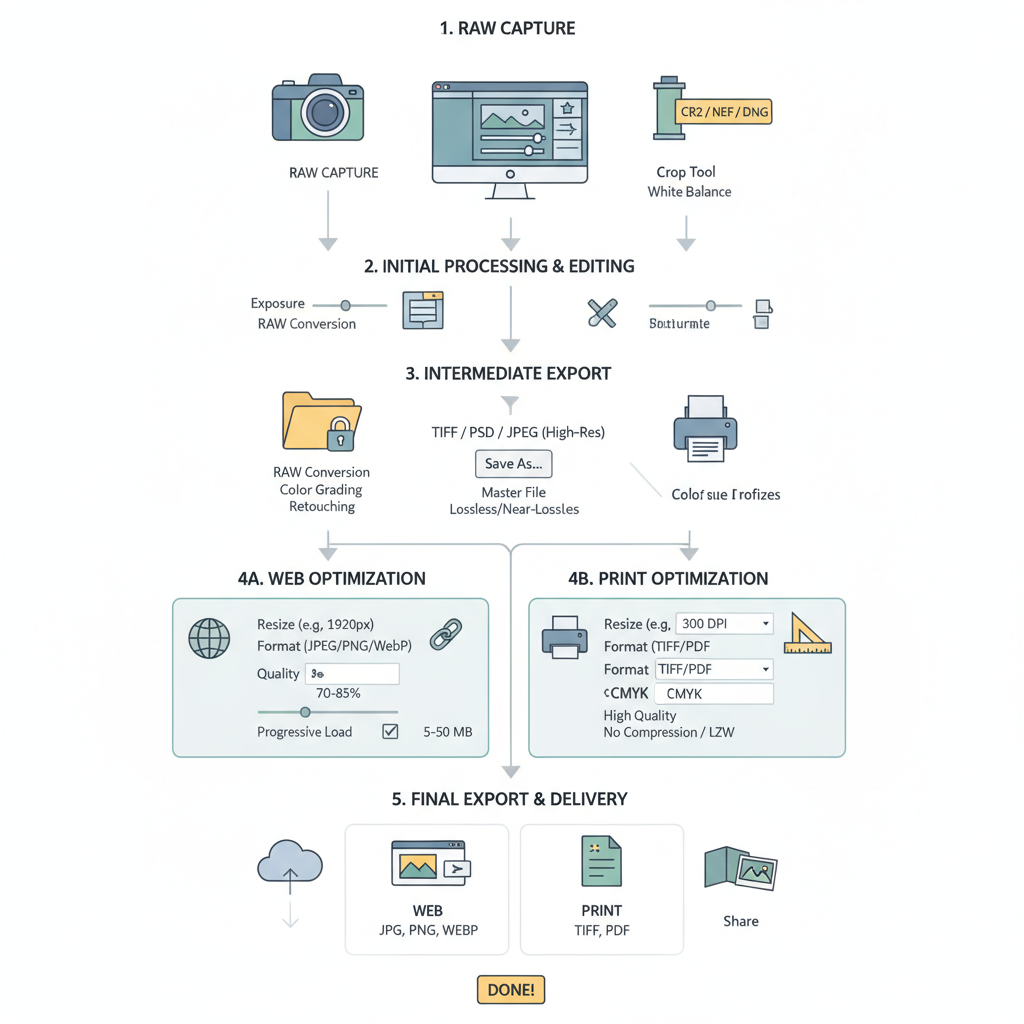
Achieving maximum image quality requires understanding key technical concepts and applying best practices from the moment you capture a photo to the final export. This guide covers resolution standards, optimal image formats, compression techniques, capture tips, editing methods, and preparation for both web and print, so your visuals remain crisp, vibrant, and professional.
---
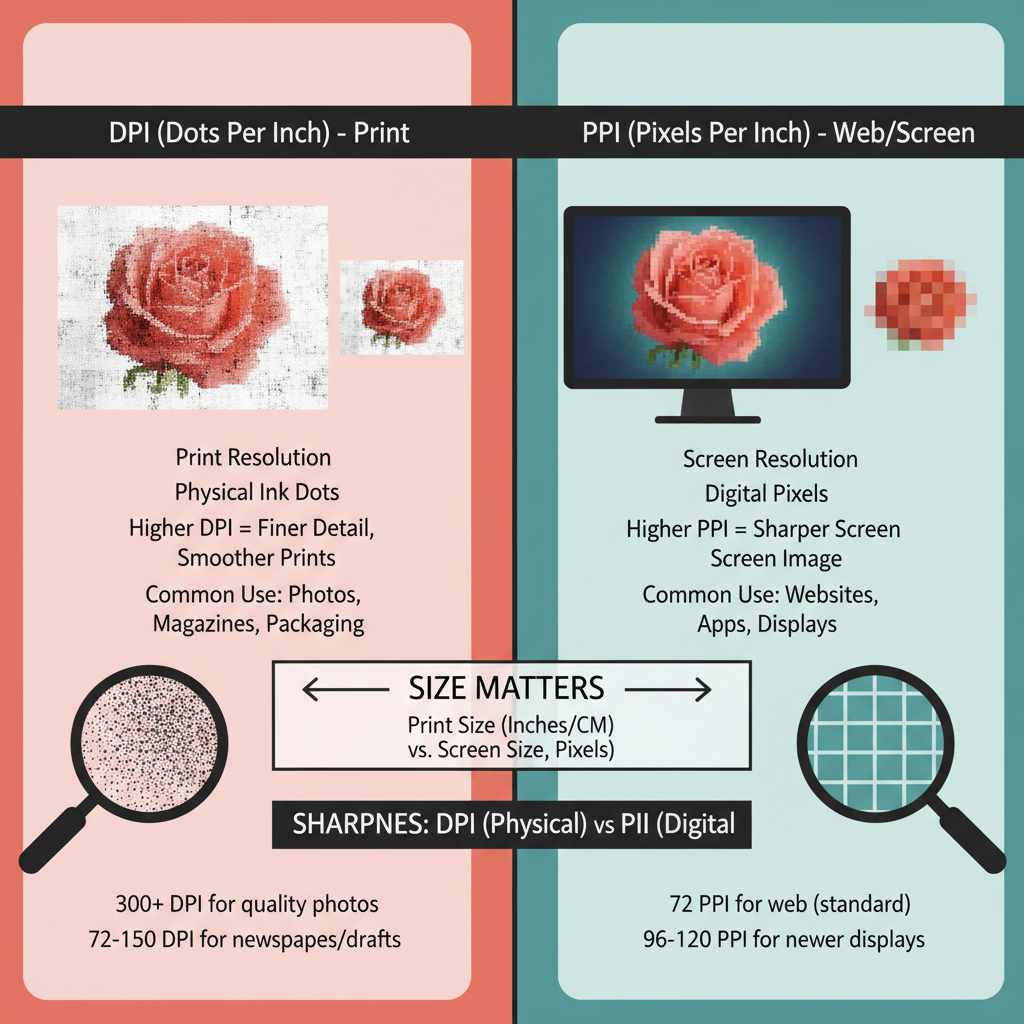
Understanding Resolution: DPI vs PPI Explained
When aiming for maximum image quality, one of the first concepts to master is resolution. Two common terms you'll encounter are DPI (dots per inch) and PPI (pixels per inch). Although often used interchangeably, they serve different purposes.
- PPI: Relates to the pixel density of digital images. It affects how images display on screens.
- DPI: Pertains to print quality. It determines how many ink dots a printer places per inch.
For web use, PPI is more relevant—most screens range from 72 to 300 PPI. For print, standard high-quality output is usually 300 DPI or higher.
Key takeaway: Use high PPI for detailed displays and high DPI for crisp prints. A mismatch can cause blurry, pixelated, or unnecessarily large files.
---
Choosing the Right Image Format
Selecting the correct file format plays a critical role in preserving maximum image quality while maintaining manageable file sizes.
Common Formats
| Format | Best For | Pros | Cons |
|---|---|---|---|
| JPEG | Photographs | Small file size, widely supported | Lossy compression, can cause artifacts |
| PNG | Graphics with transparency | Lossless compression, supports alpha channel | Larger files than JPEG |
| WEBP | Web images | High-quality with smaller size, supports transparency | Older browsers may lack support |
| TIFF | Print and archiving | Lossless, high detail retention | Very large files, limited web use |
---
How Compression Works and Balancing File Size with Quality
Image compression reduces file size by removing or simplifying data. There are two types:
- Lossless compression: Preserves all original data (PNG, TIFF). File sizes are larger.
- Lossy compression: Discards data deemed less important (JPEG, WEBP). Smaller files but potential quality degradation.
The goal is to adjust compression settings so the image remains visually acceptable while being efficiently sized. This is especially important for web performance and fast load times.
---
Camera Settings and Shooting Techniques for Maximum Clarity
Great results start at the source. Here are important factors when capturing images:
- Use the Lowest ISO Possible: Lower ISO reduces digital noise.
- Select a High-Quality Lens: Sharp optics matter more than megapixels.
- Shoot in RAW Format: Maximizes data available for post-processing.
- Use a Tripod: Eliminates camera shake in low light or long exposures.
- Focus Carefully: Use manual focus or focus peaking for precision.
Pro Tip: Overexposing slightly (without clipping highlights) can reduce visible noise in shadows after correction.
---
Editing Tips Without Losing Detail
Post-processing should enhance, not degrade, image quality.
- Sharpening: Apply subtle sharpening at the final output size to enhance edge clarity.
- Contrast Adjustment: Avoid extreme adjustments that cause clipping in highlights or shadows.
- Color Correction: Use non-destructive editing tools like adjustment layers in Photoshop.
- Noise Reduction: Apply selectively to preserve details.
Example (Adobe Photoshop Sharpening):
Filter -> Sharpen -> Unsharp Mask
Amount: 50% | Radius: 1.0px | Threshold: 3 levels
These values maintain detail without creating halos.
---
Preparing Images for Web
Web optimization involves balancing load speed with maximum image quality.
- Responsive Sizes: Use the `srcset` attribute to deliver appropriate sizes for different screens.
- Retina Displays: Provide high-resolution images (2x the CSS size) for sharper results.
- Lazy Loading: Delay loading images until they’re visible on screen to improve performance.
---
Preparing Images for Print
Printing demands settings that differ from web delivery.
- Bleed: Extend your artwork beyond the trim size (usually 0.125 inches) to prevent white edges.
- CMYK Conversion: Most printers use CMYK color mode; convert from RGB to CMYK for color fidelity.
- Resolution: Maintain at least 300 DPI at the final print dimensions for sharp results.
Tip: Always request a proof from the printer to catch potential issues before mass production.
---
Tools for Upscaling Images Without Artifacts
Sometimes you’ll need to enlarge images without losing quality. Modern AI-based tools can help.
- Adobe Photoshop Super Resolution: Doubles linear resolution using AI.
- Topaz Gigapixel AI: Uses machine learning for impressive, natural-looking upscales.
- Let's Enhance: Web-based tool for quick, accessible processing.
These tools analyze patterns and textures to create new pixels that blend seamlessly with the original image.
---
Common Mistakes That Reduce Image Quality
Avoid these frequent pitfalls:
- Over-compression: Sacrifices fine detail.
- Wrong Export Settings: Poor resizing can introduce jagged edges or artifacts.
- Repeated Saving in Lossy Formats: Each save degrades quality further.
- Ignoring Color Profiles: Leads to inconsistent color on different devices.
---
Checklist for Maximum Image Quality Export
Before finalizing images, review this quality control checklist:
- Use the correct resolution (PPI/DPI) for the target medium.
- Choose the right format (JPEG, PNG, WEBP, TIFF) for your use case.
- Apply minimal, targeted compression.
- Ensure accurate color settings (sRGB for web, CMYK for print).
- Sharpen at the final output size.
- Use responsive and retina strategies for web.
- Include bleed and correct color mode for print.
- Use AI upscaling if a larger size is required.
- Avoid saving repeatedly in lossy formats.
---
Summary and Next Steps
By understanding and controlling every step—from capture to export—you can consistently achieve maximum image quality for both web and print projects. The key is to match your resolution, format, compression, and editing workflow to the final medium, resulting in visuals that stand out for their clarity and vibrancy.
Ready to level up your visuals? Start applying these techniques today and watch your image quality improve across every platform.