Schedule 1 Best Grow Setup for Yield and Legal Compliance
Learn how to plan a discreet, high-yield indoor grow for Schedule 1 plants with tips on legal compliance, security, lighting, and odor control.

Introduction
Setting up the Schedule 1 best grow setup is not only about optimizing plant health and yield—it’s also about understanding and complying with stringent legal frameworks. Schedule 1 substances are heavily regulated due to their classification as having a high potential for abuse and no accepted medical use in certain jurisdictions. This guide will walk you through the most important aspects of planning, equipping, and running a compliant and discreet cultivation operation, so you can achieve professional-level results while remaining within authorized legal boundaries.
---
Understanding Schedule 1 Classification and Legal Implications
Before planning the Schedule 1 best grow setup, it’s essential to understand what Schedule 1 means under controlled substance laws.
Schedule 1 substances are considered to have high potential for abuse, no accepted medical use, and a lack of accepted safety under medical supervision in certain jurisdictions. Cultivation, possession, or distribution may carry severe legal penalties.
This means that:
- In many countries, growing Schedule 1 plants is illegal without explicit authorization.
- Even in places where cultivation is allowed under medical or research licenses, strict compliance with permissions, record-keeping, and security requirements is vital.
- Violations can lead to fines, imprisonment, and loss of licenses.
> Disclaimer: Always consult local laws, and operate only under authorized conditions.
---
Choosing a Discreet and Compliant Growing Location
Your location choice is critical both for yield optimization and legal compliance.
To reduce risk and maintain control over your environment:
- Indoor vs. Outdoor: Indoor locations provide greater discretion and environmental control.
- Security Measures: Use lockable rooms, restricted access, and surveillance if required by law.
- Zoning Compliance: Ensure premises comply with municipal zoning regulations.
- Noise & Odor Mitigation: Prevent disturbances to neighbors to avoid suspicion.
If licensed, your grow area should be documented in applications and follow all inspection requirements.
---
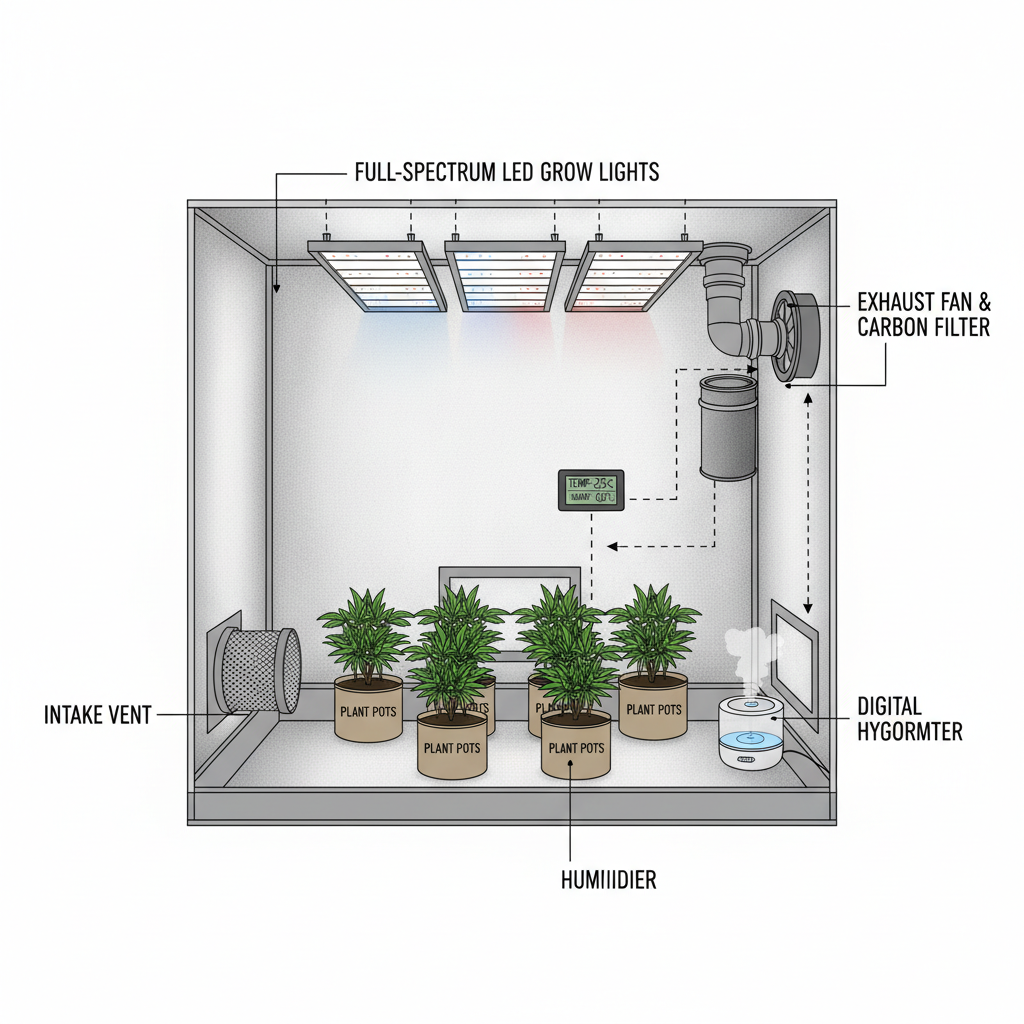
Selecting the Right Indoor Grow Tent Size and Light Spectrum
Grow tents help create a self-contained environment for Schedule 1 plants:
- Tent Size:
- Choose based on plant count and growth style—2x4, 4x4, or 5x5 ft are common in small to medium setups.
- Material: Mylar interior ensures high reflection; sturdy frame supports heavy lighting.
- Light Spectrum:
- Full-spectrum LED or MH/HPS lighting ensures plants receive optimal photons for both vegetative and flowering phases.
| Grow Tent Size | Recommended Plant Count | Suggested Lighting |
|---|---|---|
| 2x4 ft | 2-4 plants | 300-600W LED |
| 4x4 ft | 4-8 plants | 600-1000W LED / HPS |
| 5x5 ft | 8-12 plants | 1000W LED / HPS |
---
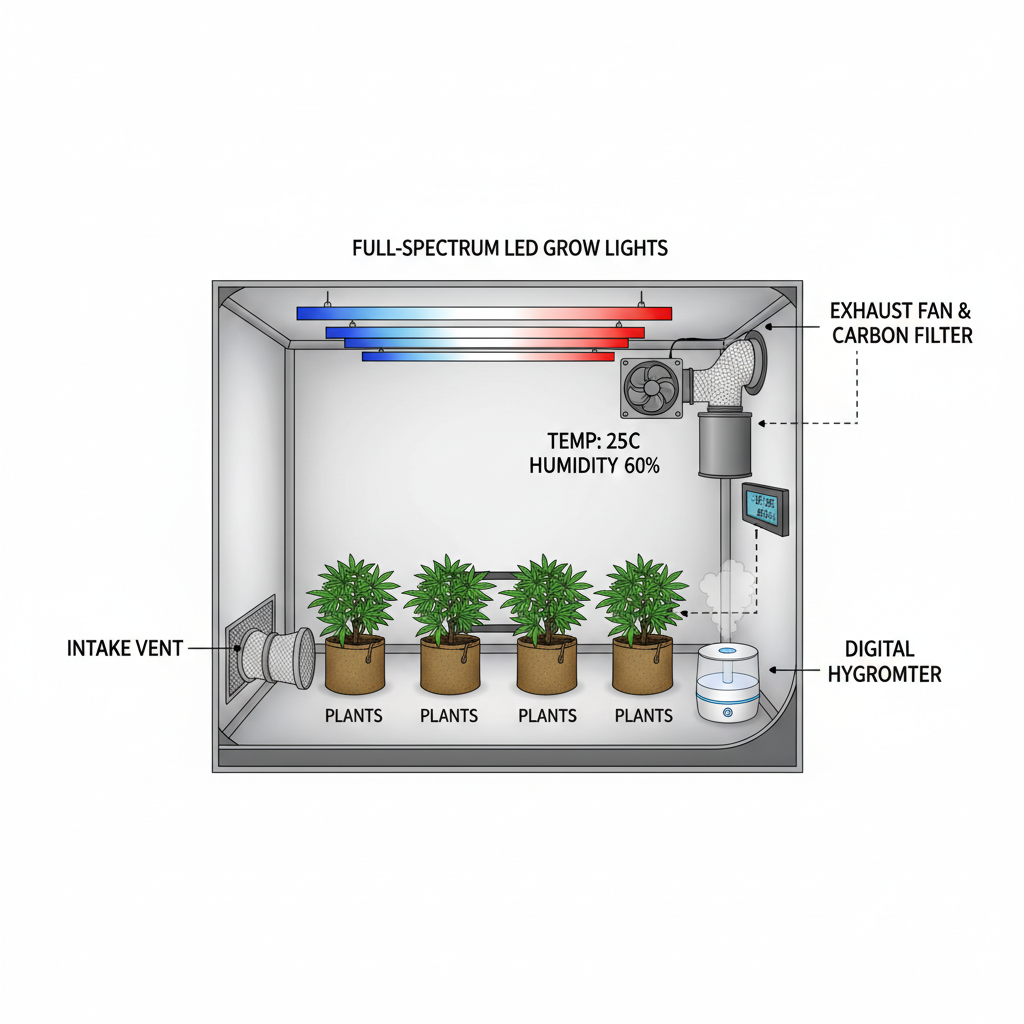
Implementing Optimal Ventilation and Odor Control Systems
Without proper ventilation, plants suffer, and odors can attract unwanted attention.
Key components:
- Exhaust Fan: Removes stale air and heat.
- Carbon Filter: Neutralizes strong plant odors inside the tent.
- Intake Fan: Draws in fresh, CO₂-rich air.
- Oscillating Fans: Improve airflow between plants to reduce mold risk.
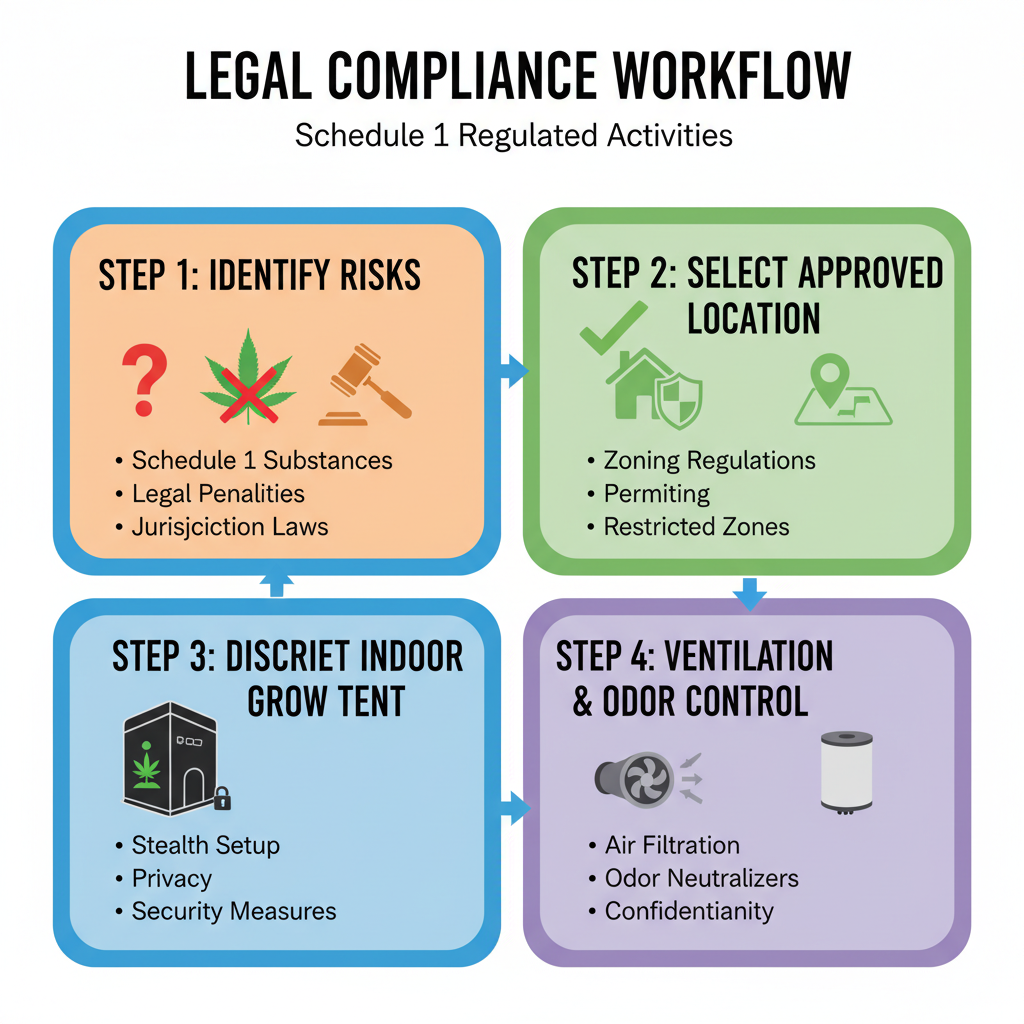
> For compliance, odor control is not just for discretion—it can be a legal requirement to prevent nuisance to surrounding areas.
---
Planning Nutrient Schedule Specific to Schedule 1 Plant Needs
Schedule 1 plants can have specialized nutrient requirements through different growth phases:
- Seedling: Mild nutrient levels, higher phosphorus for root development.
- Vegetative: Increased nitrogen for leafy growth.
- Flowering: Boost potassium and phosphorus for bud formation.
Using a nutrient chart designed for your strain will help avoid overfeeding and nutrient burn.
| Phase | Duration | Key Nutrients |
|---|---|---|
| Seedling | 2 weeks | High P, low N |
| Vegetative | 4-6 weeks | High N, moderate P/K |
| Flowering | 6-8 weeks | Low N, high P/K |
---
Managing Watering Cycles and Humidity for Growth Phases
Watering cycles depend on soil moisture, plant size, and growth phase:
- Seedlings: Light watering every 2-3 days.
- Vegetative: More frequent watering; avoid waterlogging.
- Flowering: Slightly reduce watering and humidity to prevent bud rot.
Humidity management:
- Seedling phase: 65-70% RH
- Vegetative phase: 50-60% RH
- Flowering phase: 40-50% RH
Using a humidifier/dehumidifier connected to a controller can keep conditions stable.
---
Using Training Techniques (LST, Topping) for Space Efficiency
Maximizing yield from a limited space requires plant training:
- Low Stress Training (LST): Gently bending stems outward to expose more bud sites to light.
- Topping: Removing the apex of the plant to encourage bushier growth.
- Screen of Green (ScrOG): Using a mesh screen to create an even canopy height.
These methods improve light penetration and airflow, leading to healthier plants and higher harvests.
---
Monitoring pH, EC, and Environmental Data Regularly
For precision growing:
- pH: Maintain 5.8-6.2 for hydroponics or 6.0-6.8 for soil to maximize nutrient uptake.
- Electrical Conductivity (EC): Tracks nutrient concentration; adjust feeding accordingly.
- Environmental Data: Record temperature, humidity, CO₂ levels to spot trends or issues.
Automation tools like smart sensors and data loggers provide alerts when conditions stray from set ranges.
---
Implementing Pest Prevention and Biological Controls
Prevent pests before they become infestations:
- Sanitation: Clean tools and hands before touching plants.
- Quarantine: Isolate new clones or plants before introducing them to the main grow.
- Biological control: Use beneficial insects like ladybugs or predatory mites.
Chemical pesticides may not be compliant with certain cultivation licenses—opt for approved organic solutions.
---
Harvest Timing and Curing Process for Quality and Preservation
Harvesting at the right time boosts potency and flavor.
Look for:
- Trichome color: Milky or amber for peak maturity.
- Pistil condition: Mostly brown/orange pistils indicate readiness.
Curing steps:
- Dry harvested buds at ~60°F and 50% RH for 7-14 days.
- Place dried buds in airtight glass jars.
- Burp jars daily for 2 weeks to release moisture.
- Store in a dark, cool location to preserve terpenes and cannabinoids.
---
Documentation and Tracking for Compliance and Security
For licensed Schedule 1 cultivation, documentation is crucial:
- Plant counts and locations.
- Nutrient and watering logs.
- Environmental records and deviations.
- Pest management strategies used.
- Harvest yield records.
Digital tools can simplify logging and create audit-ready reports.
Secure storage of documents ensures privacy and compliance with regulations.
---
Summary and Next Steps
Achieving the Schedule 1 best grow setup means combining technical expertise, environmental control, and a strong commitment to legal compliance. By properly planning your location, selecting the right equipment, maintaining optimal conditions throughout growth phases, and keeping precise records, you can achieve top-quality yields. Always operate within the scope of your license or local laws, and update your practices as regulations change.
Ready to take your cultivation to the next level? Apply these strategies in your authorized grow space and enjoy professional, compliant results.