Standard Size for Pictures in Print and Digital Formats
Learn standard picture sizes for print and digital formats, including DPI, aspect ratios, and social media dimensions to ensure sharp, professional images.
Introduction to Picture Sizes: Why Dimensions Matter for Quality
Whether you’re printing family portraits for a photo album, creating marketing materials, or preparing digital images for social media, the standard size for pictures directly influences their clarity, composition, and overall visual appeal. Selecting appropriate dimensions is essential for making images look professional, preventing distortion, and delivering the intended emotional impact.
Every picture is made up of either a certain number of pixels (in digital form) or defined physical measurements (in print). Choosing the wrong size can lead to pixelation, blurriness, or awkward cropping. Knowing the differences between formats—and using the right one for your purpose—is key to producing consistent, high-quality visuals.

---
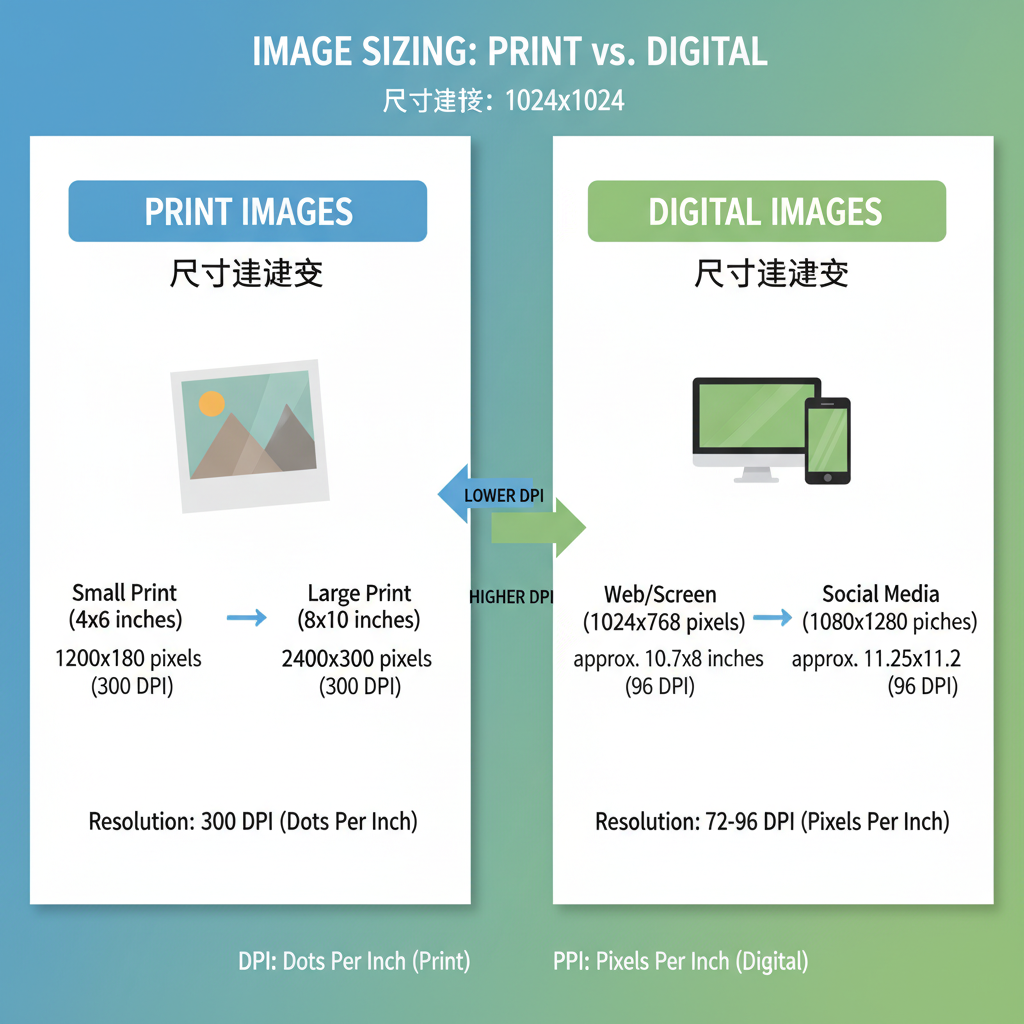
Difference Between Print and Digital Image Sizing (Pixels vs. Inches)
In the realm of image sizing, print and digital usage differ significantly:
- Print sizes are typically measured in inches or centimeters, and quality depends on resolution (DPI—dots per inch).
- Digital sizes are measured in pixels, affecting how sharp an image appears on various screen resolutions.
For example:
- A 4×6 inch print at 300 DPI requires 1200×1800 pixels.
- A Facebook cover photo is 820×312 pixels—perfect for screen display but unsuitable for high-quality printing.
Understanding both units helps avoid pitfalls such as using a low-DPI image for large prints, which results in blur and loss of detail.
---
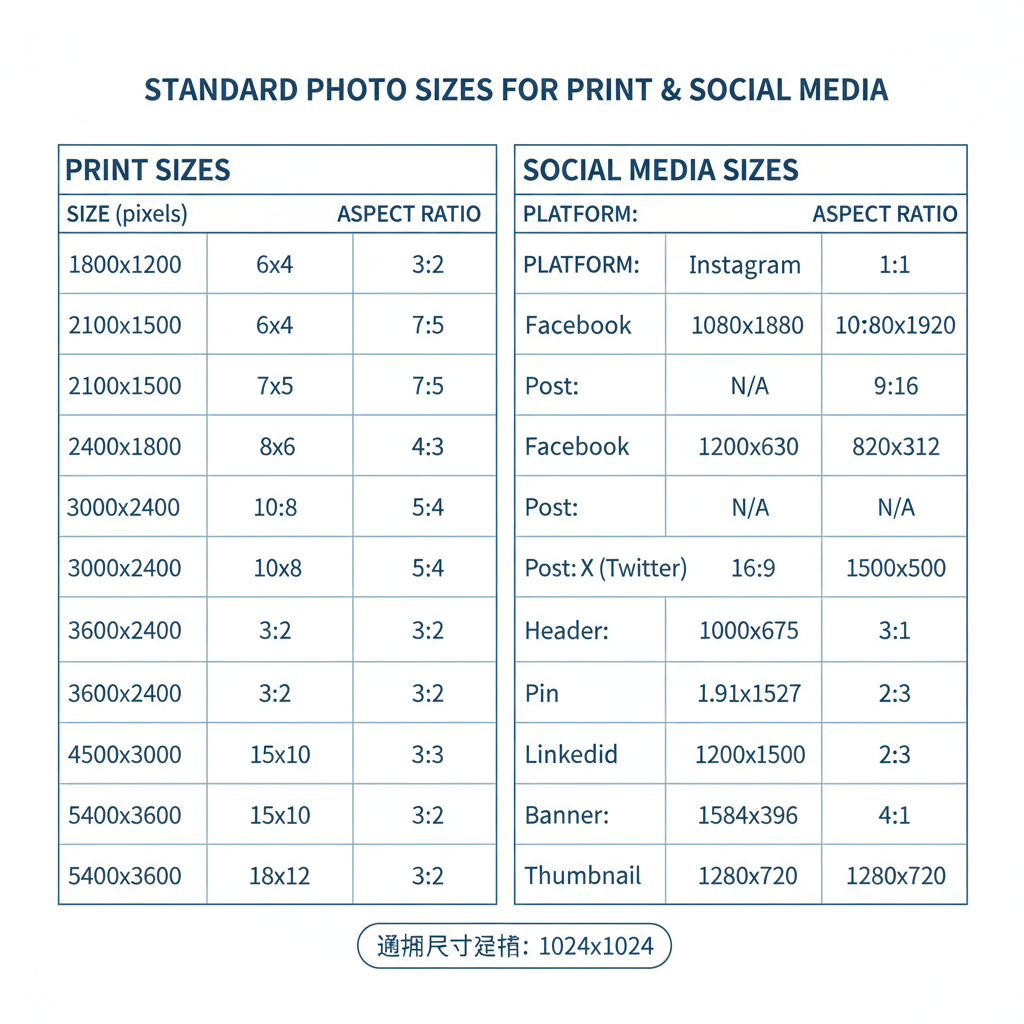
Common Standard Sizes for Print Photos
Print photography has several established formats that work well for framing, albums, and display.
| Print Size (inches) | Aspect Ratio | Best Use |
|---|---|---|
| 4×6 | 3:2 | Common snapshots, standard photo albums |
| 5×7 | 7:5 | Gift prints, small frames |
| 8×10 | 5:4 | Portraits, wall decor |
| 11×14 | 11:14 | Large format art and professional photography |
| 16×20 | 4:5 | High-impact displays |
Printing tips:
- Use images at 300 DPI or higher for sharpness.
- Maintain the original aspect ratio to avoid distortion.
- Allow for cropping if your camera’s aspect ratio differs from the final print size.
---
Common Standard Sizes for Social Media Images
For digital publishing, each platform has its own specifications to ensure optimal viewing.
| Platform | Image Type | Recommended Dimensions (pixels) |
|---|---|---|
| Cover Photo | 820×312 | |
| Post Image | 1200×630 | |
| Square Post | 1080×1080 | |
| Story | 1080×1920 | |
| Pin | 1000×1500 |
Digital image tips:
- Use exact recommended sizes to avoid compression or cropping.
- Optimize JPEGs for web at 80–90% quality for quicker load times with minimal loss.
---
Resolution and DPI Explained: Ensuring Sharpness at Standard Sizes
Resolution = total number of pixels in an image.
DPI = dots per inch, measuring print sharpness.
Formula to calculate required pixel dimensions:
pixels = inches × DPIExample:
8×10 inch print at 300 DPI:
width_pixels = 8 × 300 = 2400
height_pixels = 10 × 300 = 3000
Minimum size needed: 2400×3000 pixels.
---
Aspect Ratios: How They Affect Cropping and Composition
An aspect ratio defines the proportional relationship between width and height.
Common ratios:
- 3:2 – DSLR standard; fits 4×6 prints perfectly.
- 5:4 – Popular for portraits and 8×10 prints.
- 1:1 – Square format, ideal for Instagram posts.
Changing the aspect ratio results in cropping. Always frame your shot with the final display size in mind.
---
How to Choose the Right Size for Framing or Albums
When selecting photos for frames or albums:
- Match the frame size to your photo dimensions.
- Allow for matting, which may reduce visible space.
- Check album slot sizes—many use standard 4×6 prints.
---
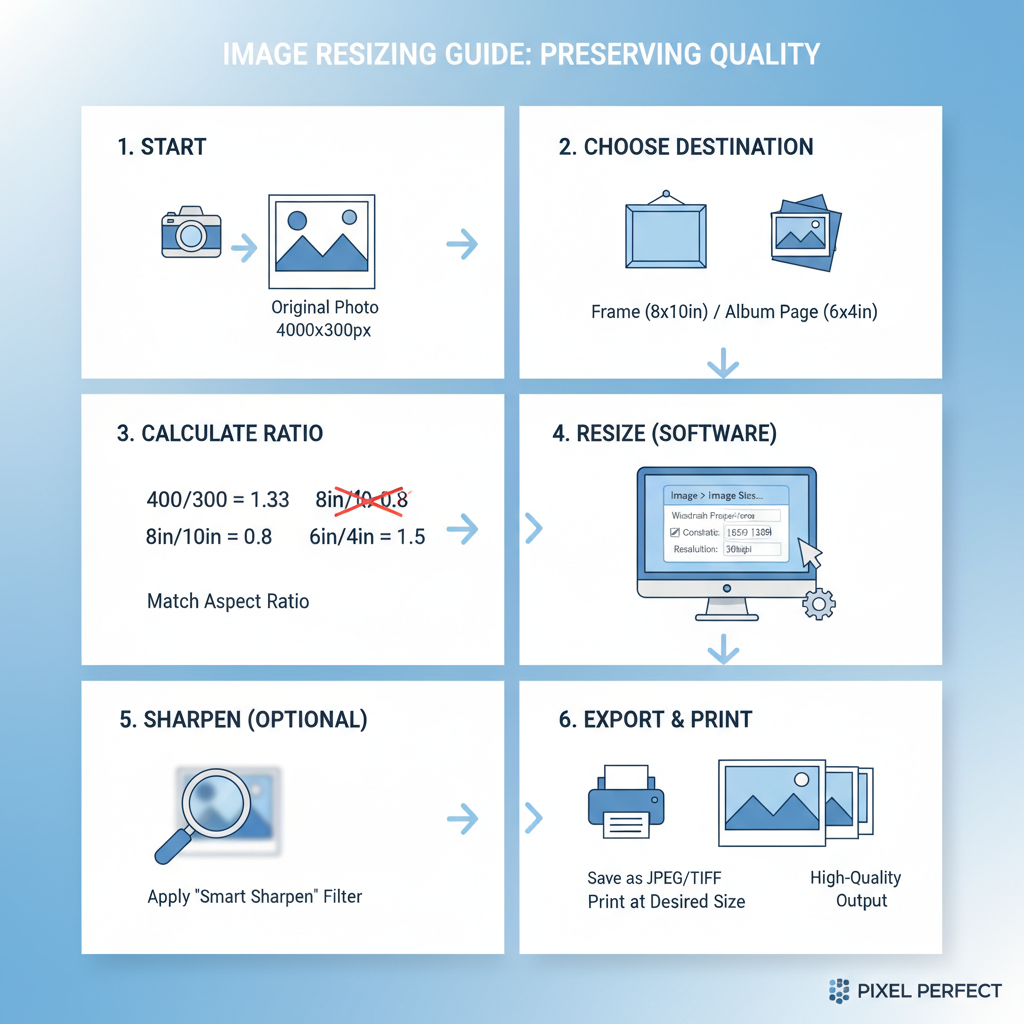
How to Resize Images Without Losing Quality
Loss of quality happens when enlarging beyond native resolution.
Tips:
- Use professional tools (Photoshop, Lightroom, GIMP).
- Enable bicubic or AI-assisted resampling to maintain clarity.
- Resize from originals to preserve details.
In Photoshop:
- Navigate to `Image > Image Size`.
- Check “Resample” with “Preserve Details 2.0”.
- Enter final size in inches and set DPI to 300 for print.
---
Tips for Preparing Pictures for Professional Printing
Before sending files to the printer:
- Convert to CMYK color profile.
- Include bleed areas to prevent cropping at edges.
- Save in TIFF or high-quality JPEG formats.
- Verify resolution and aspect ratio.
---
Final Checklist of Standard Sizes by Use Case
Quick reference for standard size for pictures:
| Use Case | Measurement | Unit | Resolution (DPI) |
|---|---|---|---|
| Small print photos | 4×6 | inches | 300 |
| Medium print photos | 8×10 | inches | 300 |
| Large posters | 16×20 | inches | 300 |
| Facebook cover | 820×312 | pixels | N/A |
| Instagram post | 1080×1080 | pixels | N/A |
| Pinterest pin | 1000×1500 | pixels | N/A |
---
Summary and Next Steps
Choosing the correct standard size for pictures—in both print and digital formats—comes down to understanding resolution, aspect ratio, and display requirements. Sticking to proven dimensions ensures professional results, minimal distortion, and optimal engagement.
Take action:
- Bookmark standard size charts for quick lookup.
- Be mindful of aspect ratios when shooting.
- Prepare files with the final medium in mind to achieve the best output quality across all platforms.